Monday, August 24, 2020

How to Make Decorative Flip Flops

Hi everyone, Steph Ackerman here today showing you how to create a set of decorative flip flops to  remind you that summer is still ongoing even if we are summering in place this year.


I drew the shapes on a sheet of plywood, then used the Scroll Saw to cut them out.  I found it easiest to cut the plywood panel first so I could work with a smaller panel.


The Scroll Saw makes easy work of cutting the flip fops.


Next, I sanded the edges with the Delta Sander.  This is my go to sander.  With it's shaped sanding surface, I can get into the smallest of areas.


The Bench Drill Press easily cut the holes in each flip flop.


I used Plaid's Folk Art Paint to paint the flip flops.  Once dry, I used a stencil with Plaid Folk Art Paint to create the design on the flip flops.


To finish, I inserted ribbons in the holes and added a flower.  Now, I just need to hang these on my wall to remember that summer comes every year.


Thanks for stopping by.


Steph


Sunday, August 23, 2020

Scroll Saw Blade Hack

There are times when doing intricate scroll saw work, you need a very small pilot hole for the scroll saw blade. This can be problematic with pin-end blades. But, here's a quick and easy work-around.


How to Hack a Pin-end Scroll Saw Blade

  1. Using the Proxxon MICRO Press MP 120, select and mount the 5/16" (8mm) punch.
  2. Center the punch over the smallest hole in the base.
  3. Position the blade pin over the hole.
  4. Lower the punch, and punch out the blade pin.
  5. Use a common safety pin to replace the removed pin.
Now you need a much smaller pilot hole to accommodate the hacked blade. 


Carole

Thursday, August 20, 2020

How To Make A Wood Carving Using Proxxon Tools And Plaid Paint


Hi friends. Today I'm gonna show you how todo some simple woodcarving using Proxxon tools. I made this Moby Dick. This is part one of two blogs I'm doing for this project. You'll see how I made what you see in this picture today and next month you'll see how I added to it. Follow along with me and I'll show you how I did it.

Sunday, August 16, 2020

How to Make a Knife Sheath

A quality knife deserves special care and handling. One way to extend the life of a fine blade is to protect it when not in use with a knife sheath. Follow these instructions to create your own for any knife in your collection.

Supplies and Equipment

Instructions for Making a Knife Sheath


NOTE: The lengths of wood necessary depend on the size of the knife blade the sheath is for.
  1. Trace the blade of the knife to make a pattern or trace directly onto the balsa wood. Balsa is a good wood for the inner frame as it is soft and will not damage the blade.
  2. Add a ¼" margin/allowance to the outer edge. 
  3. Use the bandsaw or scroll saw to cut both the outer and inner edges of the balsa wood frame.
  4. Make two tracings of the outer dimension of the frame onto the hardwood. Cut the hardwood pieces on either the bandsaw or scroll saw.
  5. Using liquid wood adhesive, glue the inner frame to one of the outer shell pieces.
  6. Test fit the blade.
  7. Glue the second outer shell to the inner frame, making a sandwich—hardwood, balsa, hardwood. Don't be too concerned with flush edges. Any irregularities will be corrected in Step 9.
  8. Clamp the layers together, and set aside until the glue dries.
  9. Sand the edges flush and finish shaping the sheath on the disc sander.
  10. In the lower corner of the sheath, drill a 1/8" hole for the dowel rod. This is a removable peg that keep the knife in place when stored, and is removed to release the knife for use.
  11. Knock down the edges and finish surface sanding with the Delta sander. 
  12. Treat the finished knife sheath with wood oil.


Carole

Thursday, August 13, 2020

How to make a Halloween Pumpkin


 Oh it is hot!   Dog days of summer are upon us.  You know what that means...fall is coming and so is Halloween!!!     I know it's a bit early but with crafting we have to start early.  Today we are going to make a pumpkin.   I was going to say "little pumpkin", but you can make it as big or as little as you want.


Supplies and Equipment/

Wood of your choosing (enough to cut out 8-12  pumpkin ribs) plus 2 circles.   (I used 1/4" birch plywood because mine was going to be a small centerpiece)

Yard scrap (for pumpkin stem)

Wood glue

wood clamps or clothespins if small.

Proxxon mini bandsaw with scroll saw blade or Proxxon mini scroll saw.

Proxxon OZI/E delta sander

Plaid paints and or other embellishments

pencil and tracing paper.


Here is the pattern I started with.  I fit 2 ribs in a small square.   I will need to repeat this pattern 4 or more times to make 8 - 12 ribs.   cut 2 circles in proportion to your rib pieces.


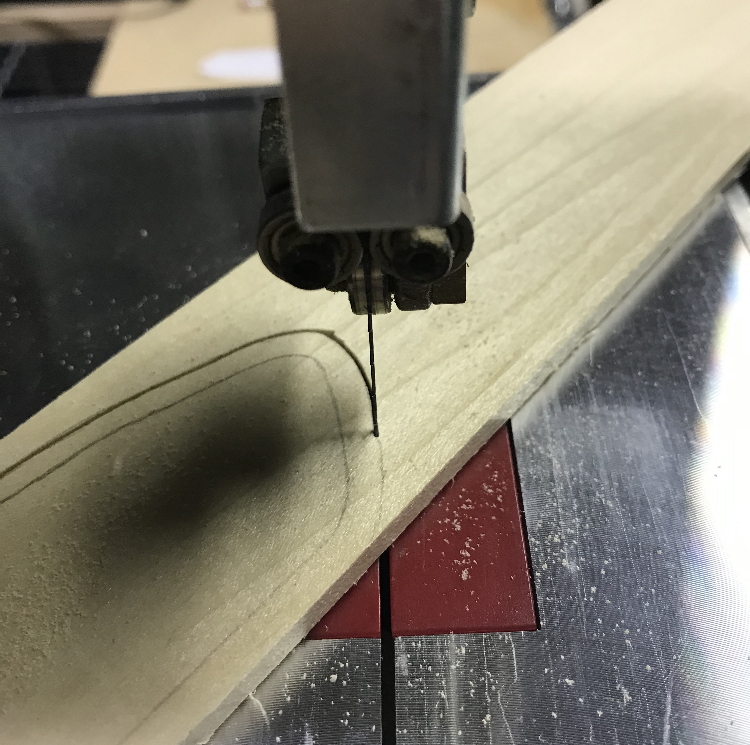
I traced my pattern onto my wood piece then proceeded to cut them out.   I am using the Proxxon mini band saw in the picture below.   It cuts the tightest curves.  I am impressed.  This is the first time I have used this saw blade.   WOW!


I got all my pieces cut, and then I sand them using the Proxxon OZIE delta sander.  I love how it gets into all the curves.  It has adjustable speeds too.   If your cutting is not perfect don't worry.  Pumpkins are very forgiving.


Next comes the part that is a little bit tricky.  If I can do it, you can, it takes just a little bit of patience.   We are going to glue it all together.   Use enough glue.   Let it get just a little bit sticky before you position your piece so it will stick some.    I used clothes pins to hold mine.  

Glue the bottom of the "ribs" to underneath the circle piece  as in the picture below.   Let this dry.   (Note- the tops of the "ribs" are lining up)    I did this 2 at a time and let dry in between.  (takes some finger dexterity)


I glued the second circle to the underside of  the top of the pumpkin.
Then I painted the pumpkin using Plaid paints.  I got my stem ready to go when the paint dries.


All done.   I painted a little egg to sit on the circle.   If I had made my pumpkin a little bigger I would place a candle on the stand.   I plan to make one about 12"-14" tall to sit on the porch this year.

Thanks for visiting.   Thank you Proxxon tools and Plaid paints.   I work with the best!

Catch ya next time.   Take care, and please be safe!!!   Carol


Sunday, August 2, 2020

Country Chic Bird Wall Hanging

This is the third in a series of country chic wall hangings. The first was the country chic sheep followed by the country chic pig.

Supplies and Equipment

Instructions 

  1. Mount the pattern pieces on appropriate scraps. Cover one side of the blank with painter's tape. Mist the back side of the pattern with spray adhesive, and mount on the taped blank. The painter's tape made removal of the pattern easy without leaving any sticky residue.
  2. Cut the shapes using the bandsaw or scroll saw.
  3. Using the drill press and brad point drill bit, drill the holes in the feet and body as indicated on the pattern. Placing a piece of waste wood under the hole helps eliminate tear-out on the back side.
  4. Sand surfaces and edges with the Delta sander.
  5. Coat the pieces with a layer of gesso. Gesso primes the surface for painting, making the surface ready to accept acrylic paint.When the gesso is dry, paint the pieces with your choice of FolkArt acrylic paints.
  6. Using a liquid wood adhesive, glue the wing in place. A rhinestone can be glued in place for the eye, or it can be painted. I opted to glue a silk flower in place, but the pattern includes a flower that can be cut and then painted.
  7. For the legs, coil a length of wire around a ¾" dowel. Attach on end to the bird body and the other to a foot.
  8. Use one the length of wire to attach the the top holes on the bird body for hanging.

Carole