Showing posts with label Delta sander. Show all posts

Tuesday, October 20, 2020

How to Create Halloween Decorations

Hi everyone, Steph Ackerman here today showing you how to use Proxxon Tools to create an assortment of Halloween Decorations.


I drew the designs on scraps of plywood.


Using the 2 Piece Scroll Saw I cut each piece.

Once I had all the pieces I wanted, I used the Delta Sander to sand each piece.

I used the Bench Drill Press to drill holes in each piece so I could hang them on a tree.


Next, I used Plaid Paints to add color to each piece.


I left the black cat and white ghost as is, but I decorated the Witch's shoe and the Candy Corn with assorted colors of Robin's Nest Dew Drops.


I tied twine to each piece and then hung them on a tree.  


I did use scraps to create these ornaments, but just think how fun they'd be in a variety of sizes, perhaps standing outside your door or fence.

Thanks for stopping by.

Steph


Thursday, October 15, 2020

Building A Tiny House - Part 1


  Hi friends!  I've been working on making some miniature houses and barns that eventually I'll be selling. Today I'll show you Part 1 of making my tiny two story house using Proxxon tools.


Materials List

  • Proxxon Micro-Bandsaw
  • Proxxon 2 Speed scroll saw
  • Proxxon Delta sander
  • 1/2" birch sanded plywood
  • Wood corner molding 
  • Craft sticks  various sizes
  • Wooden windows  
  • Wood glue
  • Brad nailer and brads
  • Drill and drill bit
  • Paint     


I drew out my pattern pieces on graf paper and transferred them to my plywood


Using the Proxxon Micro-bandsaw I cut out the two sides, a front and a back.


I now have to cut out the windows. In order to cut them I drilled a hole in each window big enough to pass the blade of the Proxxon Scroll Saw through. Bringing the saw blade though the hole then reattaching it to the saw. Cut out the windows and door using the Proxxon scroll saw.  I tried one of the window panes in to make sure they fit.


Fit the sides, back and front together. Glue and nail in place with the brad nailer.


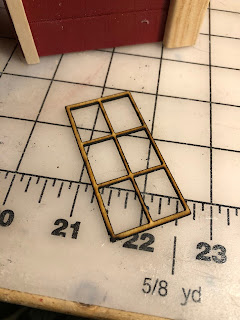
The tiny window panes were made from 1/16" craft wood. They were made with a laser burner. I fit the windows in and glued using wood glue.


Once everything was assembled I lightly sanded using the Delta Sander then painted with red spray paint.


Using the Micro bandsaw I cut pieces of corner molding for each of the outside corners and attached with wood glue and brad nails


With the Micro bandsaw I also cut out various pieces of craft sticks to trim out each window and the door.


Check out my next months blog for the completion of my tiny house project :-)


Thursday, September 17, 2020

How To Make A Whirligig Phase 2


Hi Friends!  Last month I showed you all how to make a wood sculpture using Proxxon tools.  That was phase 1 of this project.  Today I'll show you how I added to it, turning it into a whirligig.


Supplies:

 Proxxon Micro Band Saw

 Proxxon Longneck Angle Grinder

 Proxxon Delta Sander

 Fan Blade Hub (Ebay)

1/2" poplar

 Scrap 3/4' pine

 Wire Coat Hanger

 Wood Glue

 Plaid Paint


I ordered a fan blade hub from Ebay. I drew out a pattern for the fan blades on the 1/2' poplar and cut out 8 of them. I had to sand down the edges with the Angle Grinder for them to fit in the hub.


I sanded around the edges of each blade.


Next I built the wood bracket that the blade would be mounted to out of scrap 3/4" pine.  Mounted it inside the wave portion of my project.  I then drilled holes in it to accept the wire (coat hanger) that the fan blade would spin on.


The wire had to be bent for the whale to have the  motion action of bobbing up and down. I drilled a hole in the side of the waves and straight through the whale. Another piece of the coat hanger was inserted through. This would enable the whale to move. 


I inserted a screw eye on the end of the tail. Another wire was attached from the screw eye to the bend in the coat hanger. Using a scrap of a large dowel rod and the longneck grinder I made a cap to disguise where the wire stuck out on the end of the blade.


Next I attached everything to see If it worked correctly.  It was suggested by a friend that I add another row of waves which I did. I also added a tiny boat that I cut out with the Micro Bandsaw and carved with the Longneck Angle Grinder.


I painted it with Plaid Paint. My project is complete. I love how it turned out. All that's needed is a little wind to see it in action! Thanks for following along with me...Colleen


Monday, August 24, 2020

How to Make Decorative Flip Flops

Hi everyone, Steph Ackerman here today showing you how to create a set of decorative flip flops to  remind you that summer is still ongoing even if we are summering in place this year.


I drew the shapes on a sheet of plywood, then used the Scroll Saw to cut them out.  I found it easiest to cut the plywood panel first so I could work with a smaller panel.


The Scroll Saw makes easy work of cutting the flip fops.


Next, I sanded the edges with the Delta Sander.  This is my go to sander.  With it's shaped sanding surface, I can get into the smallest of areas.


The Bench Drill Press easily cut the holes in each flip flop.


I used Plaid's Folk Art Paint to paint the flip flops.  Once dry, I used a stencil with Plaid Folk Art Paint to create the design on the flip flops.


To finish, I inserted ribbons in the holes and added a flower.  Now, I just need to hang these on my wall to remember that summer comes every year.


Thanks for stopping by.


Steph


Wednesday, July 8, 2020

Hello Summer Plaque

Hi everyone, Steph Ackerman here today showing you how to create a Summer plaque.


Draw a pattern on a piece of plywood.  I wanted a large summer shell.  Use the Scroll Saw to cut out  the design.  


Use the Disc Sander to sand the edges of the panel.   Then use the Delta Sander to sand any remaining edges.


Paint the panel with Plaid paint.   Allow to dry then randomly dry brush on some white paint.  Decorate with inked mesh.  While waiting for the glue to dry, add assorted shells created from Makin's Clay.   Ink the shells in assorted colors.  You could even add some real shells if  you had some available.


Stamp a script stamp with black ink randomly about the edges of the panel.  


Die cut palm trees and Hello Summer from Rinea Foiled Papers and adhere to the panel.


Finish by adding a stamped, colored and fussy cut Prima doll to the panel.


Thanks for stopping by.


Wednesday, May 6, 2020

Birthday Gift Bags with Wood Scraps

Hi everyone, Steph Ackerman here today with showing you how to use scraps of wood to decorate gift bags.


While we are home bound and parties are put on hold, our lives go on and that includes birthdays.  So I decided to take this time to create gift bags for those individuals we can't see and celebrate with at this time.


Using some left over scraps of wood, I used the Scroll Saw to cut the wood into party hat shapes then used the Delta Sander to sand down the rough edges.


After painting each with Plaid paints, I stamped and embossed each with a party stamp.  Then I used the Bench Drill Press to put a hole in each through which I threaded twine.


After decorating the gift bags, I tied the wood scraps to the handles like gift tags.

Thanks for stopping by.