Thursday, May 20, 2021

How to make a portable laptop stand

 Hi crafty people.  Don't know about you but springtime in Arkansas has a lot of rainy days.  So I've spent a bit more time on my computer.  You know I get stiff hunched over it and although it might be good for the lap, it is awkward on the table top.   I need a little room and a better angle for typing.   So, let's make us a solution.  Today we will construct a laptop stand that is functional, lightweight, and easily portable.   And... lucky us, it is a breeze to make with my Proxxon tools.  


For this project I am using some 

 3/8" cedar wood

Proxxon mini bandsaw or Proxxon mini scroll saw (actually I used both),

Proxxon OZI/E delta sander

Proxxon cordless belt sander

pre-stain and sealer


I started with a piece of cardboard that would help me figure out the dimensions of my wood pieces.  


then made a plan for you.  My lap-top is 17"   measures  15" x 10" 

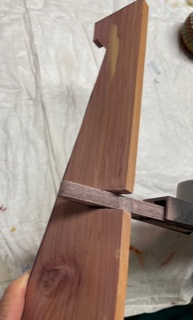
The cut in the middle is important.  It needs to be just a tiny hair larger than the thickness of the wood you are using.     I have a trick that makes it easy that I am going to show you a little later.  

Mark your pattern on the wood and cut them out.   I used the Proxxon mini bandsaw for the straight pieces and the Procxxon scroll saw for the delicate work.   There was some areas to cut that would not clear the throat on the bandsaw, so the scroll saw fit the bill

Note in the last picture \, that the base is not sitting flush.   I didn't quite make my slots long enough.   Here comes my little trick.   Introducing the Proxxon cordless hand held  mini belt sander
It is about 3/8 "- 1/2" and fits in my slot like a dream.   In just a short minute I made my slot just perfect.  And it is smooth too.  

I sanded everything super smooth with my Proxxon OZI/E delta sander.  Cedar wood is so beautiful when polished.  A little pre-stain then some sealer and it looks great!
This photo does not do it justice.  It came out really pretty, almost a shame to hide it under a computer.  It is very sturdy. but easy to take apart and throw into your computer case on the run.  


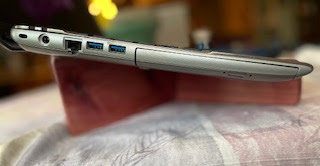
So easy and customizable.    I really enjoyed using the Proxxon cordless mini belt sander.  It's a sturdy tool and gets the job done.  It is the newest toy in my collection.  Thank you so much Proxxon.   And thank you all for visiting;.
will catch you next time.  Meanwhile, play safe!   Carol


Monday, May 17, 2021

How to Make a Tangram Puzzles

 A tangram is an ancient Chinese puzzle that has seven geometric-shaped pieces: two large triangles, two small triangles, one square, one medium triangle, and one parallelogram. These pieces are called tans, and together form patterns and shapes. The puzzle is presented as an outline and the task is to replicate it using all seven tans with no tan overlapping another. There are many online sites that offer tangram puzzles.

You can easily make your own tangram using Proxxon tools.


Supplies:

  1. Cover one side of the blank with painter's tape. The painter's tape made removal of the pattern easy without leaving any sticky residue.

  2. Mist the back side of the pattern with spray adhesive, and mount on the taped blank. 

  3. Cut pieces on the bandsaw.

  4. Alternatively, cut the pieces on the scroll saw.

  5. Sand any rough edges with the Delta sander.

  6. Apply  your choice of finishes. On the birch plywood tangram I used FolkArt Ultra Dyes. I finished the walnut hardwood tangram paste wax and buffed with the Delta sander. I created my own buffing pad by tracing the shape of the sander head onto a piece to upholstery velvet. The hooks on the head grab the fabric in the same way they do the felted side of the sanding discs.

  7. Enjoy!!

Carole

Thursday, May 6, 2021

How to make a sliding chicken toy

 Hi everyone.   I was recently looking at an old magazine and got inspired by some vintage paper projects they were showcasing.  The patterns were made to be cut out of some sturdy paper, and kids could color them with crayons or paint and then play with them.   Thinking to myself,  I could make some of these using Proxxon tools and thin wood.  Not sure if kids would play with them as they are not very modern or techie, but I know for sure, that I would have fun making them.  

Equipment and supplies

Proxxon mini scroll saw, or Proxxon mini bandsaw, or both if you are really blessed.  😀

Proxxon OZI/E delta sander plus plunge saw blade     

Proxxon mini drill press

1/4 inch plywood scraps

short length of 1/8" dowel       

Plaid paints             


To get started make a copy of this picture, enlarge or reduce it to the size you want.  The second picture is another pattern of a mama bird feeding her babies.


Transfer the design pieces onto the plywood scraps
Before cutting out the pieces use you Proxxon mini drill press to drill 1/8"  holes into the  designated areas  (A,B,C.D)  Doing this first will hopefully keep the thin wood from cracking near the edges.

OOPs, I took a picture of the mama bird from the other pattern.  (Pretend it is a baby chick)😏


 then cut them out using either the Proxxon mini bandsaw or the Proxxon mini scroll saw.   I love my Proxxon bandsaw but I believe this is better done on the Proxxon mini scroll saw.


Sand them all good with the Proxxon OZI/E delta sander  


We  need to make a little slot in the chick where we will place his wings.  

I used the cutting blade on the Proxxon OZI/E delta sander to make my slot and it worked really well.  When the slot was finished I inserted the wings.


Grab the kids and let's paint.  Use plaid paints and you will not be disappointed!
While the paint dries....
Cut 4 dowel pieces approx 1" long. 

Next we just put it all together

Insert the first dowel into the  hole marked A in the bird and the A- hole of the slider.
Do the same with B, C , and D.
Gently pull the slider back and forth to see the birds dip their beaks into the water trough.  

Wasn't that fun?   I hope you enjoyed it, I did.

Thanks you for visiting!!

Thank you Proxxon tools!  Smaller precision tools make crafting so easy and relaxing.

Carol


.  


Sunday, May 2, 2021

Country Chic Three Cats

Another installment in the County Chic series—a group of three sweet cats. Other Country Chic decor items include:


Supplies and Equipment

Instructions

  1. Cover one side of the blank with painter's tape. The painter's tape made removal of the pattern easy without leaving any sticky residue.

  2. Mist the back side of the pattern with spray adhesive, and mount on the taped blank. Mount the pattern on the blank. 

  3. Cut straight edges on the bandsaw. 

  4. Cut curved edges on the scroll saw. Alternatively, cut the entire shape on the scroll saw.

  5. Do any final shaping and edge sanding on the disc sander.

  6. Paint the shapes. Options: After the base coat dries, paint facial features. Add surface texture by splatter painting, stippling, dry brushing, distress edging, etc.

  7. These three cats can be displayed individually or grouped. They could also be glued together with liquid wood glue, and used as bookends.


Carole