Showing posts with label proxxon mini scroll saw. Show all posts

Saturday, February 3, 2024

How to make a fishing pole rack

       Hi everyone.  Hope your winter is going well.  Groundhog says an early spring and I'm all for it!  I'm ready.  Speaking of spring.  I like to go fishing when the weather is nice, but I hate storing the fishing poles.  Seems they are always getting tangled or falling over or just generally getting in my way in the workshop.  So today when I got them down out of the rafters, I made a little fishing rack with the intentions of keeping them tangle free and ready to go at a moment's notice.  I of course used my Proxxon tools, I find the smaller tools are so convenient to use for these quick projects.


 I used some wood pieces I found in my shop so my measurements might seem arbitrary, probably because they are. 😁 Feel free to shrink or enlarge your project according to your needs. 

Here are the measurements I used.  Enlarge the picture above to read it.

 I used the Proxxon mini table saw to cut all my pieces,  


Then, I used my Proxxon mini scroll saw to cut out the keyholes in the top piece.  My rack will hold 6 poles so I cut 6 keyholes.


I spaced the center of the keyholes 2 1/2 inches apart.


I always use my Proxxon O/ZIE delta sander to smooth all the edges after each cut. Splinters are never wanted.


To prepare the bottom to hold the butt of the fishing rod, I used a drill with a Forstner 1- 1/4 bit to make 1/4" deep holes spaced at center 2-1/4 inches apart.  This just keeps the poles from sliding around on the rack.


Next, I fastened the 3 supports to the side pieces, One at the top, one at the bottom/ and the third in the middle.  I glued and clamped them in place then added screws to strengthen it.  I used the Proxxon rotary tool with a small drill bit to predrill all my holes prior to adding the screws to avoid splitting the wood.


When the glue was dry, I added the top and bottom pieces aligning them perpendicular to the brace pieces; Again, I glued, clamped, and then when it was good and dry I predrilled mu screw holes prior to adding strengthening screws.  


                                                                                                                                                                                                                                                                                                                                                                                                                                                                                                                                                                                                                                                                                               I added the 2 small pieces to the top piece and fastened them down with wing nuts.  They can be loosened to release the poles.                                                                                                                                                       
 I put it all together and hung it temporarily on the wall.  It works great.  I'm going to take it down and paint it, then it will be finished, and I can add my other poles to this collection. 

]\

Proxxon tools made this project super easy.

Now I'm ready for fishing season and won't have to untangle everything first.
I enjoyed this project.  Hope you give it a try too.
Catch you next time   Carol W


00

Thursday, December 1, 2022

How to make a little wooden Christmas deer

 Hi folks,  I know you have all seen them, and they come in multiple shapes and sizes, but I am going to give you step by step instructions on how to easily make them.  Make one,or make a dozen.   You guessed it we are going to make that cute little stand-up deer.


Equipment and Supplies
Piece of thin wood large enough to cut all your pattern pieces.  1/8" to 1/2" thick
tape, pencil, carbon paper
wood sealer lacquer, varnish or paint.

Ok, let's get started on this quick, easy, kid friendly, project.

I will tell you how I did it.

1.  First thing I did was to make myself a pattern.  Simply draw a deer the size you want on paper.
The legs and antlers will go on east to west and the body will be north to south.   In other words look how it is put together.  You need little slits to slide the legs into and the antlers on.   See my drawing and you will get the picture.
  

2.  Next I transferred my pattern onto the wood I chose.  **just a note watch which way the wood grain runs and try to have the skinny legs run with the grain.   Some woods\, especially cedar will come apart at the wood grain when you cut across them on small pieces**

I used carbon paper to transfer my pattern.


3.  I used the Proxxon mini scroll saw to cut out my patterns.


4.  I sanded everything using the Proxxon OZI/E delta sander.   Love that tool.  It gets into places other sanders couldn't.


5.  Finish them off with sealer, paint, or varnish 
and they are almost done.

6.  Slip the legs into the slots.   Slip the antlers on, and they are done.  So easy you can make a dozen.  And....you can make them any size, simply draw the pattern bigger or smaller.

Here is one in cedarandaand this one is an oak veneer.  

Well, that is it.   It was fun and very quick.  I hope you enjoyed it.  It's not original but it was my drawing.    Be safe and come back.  Thanks for visiting.   Thanks, Proxxon, great company!  

till next time.......Carol

Thursday, June 2, 2022

How to Make a 3-D lion puzzle

 Hi out there, hope you are feeling well and ready to begin a new project. Today we are going to make a beautiful puzzle that is also decor for around the house.


Equipment and supplies
Nice piece of wood approx 1/2" thick
carbon paper, pencil 
sealer of your choice
wood glue

   Got my inspiration from someone who had done a horse.  Not wanting to copy exactly, I made a lion.   I drew out my own design.  This was my first drawing but I did not take into account that the pieces are up in the air and so they better lock well with each other.  I did sneak in a rock to help support him also.


Using carbon paper, I transferred my design onto my wood piece. I had a nice piece of black walnut to work with.


The next step is to cut out the design.  Proxxon mini scroll saw does the work easily.  First cut out the design outline as one piece.


Next, carefully go in and cut apart the puzzle pieces.   This is delicate so I used the slow speed on my Proxxon mini scroll saw.  This helps me make the delicate cuts.  Keep in mind they need to interlock well.

Now, we sand, sand, sand.  I want to take off the edges, so they are rounded and smooth.  This will show off the puzzle effect I am going for.   I used the Proxxon OZI/E delta sander and the Proxxon cordless mini belt sander to do the job.  


To make a base to stabilize the lion, I cut a piece of wood approx 2" x 5" and I made a slot for the lion's back foot and rock piece to fit in.  This just adds stability.  I am going to use the Proxxon mini table saw for this.


I set the saw blade at about 1/4" height and I set the fence about 1" from the saw blade and run the base piece over the blade.  It is not wide enough to insert the lion piece yet so I move it just the tiniest bit either way and run those boards through it again. I do this several times until my piece will fit snuggly into the slot  Then I glued the bottom piece in


I used some polycrylic to seal the wood which also gave it a slightly darker tone that I really liked.

Uh oh.... then I ran into some trouble.  My puzzle would not stand.  The small little forefoot of the lion kept slipping so....Using the Proxxon professional rotary tool. I drilled a hole right through his foot and into the stand and inserted a small skewer stick.  That held it.  Yay.   

Then the rest of the lion could be assembled and if left unbumped would stay together.    psssst.... the polycrylic also helped by filling in the kerf lines for a snugger fit.  


All done.   See how I changed the skewer stick into a magic wand with a little paint and a sparkly bead on the end.  He is a magic lion.  He stands 8" tall.   He has a nice shine and he is sooo smooth to touch.  It's a tactile thing.  And, the more he is played with the smoother he will become.  

Thanks for visiting.   And thank you  Proxxon.  Your tools are awesome and make making things a joy.
Till next time, play safe,
Carol


Thursday, July 1, 2021

How to make a box kite

 OK, I want to bring out the kid in you this week.  We are going to make a box kite using our Proxxon tools and hopefully it will fly and so will your spirits.  Trust me!


Supplies and equipment:

6    1/4" x 36" dowel rods

4   Walmart bags

2-3 drinking straws

kite string or suitable substitute

scissors

gorilla glue

contact cement 

plastic tape

measuring tool  yardstick or tape measure

speed square if you got one. 

Proxxon scroll saw

Proxxon profession rotary tool

Patience  ha ha

Here's our plan


Let's get started.   The first thing to do is to  cut (4) 14" pieces of dowel   These will be our cross pieces.  I used the Proxxon Scroll saw to do my cutting.  But I could have used my Proxxon mini bandsaw just as well.  You choose,


I made some indents using the Proxxon professional rotary tool.  This will help keep the parts from slipping while I lash them together.  


I lash them together in the middle with string, wrapping it around every which way until it kind of holds it together as an X.  Then I applied a drop or 2 of gorilla glue to strengthen it.   Gorilla glue is very strong but also very light.


Meanwhile I cut my straws into 2-3" lengths.  I need 8 of these.  I cut them about half way through at their halfway point.   These are really going to help keep things together.  I don't know if you noticed how hard it is to stabilize two round things together...😆
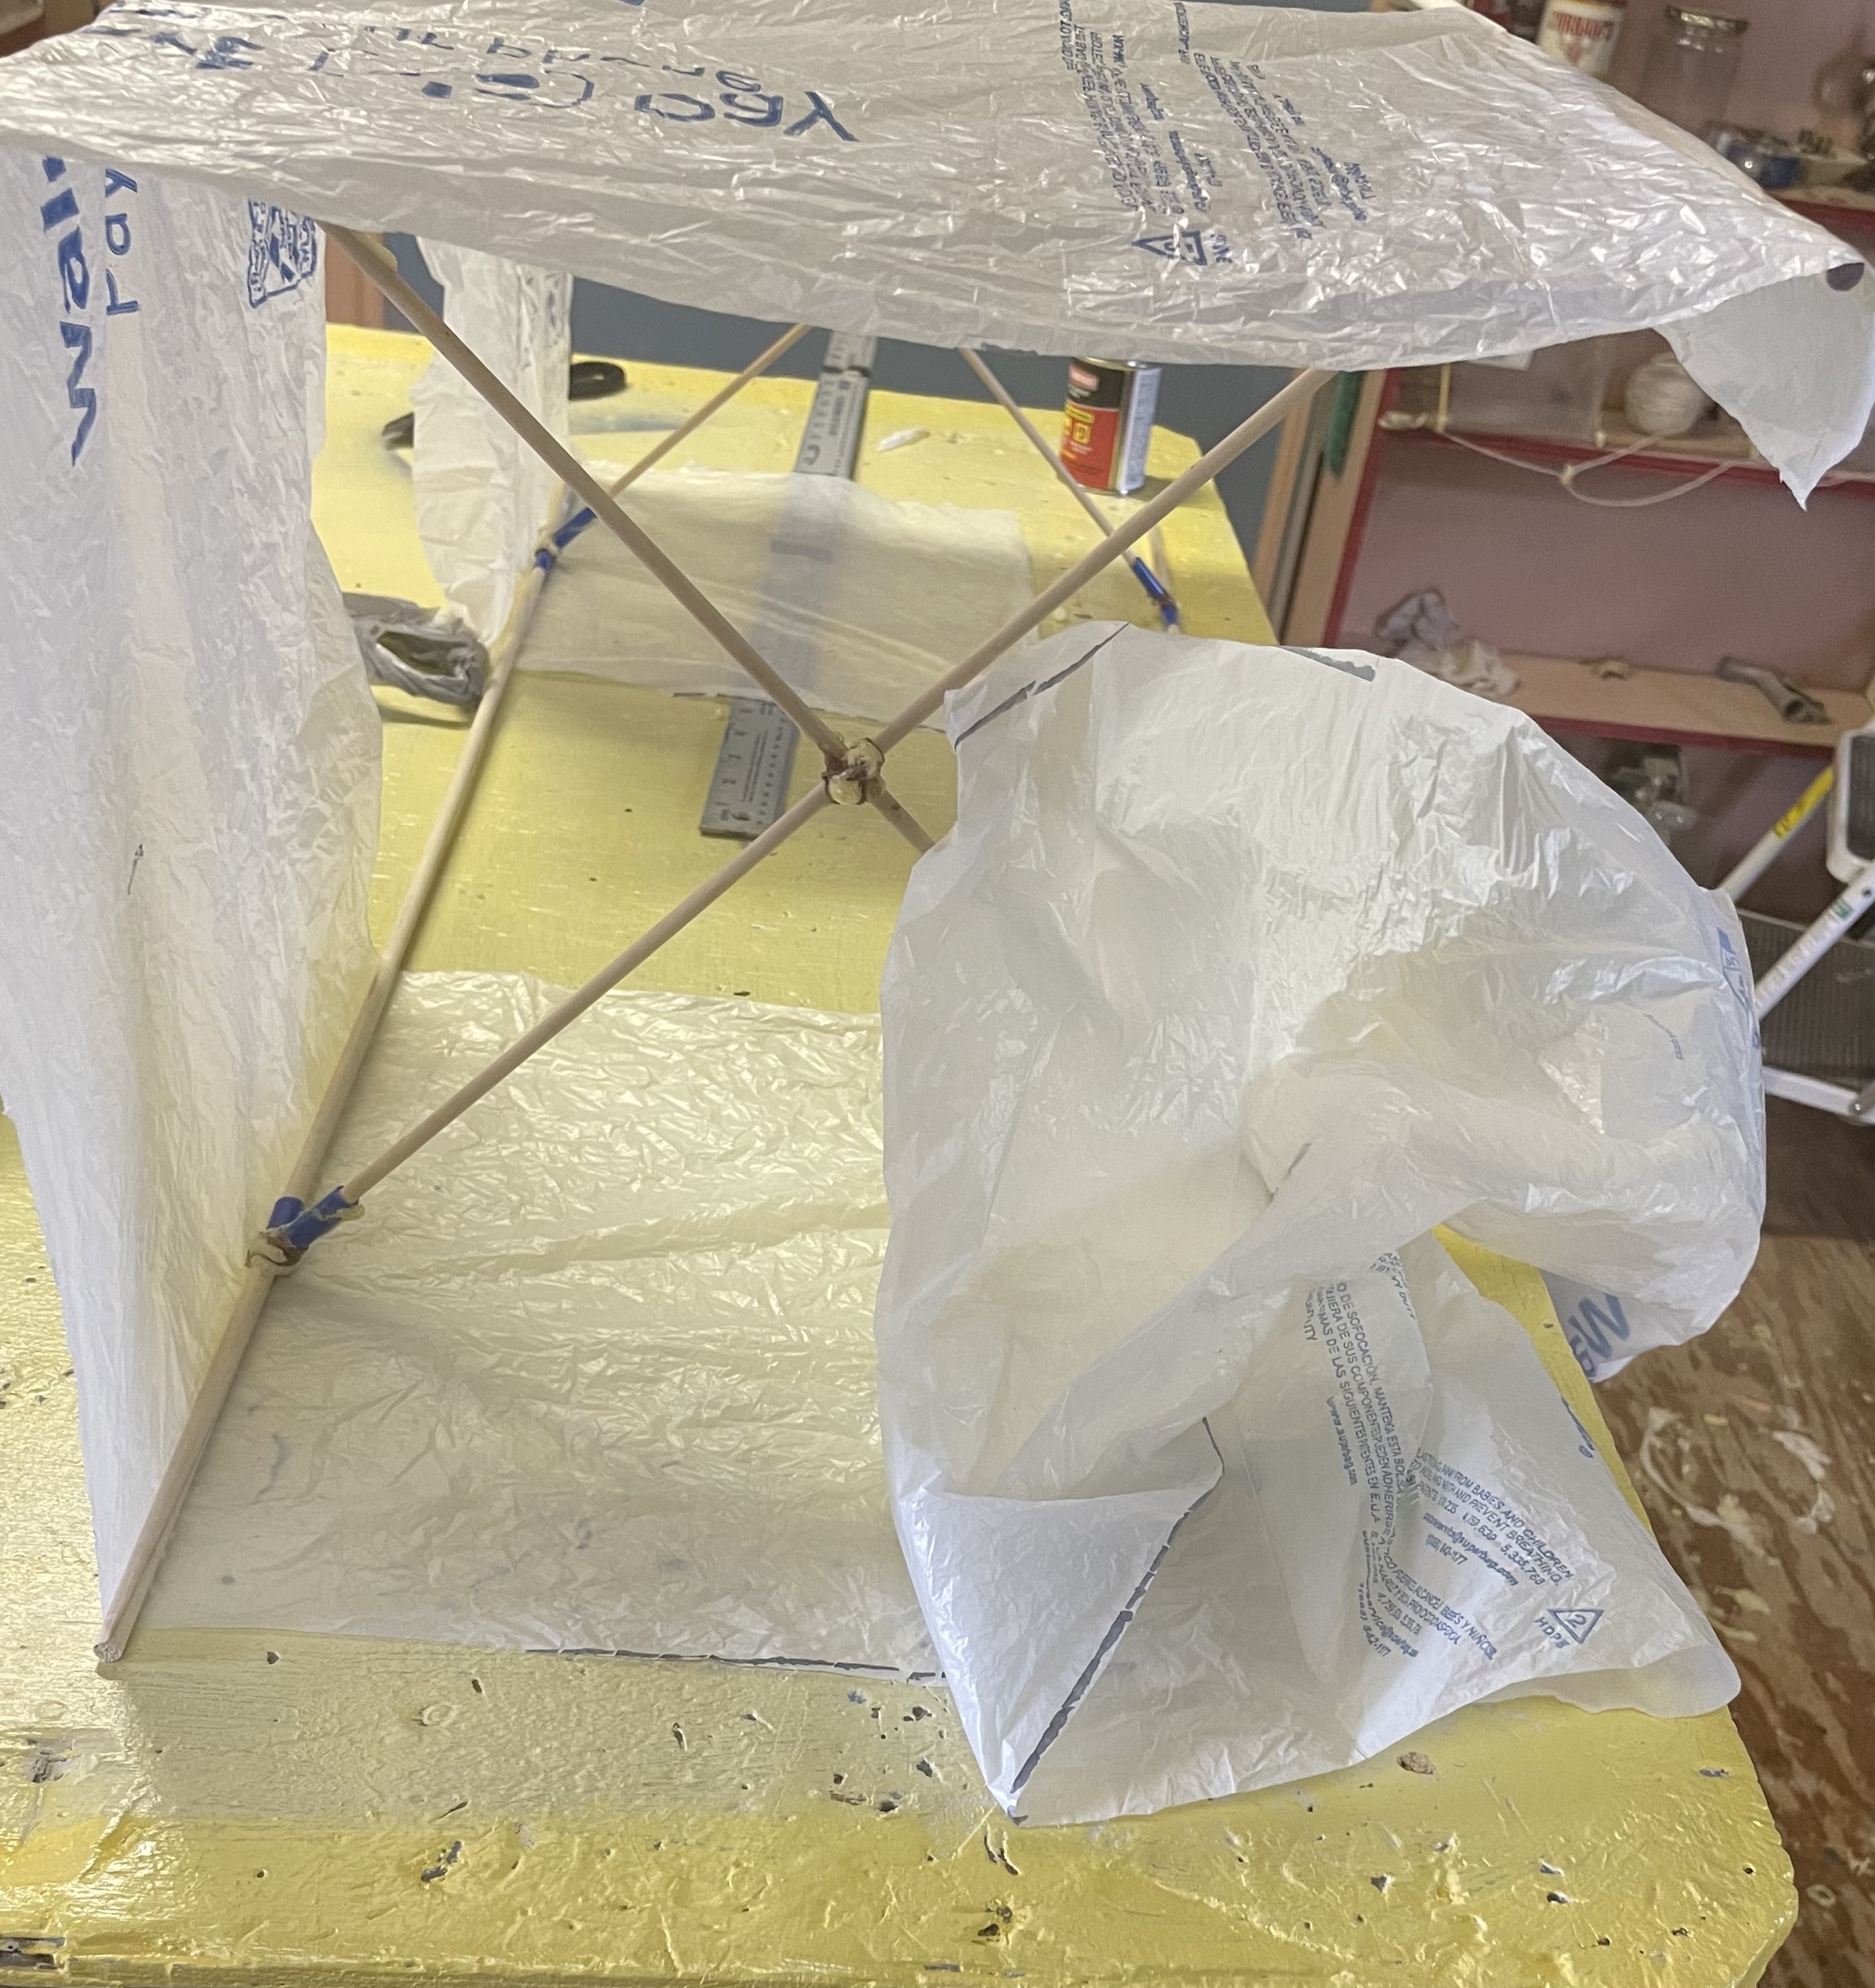
I slipped those over the 4 outside 36" dowels at the 6 " mark.  Note the picture below as how to use the straws.  


I put a drop of glue into 2 adjacent dowel sticks straw holes in each of the 4 36" dowels  then put two pieces of each cross members into the straws then propped them up to dry.  Try to keep them at pretty much 90 degrees to each other.


When it is good and dry turn it over and do the other sides just the same.   Now we have a skeleton.

Part 2, making the skin.

  Take 3 Walmart or similar bags and lay then out straight as you can.  Measure 12 inches out of the middle so that when cut it turns into a big loop.  Cut it down the side so you now have a sheet of plastic 12" wide.  Starting at one corner secure the plastic to the side using contact cement.  Then wrap the plastic around the frame as far as you can get.  I got around 3/4 of the way so I needed to add another length of plastic bag.  I attached the second plastic  to the first with a line of contact cement and finished the journey around the frame.  I cut off the excess and secured the end to the first piece at the first corner.  To add strength and durability to the wispy plastic I took clear packing tape around all the edges of the plastic.    

Part 3  Kite string

First let me say.  "goooood luck"   I went to Walmart, dollar tree, dollar general, etc etc.  I believe they have done away with it.  I did find a kite at dollar tree with a miniscule amount of string.  So use what you can.  Light but strong.  I finally chose yarn.  
Cut a piece 36 inches long and secure it to the top of the kite and the top of the bottom section of the kite.  (12" up from the bottom).  About 12- 14" down from the top, tie a small loop.  Attach your "string to' this loop.

Hey,,, guess what.  If there is some wind outside we are ready to fly.    I had to wait 3 days to get enough wind for take off.   But it was worth it.!  You are never too old to fly a kite!  Try it.  

                                                                                                                                                                                                   ↖Me, having a great day.    
Thank you all for visiting.  I do hope you give it a try.  Invite the kids or grands so you have an excuse.to play.    I had soooo much fun.

Thank you Proxxon for your fine tools that make making stuff so easy.  
Till next time.   Carol


Thursday, May 6, 2021

How to make a sliding chicken toy

 Hi everyone.   I was recently looking at an old magazine and got inspired by some vintage paper projects they were showcasing.  The patterns were made to be cut out of some sturdy paper, and kids could color them with crayons or paint and then play with them.   Thinking to myself,  I could make some of these using Proxxon tools and thin wood.  Not sure if kids would play with them as they are not very modern or techie, but I know for sure, that I would have fun making them.  

Equipment and supplies

Proxxon mini scroll saw, or Proxxon mini bandsaw, or both if you are really blessed.  😀

Proxxon OZI/E delta sander plus plunge saw blade     

Proxxon mini drill press

1/4 inch plywood scraps

short length of 1/8" dowel       

Plaid paints             


To get started make a copy of this picture, enlarge or reduce it to the size you want.  The second picture is another pattern of a mama bird feeding her babies.


Transfer the design pieces onto the plywood scraps
Before cutting out the pieces use you Proxxon mini drill press to drill 1/8"  holes into the  designated areas  (A,B,C.D)  Doing this first will hopefully keep the thin wood from cracking near the edges.

OOPs, I took a picture of the mama bird from the other pattern.  (Pretend it is a baby chick)😏


 then cut them out using either the Proxxon mini bandsaw or the Proxxon mini scroll saw.   I love my Proxxon bandsaw but I believe this is better done on the Proxxon mini scroll saw.


Sand them all good with the Proxxon OZI/E delta sander  


We  need to make a little slot in the chick where we will place his wings.  

I used the cutting blade on the Proxxon OZI/E delta sander to make my slot and it worked really well.  When the slot was finished I inserted the wings.


Grab the kids and let's paint.  Use plaid paints and you will not be disappointed!
While the paint dries....
Cut 4 dowel pieces approx 1" long. 

Next we just put it all together

Insert the first dowel into the  hole marked A in the bird and the A- hole of the slider.
Do the same with B, C , and D.
Gently pull the slider back and forth to see the birds dip their beaks into the water trough.  

Wasn't that fun?   I hope you enjoyed it, I did.

Thanks you for visiting!!

Thank you Proxxon tools!  Smaller precision tools make crafting so easy and relaxing.

Carol


.