Showing posts with label easy DIY projects. Show all posts

Saturday, February 3, 2024

How to make a fishing pole rack

       Hi everyone.  Hope your winter is going well.  Groundhog says an early spring and I'm all for it!  I'm ready.  Speaking of spring.  I like to go fishing when the weather is nice, but I hate storing the fishing poles.  Seems they are always getting tangled or falling over or just generally getting in my way in the workshop.  So today when I got them down out of the rafters, I made a little fishing rack with the intentions of keeping them tangle free and ready to go at a moment's notice.  I of course used my Proxxon tools, I find the smaller tools are so convenient to use for these quick projects.


 I used some wood pieces I found in my shop so my measurements might seem arbitrary, probably because they are. 😁 Feel free to shrink or enlarge your project according to your needs. 

Here are the measurements I used.  Enlarge the picture above to read it.

 I used the Proxxon mini table saw to cut all my pieces,  


Then, I used my Proxxon mini scroll saw to cut out the keyholes in the top piece.  My rack will hold 6 poles so I cut 6 keyholes.


I spaced the center of the keyholes 2 1/2 inches apart.


I always use my Proxxon O/ZIE delta sander to smooth all the edges after each cut. Splinters are never wanted.


To prepare the bottom to hold the butt of the fishing rod, I used a drill with a Forstner 1- 1/4 bit to make 1/4" deep holes spaced at center 2-1/4 inches apart.  This just keeps the poles from sliding around on the rack.


Next, I fastened the 3 supports to the side pieces, One at the top, one at the bottom/ and the third in the middle.  I glued and clamped them in place then added screws to strengthen it.  I used the Proxxon rotary tool with a small drill bit to predrill all my holes prior to adding the screws to avoid splitting the wood.


When the glue was dry, I added the top and bottom pieces aligning them perpendicular to the brace pieces; Again, I glued, clamped, and then when it was good and dry I predrilled mu screw holes prior to adding strengthening screws.  


                                                                                                                                                                                                                                                                                                                                                                                                                                                                                                                                                                                                                                                                                               I added the 2 small pieces to the top piece and fastened them down with wing nuts.  They can be loosened to release the poles.                                                                                                                                                       
 I put it all together and hung it temporarily on the wall.  It works great.  I'm going to take it down and paint it, then it will be finished, and I can add my other poles to this collection. 

]\

Proxxon tools made this project super easy.

Now I'm ready for fishing season and won't have to untangle everything first.
I enjoyed this project.  Hope you give it a try too.
Catch you next time   Carol W


00

Thursday, July 14, 2022

How to make a simple puzzle for a young child


 Hi everybody.  
👨👨👧👧👦👧👦

Today let's make a simple wooden puzzle for the young child.  It is easy and can be customized for that child.  I am going to use simple shapes, but you might want to cut out their name as puzzle pieces or something unique for them I will be using Proxxon tools because they are awesome.


I recently obtained a big piece of plywood that they call "blond wood"   I had never seen it before, but it is a nice 1/2" plywood that comes sanded and primed, so it is smooth on both sides and basically ready for whatever you want to make.  The employee at the hardware store told me it was often used for cabinet making so it is top of the line.  Anyhow it was perfect for this project.   I had them cut my 4' x 8' piece in half at the store simply so I could fit it in the car.  I used a circular saw to cut a strip 6" wide that I can use for this and other projects. 


At the Proxxon mini bandsaw I cut a piece 12" long to be the base of my puzzle.


 Next, I drew some simple shapes.  This is for a very young child.


I need to cut these shapes out, but first I want to drill some holes where I can insert dowels as handles for the puzzle pieces.  So, I did that with a regular drill with a bit that was the same diameter as my dowels.


Now I want to cut out the pieces, but I don't want to cut inside the pieces, so I used the Proxxon cordless rotary tool with a very small bit and made a tiny opening in the line I am about to cut.   


I will thread the scroll saw blade through that hole and cut out my pieces one by one.  Check out the Proxxon mini scroll saw,  It is a really nice machine with so many practical uses.  

\
I use the Proxxon min band saw next to cut my dowels approx 1" long.  Watch your fingers!   Alternately you could use the scroll saw for this.  I glued my dowels in place and let dry well


Everything gets a good sanding using both my OZI/E dlelta sander and my cordless mini belt sander.  These are both great little tools from Proxxon.  I hate sanding but these make it painless.


Meanwhile, I use the proxxon mini table saw to cut a piece of scrap board to 5 x 11" and glue it to the bottom of the base of the puzzle.  This is to keep the pieces from falling through. 


I used Plaid paints to paint my pieces.  I am giving this child extra clues with color as to how to solve this puzzle.  I painted the holes for the pieces the same color as the pieces.  


I didn't like how the dowel pieces looked like they could be a little dangerous so I placed and glued wood beads over them.  This puzzle is done.

Thanks for visiting.  Till next time.....Carol

Thursday, December 31, 2020

How to make a rack for small wood clamps


Hi folks.  Hope you all had a great Christmas.   Now that the New Year is here I always get in the mood to make some improvements.  I guess it comes from the tradition of making those New Year's resolutions.   I  have given up with the exercising more, eating better etc.  Trouble with those is they go on and on and... with no end in sight, I usually give up fairly quickly.  Today I have a firm step towards the vague goal of getting my shop organized  We are going to make a small rack to hold our clamps.  I am going to use Proxxon tools to make a smaller version for our smaller clamps. 

Supplies and Equipment

1" x 2" pine board (length varies according to the number of clamps your are going to put up)   Mine holds 10 clamps and is 16" long.  Plus I need 2 side pieces each 2 12" long so I needed 21"

Scrap wood approx 1/4 -1/2' x (length of your board )

wood glue

small screws and screwdriver

Proxxon mini drill press with small drill bits

Proxxon mini bandsaw

Proxxon mini chop saw


Let's make a plan   I have my slots spaced 1 1/2" apart on center


After transferring the plan to my wood. the first step id to drill the holes.  This is done easily and accurately using the Proxxon mini drill press.🠋


Next I took my wood piece over to the Proxxon mini band saw and cut the slits where my clamps will slide in  approx 1/4" width 🠋


Ok,   Now for the supports, I wanted to put this at a slight angle to keep the clamps from slipping off.   I used the Proxxon mini chop saw set at 10 degrees to make my small angled cut on one side of each support


I glued them on my wood piece with the "longer side" forward so they will tilt back slightly.   When the glue was dry I added some small screws for strength.  


To mount it to the wall, I attached the piece of scrap board to the support that spanned the wood piece   this allowed me access to screw it securely to the wall.   the 10 degree upward angle keeps the clamps from slipping off.   


Woo Hoo we are done.   Now I have easy access to my little clamps !   One step closer to an organized shop!!👍

Thanks for visiting.  I promise you a more exciting project next time.  Something pretty.   Thank you Proxxon.   Love your awesome tools!!.     Carol


Friday, July 17, 2020

How to make a custom picture frame

Hi guys,  I got a new little tool I have been dying to try out and show you.   Its the Proxxon mini chop/miter saw.   I have tried every tool in the book, (minus a chop saw), to make decent mitered corners, but no matter how careful I am, it seems impossible.  In fact I consistently have to revert back to other joints just to save my sanity.   Well now... with this new little mini chop saw by Proxxon,  I must say, and without boasting, I can make the most perfect miter corners!   Ok, now that brings to mind picture frames for me.   I have taken art classes and have had to buy custom frames because, caught in the creative moment, I never paid attention to making my creations standard size.  Well, that took a bite out of my pocket change. But NOW, I can frame any size really.    In the following I am going to show you my learning process on this new tool.  There were a few snags, but I was able to conquer them.   And now I know what is easily doable and what is doable with a little more effort.  Follow along with me.
 My picture prior to framing was 14 1/2"  x 10 1/2"


Supplies

5-6' of baseboard material ( your size may vary according to picture size)
plexiglass large enough to cover your picture.
wood glue 
corner supports (4)
small wood screws  3/8"  to 1/2"
Stain, paint, or whatever 
picture hanger of your choice

Equipment

Proxxon mini drill press   (optional)
wood clamps
Square or corner clamps

The first thing to do is to measure your picture.
  I then made the same measurements on my baseboard, this is going to be the short side of the miter on each side  Measure the red side and set the miter gauge to 45 degrees.
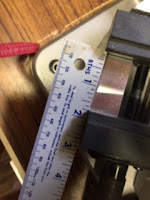


    This is when I discovered that this saw really is made for small cuts.  The clamp opens only to 1 3/4".   Ok, I can deal with that so it is off to the Proxxon mini table saw to cut my baseboard a wee bit narrower.   I saved the strips I cut off.   I have plans for these later.


Now back to the the Proxxon mini chop saw.  

OOPs, although it cut a beautiful miter angle, it did not cut the entire length.   This is my fault, (getting anxious and not reading my instruction booklet),  but we can fix it easy.

I took the partially cut pieces to the proxxon mini bandsaw and using the miter gauge there I followed the saw kerf to finish the 45 degree angled cut.
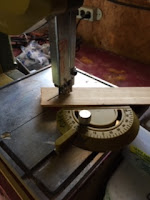

 yay, check it out.   

Now I have the pieces for the outside of the frame and the miter corners fit perfect!  Yay Proxxon mini chop saw!!!

Sand everything with the proxxon OZI/E delta sander.

Next step I glued the corners using a square to keep them square.  We will reinforce the joints later.

Then I take the  little strips I cut from the baseboard earlier to the Proxxon mini chop saw and cut  them at 45 degree angles on the Proxxon mini chop/miter saw so they would fit perfectly inside my larger frame.  

I used an orange gourd stain to color my inside frame piece hoping this will bring out the colors of my sunset.  (This is your time to be creative and paint or stain however you like.)  
  
Now  I'm going to glue these in so they sit about 1/4" higher that the outside frame.  This creates some depth and interest in the frame and 😄 it is giving me a ledge on the backside of the frame where my picture and plexiglass will rest.  I glue it, clamp it, and leave it to dry.  


To reinforce the frame I add corner braces to each corner.

Then I measured the plexiglass to the exact size to fit the ledges I made on the backside of the frame, and used masking tape to make my marks.  I used the proxxon mini scroll saw to do the cutting.   I turned the speed down slow so as not to melt the plexiglass.  I love the adjustable speed control!

Time to flip the frame and fill it up.   I remove the protective film from the plexiglass and lay it on the ledges.  Next comes my picture which I lay on the plexiglass.   I add a piece of cardboard on top of that to hold the picture tight.
Now I need to make something to hold the "sandwich" together.  


I took some scraps of my plexiglass and cut them into rectangles measuring approx 3/4" by 3".  Then I drilled a small hole at each end using the proxxon mini drill press.   I lay these pieces diagonally across my corners and use small screws to secure it all.


Add a picture hanger of your choice, then hang your picture.  

Wow, start to finish, picture and frame,  it is all yours!  Now you can make any size picture then frame it yourself.   Feeling inspired, I went to "the store" and looked at all the trim and baseboard materials they have.  I am going to make some really fancy frames!    I learned a lot with this project.  Can't wait to go at it again.

I want to thank you all for visiting.  I love sharing with you.   I also want to thank Proxxon tools for making the tools that make making fun and easy.  These are small and unscary tools, made for the creative crafter in all of us.    Come back soon and we will make something new.   Carol