Showing posts with label easy wood projects. household projects.. Show all posts

Thursday, December 31, 2020

How to make a rack for small wood clamps


Hi folks.  Hope you all had a great Christmas.   Now that the New Year is here I always get in the mood to make some improvements.  I guess it comes from the tradition of making those New Year's resolutions.   I  have given up with the exercising more, eating better etc.  Trouble with those is they go on and on and... with no end in sight, I usually give up fairly quickly.  Today I have a firm step towards the vague goal of getting my shop organized  We are going to make a small rack to hold our clamps.  I am going to use Proxxon tools to make a smaller version for our smaller clamps. 

Supplies and Equipment

1" x 2" pine board (length varies according to the number of clamps your are going to put up)   Mine holds 10 clamps and is 16" long.  Plus I need 2 side pieces each 2 12" long so I needed 21"

Scrap wood approx 1/4 -1/2' x (length of your board )

wood glue

small screws and screwdriver

Proxxon mini drill press with small drill bits

Proxxon mini bandsaw

Proxxon mini chop saw


Let's make a plan   I have my slots spaced 1 1/2" apart on center


After transferring the plan to my wood. the first step id to drill the holes.  This is done easily and accurately using the Proxxon mini drill press.🠋


Next I took my wood piece over to the Proxxon mini band saw and cut the slits where my clamps will slide in  approx 1/4" width 🠋


Ok,   Now for the supports, I wanted to put this at a slight angle to keep the clamps from slipping off.   I used the Proxxon mini chop saw set at 10 degrees to make my small angled cut on one side of each support


I glued them on my wood piece with the "longer side" forward so they will tilt back slightly.   When the glue was dry I added some small screws for strength.  


To mount it to the wall, I attached the piece of scrap board to the support that spanned the wood piece   this allowed me access to screw it securely to the wall.   the 10 degree upward angle keeps the clamps from slipping off.   


Woo Hoo we are done.   Now I have easy access to my little clamps !   One step closer to an organized shop!!👍

Thanks for visiting.  I promise you a more exciting project next time.  Something pretty.   Thank you Proxxon.   Love your awesome tools!!.     Carol


Friday, July 3, 2020

How to make a Swinging Chicken coat hanger

Hi everyone, Carol here.   I have a special project today.   Our neighbor's granddaughter is turning 9 years old and I want to make her something special for her birthday.  
They raise chickens and goats next door so I had a choice.    For this project I chose chickens.   Goats wait your turn.   They have a young grandson as well..   👦 A project featuring goats is likely in the future.  


Let's get started.

Supplies and Equipment:

1" x 2" pine board about 7 feet long
1" x 6" x 18" pine or plywood.  Or (3) pieces of 1" x 6" x 5"
Proxxon mini drill press and drill bits
(6) straight 3" nails (minus nail heads)
(8) 1 ½" wood screws
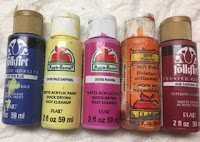
Plaid paints of your choice.
2 small picture hangers
Wood glue


I used the Proxxon Mini table saw to cut my frame pieces to size. 
  I cut 4 pieces of the 1 x 2 to 16" lengths
and 2 pieces 5" long.   I put these aside for now


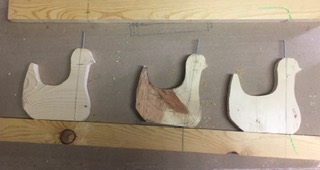
I free handed a chicken onto a piece of my larger wood.   I wanted her to be about 5" tall and 5" wide  I made sure she had a tail that could act as a " hook"   We need 3 of these

I cut the chickens out using the Proxxon mini band saw.

The next part is optional but recommended and actually kind of fun.
Using the Proxxon professional tool with the router base and chamfer bit I routed around the edges of the chickens to soften their edges. It was a little bit messy but worth it.  


After that I used the Proxxon OZI/E delta sander to smooth the edges even further.


Before and after


I need a hole in each head and each bottom.    The drill press allows me to make perfect perpendicular holes which is important so that the chickens can swivel.  


We need holes in the frame pieces as well.   Line up the chickens and place the nails in the chicken's head mark where the holes will go.  Then off to the drill press.  The holes in the top and bottom frame pieces will line up exactly.  Drill the holes in the center of the 1" side of the frame piece at your mark.


Ok, we still have 2 long frame pieces.   That is because I forgot that when we turn the chickens to use the hook the wall will prevent their turn.  So... glue the long pieces to the back side of the existing long pieces to make it thicker.  We are going to turn the end pieces on their side to complete the frame...in a little while.

Now take it all apart and paint it.   Plaid makes so many pretty paints.
 
.
Now,  put the nails in the ducks and then in the frame and using wood screws put the frame together by securing the sides to the top and bottom.    And it's done.  Don't make it too tight, the chickens need to swivel.

All it needs now is some picture hangers on the back and it is ready to hang.   Hope Emma likes it.


I had fun with this project.   I think just about any animal or whatever might work so long as there is something that can be used as a hook.    Customize it for any kid.

Thanks for visiting.   Thanks also to Proxxon and Plaid for their contributions of tools and paint.
Hope you try this.   Leave me a comment if you can.   Thanks again   Carol