Thursday, August 19, 2021

Weiner dog bobbin holder

 All right, I think I have said this before, but I have recently taken up a new hobby...Sewing... but just like every other hobby it comes with so much equipment and supplies, I wish I had a dedicated room for it, but I don't so I am enjoying making what I can to try and keep it a little organized.   Today we are going to make a simple, no, super simple, bobbin holder, but not for me.  This is for a young lady just learning to sew like me, and she is going to help me make it.  


We are going to start out with some pieces of scrap wood and a small wooden ball that I had on hand.


We used the Proxxon professional rotary tool to make a hole in one side of the wood piece where we will put a small dowel to mount the head.   We also put the same size hole in the round piece of wood. and glued it in place.  Now we will stick the remaining dowel part into the body of the "dog to be" to see if it works.  It' ok, but  we won't glue it yet.


Using the Proxxon mini band saw, I rounded off the corners a little bit on all 4 sides


We am going to use the Proxxon mini drill press to make lots of holes all over the "doggy's" back   Then I am going to use the Proxxon mini bandsaw to cut lengths of dowels that will fit into these holes.   This is where she will stack her bobbins.  Looks more like a porcupine.  


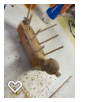
You can see we have added a small nose.  Wewill also cut out some simple ears.  This is best done on the Proxxon mini scroll saw.  We can attach these with small nails so they can be positioned in different ways.


Got the kid to paint it.  Look, she has added some pony beads as well as the bobbins.   Good for her.   You go girl, make it your own.  

She says she has a space for this on a shelf next to her sewing machine.   I am glad she likes it.  We had fun making it.
  
Important note.  Never leave youngsters alone with woodworking tools.  Close supervision is absolutely mandatory, and some tools, like the bandsaw should not be operated at all by children.  But do get them involved in safe ways.   They love it.

Well, thanks for visiting.  Hope you enjoyed the project.   Looking forward to seeing you next time.
Thank you Proxxon, love love love your tools.

Take care and play safe!   Carol


How To Build A Window Shelf


Hi friends. I've been working on my spare bedroom. I just finished making new curtains and I wanted to build window shelves for the curtains to hang from. Follow me and I'll show you how I made them.


Supplies:

     Proxxon Micro Band Saw

     Proxxon Table Saw

     Proxxon Delta Sander 

     1 x 6" pine boards. 

     Paint of your choice

     Screws

     Wood Glue

I started by measuring my window casings to determine the length of my shelves.  I cut the length with the Proxxon Table Saw.  Next I drew a pattern for the brackets under the shelf and transferred it to my wood. I also cut these partially out with my Proxxon Table saw.


I cut the brackets out with the Proxxon Micro Band Saw.


Next I drilled a 1" hole in the bracket for my curtain rod and sanded everything with the Proxxon Delta Sander.


                  I positioned the brackets under the shelf and glued and screwed them together.


I painted them with the same color paint as my window trim. Mounted them above my window casings and tapped a tiny nail in each side of the bracket into my casings to secure them. I put my rods up through the holes on each side of the brackets and hung my curtains.  This was an easy project and I love how they look on my windows.  Thanks for following along with me.  Till next time ... Colleen :-)


Sunday, August 15, 2021

How to Make a Trio of Vases

 This small trio of vases is perfect for displaying those tiny sprigs and blossoms that get lost in a larger arrangement. 


Supplies and Equipment for the Trio of Vases:

Instructions:

  1. Determine the size of the wood blank that you will need. This will vary depending on the size and number of your bottles.
  2. Use the table saw to cut two blanks the same size.

  3. Measure and mark one of the blanks to indicate the positions of the bottles spaced horizontally on the blank.

  4. To determine the vertical placement of the bottles begin by measuring the height of the bottle.

  5. Next, measure the height of your blank. Subtract the height of the bottle from the height of the blank, and divide by two. This number is the top and bottom margin.

  6. Measure the width of the bottle neck (where you will attach it to the blank with wire). 
  7. Transfer these measurements to the blank.

  8. Using the bench drill press, set the adjustable fence, and drill holes for the wire.

  9. Decide which side of this blank will be front-facing. Using the holes you drilled for the wire as guides, mill a groove on the back side of the blank between the holes. 

  10. This groove will hide the wire ends used to secure the bottles.

  11. Sand all surfaces of both blanks.
  12. To attach the bottles to the blank, center the neck of the bottle on a length of 18 gauge wire. The length of your wire will depend on the size of your bottles.

  13. Thread the wire ends through a set of holes.

  14. Twist the wire ends to secure the bottle to the front of the blank.

  15. Fold the twisted wire ends into the milled groove, trimming to fit if necessary.

  16. Spread a thin layer of wood glue on one of the blanks.

  17. Fit the two pieces together and clamp. Wipe away all traces of glue that seep out when the pieces are clamped. Let dry.

  18. Finish as desired. I treated mine with wood oil.


Carole

Thursday, August 5, 2021

How to make a handy paintbrush holder

 Hi everyone,   This is for the artists and makers out there.  It is an easy but useful project.   Let's make a paintbrush holder.  Ive seen these in plastic, but I think we can do better.   I know we can because we have the tools, thank you Proxxon, for the job.  


I am going to start with a short piece of 1/2" by 4" piece of cedar board, left over from another project.

When I measure it out it is about 8" long, this will work well for what I have in mind.  First thing to do is to cut it in half.   I use the Proxxon mini bandsaw to do this.  


Square is ok, but I want to fancy it up a little bit, so I cut off the corner to make an octagon shape.

The Proxxon mini bandsaw makes that a simple and easy task.


I next used the Proxxon disk sander to smooth the edges.  Note- make sure the second piece keeps the shape of the first piece.


Now draw some dots where you want to drill your holes for the paintbrushes.  I plan on some holes being bigger to hold my bigger brushes.


Stack the two pieces together and tape them or use nails to keep them together.  (If you use nails make sure to put them where you will be drilling a hole for a paintbrush.)  Don't want any stay holes  Then using the Proxxon mini drill press make pilot holes through the top layer to just deep enough to mark the bottom layer.  


Separate the 2 pieces.
Using standard size drill bits drill holes where you want them in the size to suit your needs all the way through the top piece.  
On the bottom piece, use a large drill bit to make a small dip into the wood.  this will keep the paintbrush from sliding around. 


Use the Proxxon OZI/E delta sander to make everything smooth and pretty.   I started with 80 grit to remove my markings then moved on the 240 grit to smooth everything out.  


Drill 4   5/8" holes half way through the bottom of the top piece and the opposing top of the bottom piece.    Cut 4 4" pieces of dowel rod. and inset these into those drilled spots.   If it fits well, then add some glue and allow it to dry well


The only thing left is to apply a sealing finish to the wood.  I love how cedar looks when finished.   That is all there is to it.  This makes a nice little gift to give to your artist friends.   I think I will make a few for the girls in my art class, for Christmas.    Trying to get a head start this year.   I will wood burn their names in it to make it personal.   Yup, that will work. 


Hope you had fun, I did!   I always do when working in my wood shop with my Proxxon tools.   
Thanks for visiting.   Will catch you next time.    Carol.

Sunday, August 1, 2021

Country Chic Cuts of Pork Wall Hanging

Another Country Chic wall hanging!! This time with a different look. Download the patterns below and follow the instructions to create your own Cuts of Pork wall hanging.


Other Country Chic projects include:

Supplies and Equipment:

Instructions:

  1. Cut the 9" x 5" blank to size on the table saw.

  2. Cover one side of the blank with painter's tape. Mist the back side of the pattern with spray adhesive, and mount on the taped blank.  The painter's tape makes removal of the pattern easy without leaving any sticky residue. 
  3. Cut the pig silhouette on the bandsaw.

  4. Cut the details of the outline on the scroll saw.

  5. Mount the 3mm semi-spherical punch in the micro press.

  6. Punch the dotted lines using the micro press. Press gently with only enough pressure to make an indentation without breaking through the surface of the wood. I suggest practicing on a scrap of the same wood that you're using for the wall hanging.

  7. Sand the edges and surfaces with the Delta sander.

  8. Following the manufacturer's application instructions, coat the piece with the antiquing wax. Set aside to dry over night.

  9. Buff the surface of the wall hanging. I created this buffing pad by tracing the shape of the Delta sander head and cutting the pad from a piece of upholstery velvet.

  10. Add the labels either by hand lettering or cutting the words from vinyl.
  11. Add appropriate hanging hardware.

Carole