Showing posts with label easy kids projects. Show all posts

Thursday, August 4, 2022

How to make a simple piggy bank

 Hi gang.  Hope all is going well for you.  Today I have a simple project that you can help your child make, under strict supervision of course due to the nature of saws living to cut, wood and or fingers.)  In other words, just be careful with cutting tools.  Enough said, let's get busy with this easy project.


I'm not sure if you can tell from the picture but my inspiration was an empty Gatorade bottle.  It had a couple of things going for it.   It was a nice sturdy plastic bottle, (so it could be cut) and... the orange bottle top which was bigger than a quarter sold me.


Firstt,I designed a pattern that I was going to use.  Everyone should do their own but basically see the cutting pattern below.  These are the 3 pieces you will need.


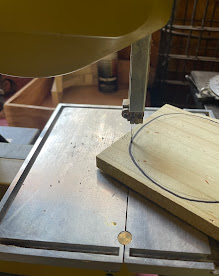
I drew my patterns onto my pieces of scrap wood then took it over to my Proxxon mini bandsaw and cut out the perimeter of all 3 pieces.


Now, for the inside cuts I used my Proxxon professional rotary tool with a small drill bit to make a hole inside the circle I wish to cut out.  Then I passed the scroll saw blade through that hole and reattached it so I could make my inside cut.

Then I used my Proxxon cordless mini belt sander to bevel the edges slightly outward on my inside pieces, so they fit the bottle pretty tight.   I used the Proxxon OZI/E delta sander to smooth all the edges of the wood, (no splinters allowed!)


Its a good time to paint the pig parts.  🐷🐖  I used Plaid paints because they have the best colors.


I used my Proxxon professional rotary tool with a cutting wheel to cut a slit in the top of my bottle.  This is where everyone is invited to stuff coins, and or paper cash.!


Next Glue the cap of the bottle the front part to the pig.  Be careful not to glue the piggy parts to the body of the bottle.   (To get our money out we are going to untwist the nose).


I'ts done, if you want, put a squiggly tail on him--or not

I painted him at this point, but hopefully you painted him earlier.  It's a lot easier before it is together. 


It[s been a lot of fun,  Thank's Proxxon, and Thank you for visiting!

Catch ya next time..   Carol

Thursday, December 2, 2021

How to make a whistle

 Hope you all had a great Thanksgiving.   Ours was quiet and I enjoyed it.   Today I have a quick and easy project, but one the kids will love.   Take it on a hike... just in case you get lost or find yourself in trouble.  I enjoy making things with and for kids.  Call me a big kid, and I won't argue the fact.  🐐


Step 1-   I started with a piece of hardwood measuring 1" x 1" x 4"  (A pen blank for woodturning is just about the right size)   If I had needed to cut it I would have used Proxxon's mini table saw.

Step 2-  Using the Proxxon vise clamp to hold my wood piece vertical I drilled a 3/8 inch hole down the center, stopping 1" short of the end.

Step 3- Using the Proxxon mini band saw I made a 90 degree cut approx 1 inch down from the hole side of the wood just deep enough to meet the hole we made in step 2.

Step 3.  Starting approx 3/4" down from the 90 degree cut, I used the Proxxon mini band saw to make a cut at about 45 degrees that met up with the 90 degree cut. to take a wedge out of the top of the soon to be whistle.  


                              hope you can follow my drawing 🠞🠞🠞🠞🠞🠞🠞


Step 4.Take a 3" piece of 3/8" dowel and cut the top so that it has a flat top.  Insert it into the hole in the whistle.  Moving it in and out find the sweet spot.  You will know when you find it because it will whistle loud and clear.  Hold it in place and drop a couple drops of super glue around the dowel. where it meets the wood.  Let it dry then cut it flush with the end of the whistle.  The whistle is now complete.       

But wait... there is more.  Just for fun lets doll it up a bit.    I am still learning my new Proxxon engraving device, so I set it up and engraved on the little whistle.

Then I took it over the Proxxon disc sander and rounded all my edges.

Then more smoothing with the OZI/E delta sander

And a coating of butcher block, which is non toxic and a key ring.   Now give it to the
 boy or girl scout of your choice.


Again, this was easier to make that to describe.  Give it a shot, it won't take but about an hour.

Thanks for visiting.   Thanks Proxxon, Your tools are the best!

Catch you next time.   Carol


Thursday, July 1, 2021

How to make a box kite

 OK, I want to bring out the kid in you this week.  We are going to make a box kite using our Proxxon tools and hopefully it will fly and so will your spirits.  Trust me!


Supplies and equipment:

6    1/4" x 36" dowel rods

4   Walmart bags

2-3 drinking straws

kite string or suitable substitute

scissors

gorilla glue

contact cement 

plastic tape

measuring tool  yardstick or tape measure

speed square if you got one. 

Proxxon scroll saw

Proxxon profession rotary tool

Patience  ha ha

Here's our plan


Let's get started.   The first thing to do is to  cut (4) 14" pieces of dowel   These will be our cross pieces.  I used the Proxxon Scroll saw to do my cutting.  But I could have used my Proxxon mini bandsaw just as well.  You choose,


I made some indents using the Proxxon professional rotary tool.  This will help keep the parts from slipping while I lash them together.  


I lash them together in the middle with string, wrapping it around every which way until it kind of holds it together as an X.  Then I applied a drop or 2 of gorilla glue to strengthen it.   Gorilla glue is very strong but also very light.


Meanwhile I cut my straws into 2-3" lengths.  I need 8 of these.  I cut them about half way through at their halfway point.   These are really going to help keep things together.  I don't know if you noticed how hard it is to stabilize two round things together...😆
I slipped those over the 4 outside 36" dowels at the 6 " mark.  Note the picture below as how to use the straws.  


I put a drop of glue into 2 adjacent dowel sticks straw holes in each of the 4 36" dowels  then put two pieces of each cross members into the straws then propped them up to dry.  Try to keep them at pretty much 90 degrees to each other.


When it is good and dry turn it over and do the other sides just the same.   Now we have a skeleton.

Part 2, making the skin.

  Take 3 Walmart or similar bags and lay then out straight as you can.  Measure 12 inches out of the middle so that when cut it turns into a big loop.  Cut it down the side so you now have a sheet of plastic 12" wide.  Starting at one corner secure the plastic to the side using contact cement.  Then wrap the plastic around the frame as far as you can get.  I got around 3/4 of the way so I needed to add another length of plastic bag.  I attached the second plastic  to the first with a line of contact cement and finished the journey around the frame.  I cut off the excess and secured the end to the first piece at the first corner.  To add strength and durability to the wispy plastic I took clear packing tape around all the edges of the plastic.    

Part 3  Kite string

First let me say.  "goooood luck"   I went to Walmart, dollar tree, dollar general, etc etc.  I believe they have done away with it.  I did find a kite at dollar tree with a miniscule amount of string.  So use what you can.  Light but strong.  I finally chose yarn.  
Cut a piece 36 inches long and secure it to the top of the kite and the top of the bottom section of the kite.  (12" up from the bottom).  About 12- 14" down from the top, tie a small loop.  Attach your "string to' this loop.

Hey,,, guess what.  If there is some wind outside we are ready to fly.    I had to wait 3 days to get enough wind for take off.   But it was worth it.!  You are never too old to fly a kite!  Try it.  

                                                                                                                                                                                                   ↖Me, having a great day.    
Thank you all for visiting.  I do hope you give it a try.  Invite the kids or grands so you have an excuse.to play.    I had soooo much fun.

Thank you Proxxon for your fine tools that make making stuff so easy.  
Till next time.   Carol