Showing posts with label Halloween Decor. Show all posts

Thursday, October 1, 2020

How to carve a gourd pumpkin

Halloween is almost here and it is time to start thinking pumpkins, carving pumpkins and jack-o'-lanterns πŸŽƒπŸŽƒπŸŽƒπŸŽƒ   I love pumpkins, and I enjoy carving them, but it's a little sad when the pumpkin begins to shrivel up after just a few weeks.   This year I am going to bring out a few of my smaller gourds and show you how easy it is to carve them using Proxxon tools.   And these "pumpkins" will last forever.  


Equipment and supplies

Small pumpkin shaped gourds

Proxxon mini jigsaw

Proxxon rotary tool with small drill bit or a sharp awl.

Plaid paints

sealer of your choice

2 small hinges + one small latch

super glue and small screwdriver

velcro dots

1 battery powered candle light.


Let's get started.   First we need to choose a gourd   Warning gourds start out dirty!  But they are easy to clean using steel wool and water.


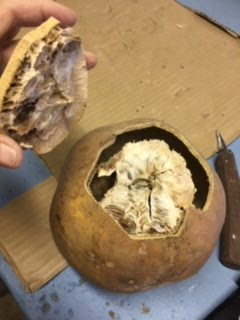
Now we are going to cut him open.   It is always a surprise to find out what is inside.

We need a small hole in order to insert our jigsaw blade.   If you have a Proxxon rotary tool this is perfect for drilling the small hole.   If you don't you may punch a hole using a sharp awl.


Using the Proxxon mini jigsaw I cut out the bottom of the gourd.  Notte that I made a zig-zag in my cut.   This is to make it easy to put back together properly.   Also it is important to make a straight edge where we are going to attach the hinges later.    OK let's open her up.  


Lucky me, it is dry and easy to remove.   Now my pumpkin is hollow.

Now to design a jack-o'-lantern.   I drew a simple face.   You can be more creative!


I cut it out using the Proxxon mini jigsaw.  It was a breeze!

Optional step:
Using the proxxon rotary tool with the bull nose rasp cutter I added some hair and a label on the back.


Ok back to our original plan.   We are going to add hinges to the bottom of our gourd and a latch to keep it shut.    I used glue to first affix the hinges then added very small screws.   I did the latch in the same way.


For candlelight I put velcro on the inside of the bottom of the gourd and the other side to the bottom of my battery powered candle.  That way I can open the bottom of the gourd, stick the candle on the velcro and shut the gourd.   I used some watered down plaid paints to give my pumpkin his orangey color.    And we are done.  


πŸ˜€πŸ˜€πŸ˜€My candle changes color.  πŸ˜€πŸ˜€πŸ˜€


Thanks for visiting.   I hope you have a happy and safe halloween.    
Thank you Proxxon and Plaid.

Check out these fine products.   Just click on the links above.   
Have fun!   catch you next time  Carol


Tuesday, September 29, 2020

How to Alter Paper Mache Pumpkins

Hi everyone, Steph Ackerman here today showing you how to use Proxxon Tools to alter paper mache pumpkins.


I found these paper mache pumpkins and thought they would look amazing amongst the real pumpkins this holiday season.


Using the Proxxon Jig Saw, I cut around each pumpkin.  It certainly did not take long to cut them apart.  At approximately 1 pound, I love how light weight the Jig Saw is and how easy it is to maneuver.


In this time of social distancing, I wanted to create a reusable container that the kids would enjoy taking candy from this year.


Since the pumpkins would be sitting outside all Halloween day, I painted them with Plaid Outdoor Acrylic Paint in Geranium.  Once dry, I added touches of Raw Umber.


Don't they look great amongst the real pumpkins?


Thanks for stopping by.

Steph


Thursday, August 13, 2020

How to make a Halloween Pumpkin


 Oh it is hot!   Dog days of summer are upon us.  You know what that means...fall is coming and so is Halloween!!!     I know it's a bit early but with crafting we have to start early.  Today we are going to make a pumpkin.   I was going to say "little pumpkin", but you can make it as big or as little as you want.


Supplies and Equipment/

Wood of your choosing (enough to cut out 8-12  pumpkin ribs) plus 2 circles.   (I used 1/4" birch plywood because mine was going to be a small centerpiece)

Yard scrap (for pumpkin stem)

Wood glue

wood clamps or clothespins if small.

Proxxon mini bandsaw with scroll saw blade or Proxxon mini scroll saw.

Proxxon OZI/E delta sander

Plaid paints and or other embellishments

pencil and tracing paper.


Here is the pattern I started with.  I fit 2 ribs in a small square.   I will need to repeat this pattern 4 or more times to make 8 - 12 ribs.   cut 2 circles in proportion to your rib pieces.


I traced my pattern onto my wood piece then proceeded to cut them out.   I am using the Proxxon mini band saw in the picture below.   It cuts the tightest curves.  I am impressed.  This is the first time I have used this saw blade.   WOW!


I got all my pieces cut, and then I sand them using the Proxxon OZIE delta sander.  I love how it gets into all the curves.  It has adjustable speeds too.   If your cutting is not perfect don't worry.  Pumpkins are very forgiving.


Next comes the part that is a little bit tricky.  If I can do it, you can, it takes just a little bit of patience.   We are going to glue it all together.   Use enough glue.   Let it get just a little bit sticky before you position your piece so it will stick some.    I used clothes pins to hold mine.  

Glue the bottom of the "ribs" to underneath the circle piece  as in the picture below.   Let this dry.   (Note- the tops of the "ribs" are lining up)    I did this 2 at a time and let dry in between.  (takes some finger dexterity)


I glued the second circle to the underside of  the top of the pumpkin.
Then I painted the pumpkin using Plaid paints.  I got my stem ready to go when the paint dries.


All done.   I painted a little egg to sit on the circle.   If I had made my pumpkin a little bigger I would place a candle on the stand.   I plan to make one about 12"-14" tall to sit on the porch this year.

Thanks for visiting.   Thank you Proxxon tools and Plaid paints.   I work with the best!

Catch ya next time.   Take care, and please be safe!!!   Carol


Wednesday, August 1, 2018

How to create a tombstone with the Hot Wire Cutter

As we head toward the end of summer, it's not too early to think about Halloween.  Steph Ackerman here today to show you how to create a tombstone using the Proxxon Hot Wire Cutter.


I love decorating for Halloween and realized I didn't have a tombstone!!  So I decided to use a sheet of Smoothfoam with my Hot Wire Cutter to create a tombstone.  So quick and easy and so much fun to create.

Supplies:
Proxxon Hot Wire Cutter
Smoothfoam
Plaid Paints - Delta Ceramcoat - Ink Blot, Antique White, Charcoal
Folk Art Coastal Texture Paints - Sand Dollar, Seal Grey


I began by drawing the tombstone on a sheet of Smoothfoam.


Using the Hot Wire Cutter I then cut the pattern.


Next I painted the tombstone with Coastal Texture Paint in Sand Dollar and Seal Gray, mixing the colors together.  Then I put it aside to dry.


Once dry, I used the Hot Wire Cutter again to create the "cracks".  With no specific plan in mind, I created assorted "cracks" around the tombstone.


Check out how defined the cracks are and how small I was able to cut them.


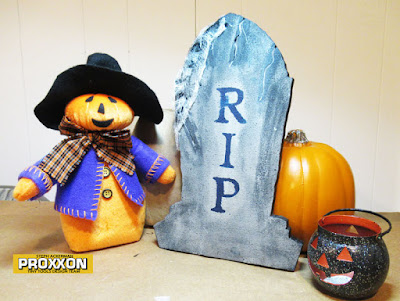
For definition, I paint the cracks with black and white paints.  Using a stencil, I added RIP down the center with blue paint.


To give it a more aged appearance, I added more black paint around the edges and used a baby wipe to blend it in.


Finally, I added some mesh along one side creating a cobweb effect down the side.


What do you think?

I love using the Hot Wire Cutter for projects like this.

Thanks for stopping by.

Steph

Friday, September 30, 2016

Pumpkin Carving with the Proxxon Jigsaw

Hi everyone Steph Ackerman here today.  Tomorrow is October 1st and that means Halloween is on it's way.  It's time to begin decorating and nothing screams Halloween more than pumpkins.  I decided it was time for pumpkin carving and the Proxxon Jigsaw made it so easy!


I used the jigsaw to cut the top off the pumpkin.  I wasn't careful about how I cut the top since pumpkins come in a wide variety of designs and styles.


I also used the jigsaw to create the face.  I found the Jigsaw was very light to hold and easy to maneuver.  It was so much fun to create my designs easily and quickly and I definitely have more projects in mind.

 
The jigsaw easily cut through the pumpkin. And now that the design was cut, it was time to start decorating.


I used Plaid's Milk Paint in Petticoat to paint the pumpkin.  Then I used assorted inks to ink up the pumpkin to add color and to create an assortment of  designs around the pumpkin.   And because I found some lovely bling, I just had to finish with some bling swirls.


Happy Halloween.
 
Thanks for stopping by today.


Wednesday, September 28, 2016

Halloween Wooden Wreath

Hello friends. Larissa here with you today. So I am still workig on Halloween decor. Today I made this fun wooden Halloween Wreath. I will explain what happen as I go.

For this project I used:
Proxxon Delta Sander
Proxxon Scroll SawWooden Bats
Thin piece of wood for the wreath
Paint: Orange, Black, White, Light Pink
Different sized brushes
Hot Glue


So to start out I used my Scroll Saw to cut the wreath. Unfortunately I did not have the ability to take a picture of this since I was working on it by myself and no one was home to help me take photos while I cut.:)

I used the Delta Sander to smooth the edges of the wreath and the bats.


The edges were pretty rough and since the wood is really thin I didn't apply very much pressure as I was afraid of sanding too much off.
I then painted the wreath with two coats of orange acrylic paint and the bats with one coat of black.

.

Once the bats dried which really didn't take that long, I added the faces with a detailed brush.

I attached the bats to the wreath with hot glue. And it fit in the spot I was hoping it would on my wall. 


I hope you enjoyed my project today, even though I left a few pictures out. I am still shaking my head on that one. :)

Have a wonderful day friends.
Larissa Pittman www.muffinsandlace.com