Showing posts with label Proxxon Scroll Saw DSH/E. Show all posts

Wednesday, September 13, 2017

Live Love Bark

Hello friends. Larissa here today with another fun wood project.

This is a little wood bone sign for a friend who is a dog lover like me.


What I used: 

Other products: 
Small Piece of Plywood 
Plaid Chalk Paint Brushes
Chalk Pen in White
Felt Flowers


First I cut the bone out of a thin piece of plywood using my Scroll Saw.


I then smoothed the edges and any rough spots with the Delta Sander. 


I then applied 2 coats of the Black Chalk paint to cover the bone. Once is was dry I used my White Chalk Pen and wrote the words out across the front and outlined it with some white dots. 
I also added a bunch of felt flowers to the top and adhered them with hot glue. 

I placed a little hook in the back so it can be hung. 


I hope you enjoyed my post today. Have a wonderful day friends. 


Sunday, September 3, 2017

Hello Fall Wooden Mason Jar

Hello friends, Larissa here with you today with a Hello Fall Wooden Mason Jar.


What I used: 
Proxxon Tools: 

Other Products: 
Crafter's Companion Flower Die
Felt Asst Colors
Ribbon
Beacon Fabri-Tac 
Chalk Marker

First off as always I draw whatever it is I am going to be cutting out of the wood. I cut the sides using the Table Saw and the corners using the Scroll Saw. I could have done it all with the Scroll Saw but I had them both sitting right there so I just played around.


I used my Delta Sander and smoothed the edges and any rough areas on the wood. 


I painted two layers of Black Chalk paint on the jar and two coats of the silver paint for the lid. 


Once dry I wrote with chalk on the jar and tied a ribbon in a bow around the top. To finish it off I added a big felt flower in fall colors to the top corner. 


I hope you enjoyed my post today. Have a wonderful week friends. 


Sunday, August 6, 2017

How to Make Five Pointed Patchwork Star

This five pointed patchwork star is such a versatile pattern. It can be used as a decorative piece, a coaster, or a trivet depending on the size you make it. There are also many decorating options depending on how you paint it. How about red, white and blue for a patriotic theme? Or, each point a different color to resemble a quilted star? Silver and white tones would be perfect for wedding decorations. Of course, gold metallics are ideal for Christmas ornaments and display pieces.
Finished Five Pointed Patchwork Star

Supplies and Equipment for Making the Five Pointed Patchwork Star

Instructions for Making the Five Pointed Patchwork Star

  1. Cut out star point pattern. You can vary the size of the star by reducing or increasing the size. I recommend cutting the template out of substantial cardstock or acetate so it maintains its shape through multiple tracings.
  2. Trace the template onto your wood. I traced a column of star points the entire length of my piece of MDF.
    Template and Pattern on MDF
  3. I used the table saw to cut the column of star point patterns. Here you can see that I'm adjusting the blade height to be just above the thickness of the MDF.
    Setting Saw Blade Height
  4. I moved to the band saw to cut out the star points. Note: This could also be done on the scroll saw.
    Cutting Shapes on Band Saw
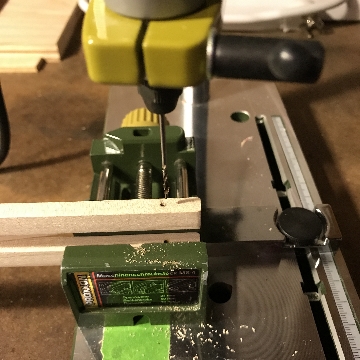
  5. Drill the holes for attaching the star points to one another using the Professional Rotary Tool and Drill Stand. I used a 1/8" HSS twist drill bit with brad point.
    Drilling Holes
  6. Paint each star point. I used FolkArt Brushed Gold Brushed Metal Acrylic Paint.
    Painting Star Points with FolkArt Brushed Metal Acrylic Paint
  7. When the paint is dry, glue the star points together with wood glue. This step is not absolutely necessary, but it does give the finished patchwork star extra strength.
    Gluing Star Points Together
  8. With wire cutters, cut the brass wire into 1½" lengths. Note: If you increase or decrease the size of the star point template or the thickness of the wood, you will need to adjust the length of the brass wires. Bend the brass wires to form a U-shaped staple.
    U-shaped staple formed from brass wire
  9. When the glue is dry, working from the front of the star insert a staple into holes on adjacent star points. 
    Inserting staple in adjacent star points
  10. Holding the staple in place, turn the star over and flatten the ends.
    Flatten staple on reverse side of star
Your five pointed patchwork star is complete—ready to be a used as a decoration, an ornament, or a trivet.
Five Pointed Patchwork Star Trivet

Sunday, July 16, 2017

How To Make Detail Sanding Pens for Fine Woodworking

While Proxxon carries great electric detail sanders (Pen Sander PS13 and Belt Sander BS/E), sometimes a woodworker still needs to use manual sanding. That's why I made these detail sanding pens for fine woodworking. They are wonderful for those tiny, hard-to-access areas, like in fretwork. The original pattern for these detail sanding pens can be found on the Scrollsaw Workshop blog.

Supplies and Equipment for Making the Detail Sanding Pens

Instructions for Making the Detail Sanding Pens

  1. Print the patterns and adhere to the wood. Cover the surface of the wood with painter's tape. Next, spray the back of the pattern with spray adhesive, and put that on top of the painter's tape. The spray adhesive holds the pattern in place, and the painter's tape makes for easy removal.
  2. Cut the outline shapes of both the large and small sanding pen and kerfs on the large sanding pen on the band saw.
  3. Cut the notch on the small sanding pen on the scroll saw. (See note below.)
  4. Using the professional rotary tool and drill stand, drill a 1/16" hole in the large sanding pen for the tack that will secure the sandpaper in place.
  5. Realign the rotary tool and add a sanding disc to sand the pieces.
  6. Insert the tack into the drilled hole. If it extends beyond the pen piece, trim with wire cutters.
  7. Cut lengths on fine grit sandpaper to wrap around the sanding pens, and secure with the tacks.
  8. Enjoy your completed detail sanding pens!!
Note: I was not pleased with the notch arrangement for securing the sandpaper on the small sanding pen, so I modified the pattern as show below. I eliminated the notch and used a tack to secure the sandpaper.

Used along with the Proxxon detail sanders, these will do the job for fine woodworking.

Carole

Sunday, June 18, 2017

How to Make Wooden Salad Tongs

For the perfect green salad you need the perfect pair of salad tongs. These handmade wooden tongs are just the ticket.

These great tongs can be used for more than salad—how about retrieving a slice of toast from the toaster, or lifting an ear of corn from the pot. An added bonus is that they fold flat for storage. Let's get started, and make a pair.

Supplies for the Salad Tongs

  • 12" x 3" x ¼" food-safe hardwood (I used maple, but cherry would be another option.)
  • 1½" length of 1/16" brass rod
  • 2 5/8" brass washers
  • 2 bamboo skewers

Equipment for the Salad Tongs

  1. Using the table saw, cut the wood into two 10¾" x 1¼" strips.
  2. Move the work to the band saw, and cut two 5" kerfs on one end of each tong piece. Refer to the accompanying drawings.
    Finished kerfs
  3. On Piece A cut 2" from the outer slats using the band saw.
  4. Move the work to the scroll saw, and on Piece B cut 2" from the center slat.
  5. Sand the pieces using the Delta sander with 150 grit sandpaper.
  6. Soak the pieces in water for an hour. Weight them down so they don't float. I used a food storage container filled with water.
  7. After they have soaked, wedge a piece of the bamboo skewer under the center slat in each piece. When the wood dries, these will form the "spring" for the working tongs.
  8. Heat the pieces (with the skewer still in place) to dry the wood. Keep the heat gun moving so you don't scorch the wood. This step is optional. It dries the surface of the wood, but you still need to set the pieces aside overnight to dry thoroughly.
  9. The water bath may have slightly raised the grain of the wood, so when the pieces are thoroughly dry finish sanding use the Delta sander with 220 grit sandpaper.
  10. Using a 1?16" bit, drill a hole ½" from the top and centered on the side of each piece for the brass rod.
  11. Line the pieces up with Piece A on the left with the center "spring" facing up. Piece B is on the right with the center "spring" facing down. Fold Piece B to the left so it rests on top of Piece A. 
  12. Thread the brass rod through the holes, adding a brass washer on each side of the center slat.
  13. Trim the brass rod almost flush on one side. File until it's flush. This will flare the end to hold it in place. Repeat the trimming and filing on the other side.
  14. Close the tongs, and mark the inside bottom edges. Adjust the table of the band saw to 45°, and cut a taper on the ends of each tong piece.
Here are pictures of the finished salad tongs.