Showing posts with label halloween. Show all posts

Sunday, October 2, 2022

How to Make Halloween Tin Punch Decorations

 Halloween tin punch decorations are easy and fun to make with Proxxon MICROMOT tools.


Here are the supplies and equipment that you'll need:

  1. Print and cut out the Halloween Tin Punch Patterns.
  2. Using the bench circular saw and a tungsten carbide saw blade, cut the aluminum flashing into 2½" x 2½" pieces.

  3. Use painter's tape to mount the pattern onto the aluminum square allowing a margin at the bottom edge.

  4. With the appropriate size punch in the MICRO press position the pattern for punching.

  5. To make the stand, cut 2½" x 2" x ½" pieces from the plywood using the table saw.
  6. Adjust the table saw blade height to make a partial cut ~¼" deep in the plywood stand piece.

  7. Remove the guard assembly on the table saw to allow the partial cut. It is not possible to make a partial cut with the splitting wedge in place. Set the adjustable fence ~¼" from the saw blade. Make the partial cut. Replace the guard assembly.

  8. Sand any rough edges on the stand using the disc sanders.

     
  9. Finish the stand with FolkArt Home Décor Antique Wax.

  10. Place a battery operated candle on the stand behind the tin punch for a spooky Halloween decoration.

Carole

Sunday, September 19, 2021

How to Make Wooden BOO Halloween Decorations

 Halloween will soon be here. Time to put the Proxxon tools to work making this BOO Halloween decoration.


Supplies and Equipment:

  1. Cut wood blank to appropriate size using the table saw.

  2. Print the BOO pattern. Cover one side of the blank with painter's tape.

  3. Mist the back side of the pattern with spray adhesive, and mount on the taped blank. The painter's tape makes removal of the pattern easy without leaving any sticky residue.

  4. Cut the shapes on the bandsaw using the extra narrow scroll saw band. Alternatively, the shapes can be cut on the scroll saw.

  5. Use the depth gauge on the bench drill press to drill identical indents for the ghost's eyes.

  6. Drill pilot holes for the cutouts in the letter B.

  7. Thread the scroll saw blade through the pilot hole, and cut out the holes.

  8. Sand the edges and surfaces of the shapes with the Delta sander.

  9. Sand the interior edges of the holes in the letter B using the precision rotary tool with the flexishaft and a sanding drum.

  10. Paint the shapes with acrylic paints.
  11. Enjoy the Halloween holiday!!


Carole

Thursday, October 1, 2020

How to carve a gourd pumpkin

Halloween is almost here and it is time to start thinking pumpkins, carving pumpkins and jack-o'-lanterns 🎃🎃🎃🎃   I love pumpkins, and I enjoy carving them, but it's a little sad when the pumpkin begins to shrivel up after just a few weeks.   This year I am going to bring out a few of my smaller gourds and show you how easy it is to carve them using Proxxon tools.   And these "pumpkins" will last forever.  


Equipment and supplies

Small pumpkin shaped gourds

Proxxon mini jigsaw

Proxxon rotary tool with small drill bit or a sharp awl.

Plaid paints

sealer of your choice

2 small hinges + one small latch

super glue and small screwdriver

velcro dots

1 battery powered candle light.


Let's get started.   First we need to choose a gourd   Warning gourds start out dirty!  But they are easy to clean using steel wool and water.


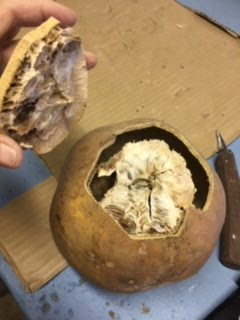
Now we are going to cut him open.   It is always a surprise to find out what is inside.

We need a small hole in order to insert our jigsaw blade.   If you have a Proxxon rotary tool this is perfect for drilling the small hole.   If you don't you may punch a hole using a sharp awl.


Using the Proxxon mini jigsaw I cut out the bottom of the gourd.  Notte that I made a zig-zag in my cut.   This is to make it easy to put back together properly.   Also it is important to make a straight edge where we are going to attach the hinges later.    OK let's open her up.  


Lucky me, it is dry and easy to remove.   Now my pumpkin is hollow.

Now to design a jack-o'-lantern.   I drew a simple face.   You can be more creative!


I cut it out using the Proxxon mini jigsaw.  It was a breeze!

Optional step:
Using the proxxon rotary tool with the bull nose rasp cutter I added some hair and a label on the back.


Ok back to our original plan.   We are going to add hinges to the bottom of our gourd and a latch to keep it shut.    I used glue to first affix the hinges then added very small screws.   I did the latch in the same way.


For candlelight I put velcro on the inside of the bottom of the gourd and the other side to the bottom of my battery powered candle.  That way I can open the bottom of the gourd, stick the candle on the velcro and shut the gourd.   I used some watered down plaid paints to give my pumpkin his orangey color.    And we are done.  


😀😀😀My candle changes color.  😀😀😀


Thanks for visiting.   I hope you have a happy and safe halloween.    
Thank you Proxxon and Plaid.

Check out these fine products.   Just click on the links above.   
Have fun!   catch you next time  Carol


Tuesday, September 29, 2020

How to Alter Paper Mache Pumpkins

Hi everyone, Steph Ackerman here today showing you how to use Proxxon Tools to alter paper mache pumpkins.


I found these paper mache pumpkins and thought they would look amazing amongst the real pumpkins this holiday season.


Using the Proxxon Jig Saw, I cut around each pumpkin.  It certainly did not take long to cut them apart.  At approximately 1 pound, I love how light weight the Jig Saw is and how easy it is to maneuver.


In this time of social distancing, I wanted to create a reusable container that the kids would enjoy taking candy from this year.


Since the pumpkins would be sitting outside all Halloween day, I painted them with Plaid Outdoor Acrylic Paint in Geranium.  Once dry, I added touches of Raw Umber.


Don't they look great amongst the real pumpkins?


Thanks for stopping by.

Steph


Sunday, September 2, 2018

How to Make a Halloween Cat from Lumber Scraps

It will soon be time for witches, pumpkins, and black cats. Halloween is right around the corner, and I've got an easy decorative project that you can make from scraps. Isn't this Halloween cat fun??!!

I used ½" birch plywood for my cat body and ¼" birch plywood for the tail.

Instructions for the Halloween Cat

  1. Start by measuring and marking the width and height of the cat and the depth of the ears. This can vary depending upon the size of your scrap lumber and you desired finished size of the cat. My cat measures 7" high and 2¼" wide. For the ears I marked a point in the center of the width and 2½" from the top. Then, I marked diagonal lines from the top corners to the marked point.
  2. Cut the shapes on the Proxxon MICRO Bandsaw MBS/E.
  3. Save the triangle from the ears. It will make a great Christmas tree!!
  4. Sand any rough edges on the Proxxon Disc Sander TSG 250/E.
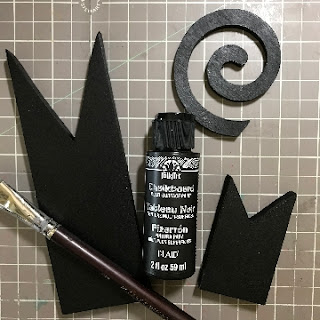
  5. Paint the pieces with black FolkArt Chalkboard Multi-Surface paint.
  6. When the paint is dry, distress the edges with 150 grit sandpaper.
  7. Glue the tail to the back of the cat. Glue googly eyes in place, and finish with a raffia ribbon bow.
A note about my cat's tail: It was a scrap the was already cut that I retrieved from a trash bind at a local makers' space. But it could easily be cut on a scroll saw, so I've included a pattern for the tail.
Carole