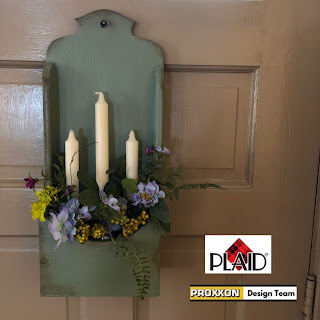
Hi everyone! With me being a lover of everything Colonial, I thought I'd build a Colonial Candle Box. This could hang on your wall or front door. I'm going to fill it with Spring flowers, but could easily change it out for other seasons.
Supplies And Tools Needed For Building This Project:
⦁ Proxxon Bench Drill Press TBM 115 with 1/2” drill bit
⦁ Proxxon OZI/E Delta Sander
⦁ 1/2" birch sande plywood
⦁ 3 wooden candle holder cups
⦁ Paper to draw pattern on
⦁ Scissors, pencil
⦁ Plaid Chalk Paint (Moss)
⦁ Plaid Waverly Inspirations Wax (clear & antique)
⦁ Paint Brush and Waxing Brush (Martha Stewart by Plaid)
⦁ Wood Glue
⦁ Wood Putty
⦁ 1’ brads and hammer
Instructions:
Start by drawing the pattern out on paper. I use freezer paper or poster board. Cut out your pattern with scissors & transfer it to your birch plywood. You will have 5 pieces all together.
You can now cut out your pieces using the Proxxon Band Saw.
Using the
Proxxon Drill Press and the 1/2’ drill bit, drill the hole at the top on the back piece.
After all the pieces are cut I like to lightly sand the edges using the
Proxxon OZI/E Delta Sander.
The next step is to assemble the candle box. Using wood glue, attach the two side pieces to the back. Next, I glued in the bottom. I secured the sides and bottom with 1” brads. Last, I glued on the front piece. I used a tiny amount of wood putty to fill in the nail holes.
I purchased 3 wooden candle holders and I screwed them on (inside the box).
Now to Paint! I chose
Plaid Waverly Inspirations Chalk Paint in the Moss color. Paint inside and out. I did 2 coats. Once completely dry I applied a coat of
Plaid Waverly Inspirations Wax in the clear color using the Martha Stewart vintage décor paint brush. I then chose to apply a tiny amount of
Plaid Waverly Inspirations wax in Antique color. Using it sparingly in certain areas to give it an aged look. Let dry overnight and buff.
This was a fun project and makes a great addition to my colonial décor. I tucked some eggs in for Easter and you can remove them later for a Spring display. Remember to log on to the
Proxxon and
Plaid websites to see all the great products they offer. See you next time!
Colleen