Showing posts with label kids. Show all posts

Sunday, December 3, 2017

How to Make a Windowsill Village Using Scrap Wood

I love involving my grand daughters in my projects, and this windowsill village was a great hit with them. Not only did they get to paint the buildings, but they had a toy village when the project is complete. Added bonus for me: it was made from scraps of wood left over from previous projects.
Windowsill Village

Supplies and Equipment:

  1. Gather your wood scraps and leftovers. 
  2. Decide on the size of your village buildings. There is no exact size for the village buildings. Here are the measurement for mine:
      • Pink: 4¼" x ¾" x ½"
      • Melon: 2" x ¾" x ¾"
      • Lavender: 4¾" x 5/8" x ¾"
      • Chartreuse: 3¼" x 1" x ¾"
      • Purple: 1½" x ¾" x ¾"
      • Blue: 3¾" x ¾" x 5/8" 
  3. Use the bandsaw to cut the building shapes.
  4. Sand each of the shapes on the disc sander. Use the angle gauge to accurately sand roof lines.
  5. Use FolkArt ColorShift acrylic paints to paint each building.


  6. Add windows and doors. I cut vinyl on my Zing electronic cutter, but you could add windows and doors with acrylic paints or permanent markers. You could also omit the windows and doors, and sand edges for a rustic look.
  7. Seal everything with a coat of Mod Podge.
  8. Enjoy your windowsill village. 

Sunday, June 4, 2017

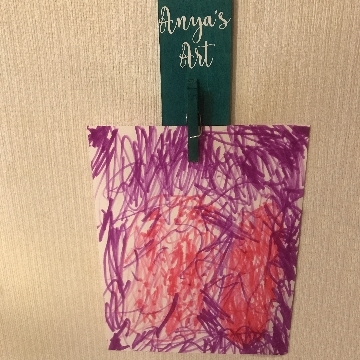
How to Make a Display Hanger for Kid's Art

School may be out for the summer, but kids have art to display all year. I like to give each of my granddaughters their own space for displaying their creations. These personalized display hangers are just the ticket.

Tools:

Supplies for one display hanger:

Let's get started!!

  1. From the scrap board, use the table saw to cut a 2½" x 5¾" piece for each display hanger that you're going to make.
  2. Sand any rough areas with the Delta sander, starting with 150 grit sandpaper and ending with 220 grit.
  3. Wipe the boards free of sawdust. Disassemble the clothes pins. 
  4. Paint both the boards and the clothes pins with FolkArt Ultra Dye. This comes in gorgeously vibrant colors, but still allows the wood grain to show. Finish with a coat of Ultra Dye Varnish.
  5. When the paint is dry, reassemble the clothes pins and attach to the base board with E6000 adhesive.
  6. If desired, you can personalize the art display hanger. I cut my titles from vinyl.
Now you're ready to display the work of the future Jackson Pollock's.