Showing posts with label lathe. Show all posts

Sunday, July 18, 2021

Easy to Make Burn Wires for the Proxxon Woodturning Lathe

 Burn wires are easy to make and use, and can add a great design detail to woodturning projects.


Supplies and equipment that you'll need:

Here's how to make a Burn Wire

  1. You'll need one length of wire 12" to 15" long, and two handles.
  2. Using the bandsaw, cut two scraps piece of wood each measuring about 3½" long x 2" high x 1" thick for the handles. I'm using a 5/8" dowel rod into two 3½" lengths.
  3. Measure and mark the center point. Use the bench drill press to drill a hole for the wire at the mark.

  4. Feed the wire through the hole.

  5. Twist the wire to secure it in place. Repeat with the second handle.
  6. Here's the finished burn wire.

You can use a variety of objects for handles. I've used large buttons, and secured the wire in place with jewelry crimps. Different thicknesses of wire will give different results. Any wire will work. Experiment with wires and handles. Be aware that with much use, the wires may break.

How to use the burn wire:

  1. Turn a swallow groove on your piece with the point of a skew tool or parting tool. The size of the groove should match the size of the burn wire.
  2. While your piece is mounted on the lathe and the lathe if turned off, pass one handle under the work. 

  3. Align the wire in the appropriate groove, and gently pull on the handles to snug the wire against the piece.
  4. Turn on the lathe, still maintaining tension on the burn wire. The friction from the wire against the wood "burns" a ring into the wood. Stop when it begins to smoke.
Be aware that while it is unlikely, it is possible that a hot ember from the burning process could ignite shavings. Take appropriate precautions. 

Carole

Thursday, February 18, 2021

Making A Little Brown Jug


Hi everyone!  I'm continuing to make small accessories for the tiny houses I'm building (which I'm selling as fast as I can make them).  I thought a little brown jug would look cute along side the little bench I built.  I'm going to show you how to make one using the Proxxon Micro Woodturning Lathe.  follow along to see how I did it.


Supplies and Equipment

  Proxxon Micro Woodturning Lathe

  Proxxon Five Piece Chisel Set

  Proxxon Micro Bandsaw

  Proxxon Bench Drill Press

  1 1/4" round wood dowel

  Plaid Paint

  Sand Paper


Attach the dowel rod to the lathe.


Turn the lathe on and cut in a few reference lines.


Using the chisels begin shaping the jug.  Try different chisels to get a feeling for what each one is capable of.


Once I was satisfied with the shape I removed it from the lathe.


Using the Proxxon Mini Bandsaw, I carefully cut it away from the rest of the dowel.


Using the Proxxon Bench Drill Press, drill press I drilled a small hole in the top.


I sanded lightly with a small piece of sandpaper and painted with Plaid paint.


This is my finished product.  I think they look cute sitting on the tiny bench.  Can't wait to display them with my next cabin.  Till next time .... Colleen


Sunday, September 6, 2020

How to Make a Cocktail Pick on the Woodturning Lathe

This is a great project to hone turning skills to carefully create the pointed tip of the cocktail pick. It takes sharp, sharp tools and patience to create the point without snapping the wood.

Supplies and Equipment

Instructions

  1. Use a center finder to mark the center of one end of the dowel. Use an awl to make a small divot at the center mark.
  2. Load the unmarked end of the dowel into the lathe chuck.
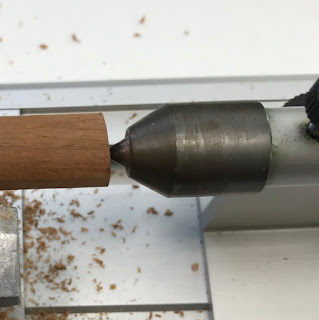
  3. Set tailstock so it is firmly seated in the center divot.
  4. Use a bowl gouge to begin shaping the pick. Shape the decorative handle before completing the shaping of the pick end. 
  5.  Continue shaping.
  6. Continue shaping until the dowel at the pick end just falls away.
  7. The pick is nearly finished with the handle end still attached to the dowel in the chuck. Now, sand the pick with progressively finer grits of sandpaper.
  8. The last step is parting off the completed cocktail pick at the handle. Alternatively, the entire piece—still attached to the dowel—can be removed from the lathe and cut away with a saw.
  9. Finish with a butcher block wood oil.
Carole

Sunday, December 2, 2018

How to Make a Wooden Ornament on a Lathe

Anytime is a good time to work with Proxxon tools, but the holidays offer exceptional opportunities to make special items. Today I'm sharing how I turned this wooden ornament on the Proxxon Micro Woodturning Lathe.

Supplies and Equipment

Instructions

  1. Using a center square mark the center of the dowel.
  2. Use an awl to pierce a pilot hole in the center of the dowel.
  3. Load the unmarked end of the dowel into the chuck on the headstock. 
  4. Mount the tail stock firmly into the divot that you pierced in Step 2.
  5. Begin shaping the piece using a bowl gouge.
  6. While the piece is still intact, but not quit finished, begin the sanding process. While the lathe is turning use progressively finer grits of sandpaper is smooth the piece. I started with 100 grit and moved to 150, 220, 320, and finally, 400.
  7. Carefully continue to shape the narrow end of the piece alternating with the bowl gouge and sandpaper until the tail piece falls away.
  8. Polish with wax while the remaining piece is still in the lathe.
  9. Remove the piece from the lathe, and cut away the end using the bandsaw.
  10. Lightly sand the cut edge on the disc sander, and polish the end with wax.
  11. Attach a small eye screw to the wide end.
Hang your ornament and enjoy!!

Carole

Sunday, July 1, 2018

How to Make a Wooden Lamp Pull on a Lathe

I have a pull cord shop light over my work area, and decided to dress it up will a wooden lamp pull made on the Proxxon Woodturning Lathe.

Supplies and Equipment for Making the Lamp Pull

Instructions for Making the Lamp Pull

  1. Mark the center of the dowel rod using a centering square. Make a divot in the rod at the center point.
  2. Mount the rod in the lathe. Snug the tailstock making sure that the point of the tailstock rests in the center divot.
  3. Use wood turning chisels and gouges to carve a simple beaded pattern on a 1½" portion of the dowel rod. Finish the lathe work on the lamp pull with the exception of parting off.
  4. Release the tailstock and replace it with a drill chuck specially designed for the lathe. Insert a ¼" drill bit in the drill chuck. Center the bit in the divot and drill out the center of the lamp pull.
  5. Release the drill chuck and replace it with the tailstock. Using increasingly fine sandpapers, sand the lamp pull until it is smooth. Polish with a paste wax.
  6. Part off the lamp pull. Alternatively, you can remove the rod from the lathe and use a band saw to free the lamp pull.
  7. Thread the lamp cord through the pull, and secure with a knot in the cord.

Carole

Monday, August 1, 2016

Hair Stick Turned on Proxxon Lathe

I love turning wood using my Proxxon wood turning lathe!! My latest project are these hair sticks.

I started with a 1/4" oak dowel for each hair stick.

I mounted it on the lathe, and used the roughing gouge, skew tool, and spindle gouge to add the decorative beading on the hair sticks.

This is the first hair stick as it came off the lathe, along with a close up of the beading detail.


The next step was coloring this hair stick with Plaid Folk Art Ultra Dye. Wow!! What a vivid color it gave the wood!!


The second hair stick I polished with wax. And, you can see by my pic below that I'm not a candidate for a hair stick!! So, these have found a new home with someone who has the gorgeous hair to show them off.


Carole