In addition to making projects with my Proxxon tools, I'm also a bobbin lace maker. I specialize in Withof lace, and many of the pieces that I make are small. Now I can use my Proxxon tools to make a custom picture frame that is perfect for my lace pieces. This 4½" square frame has a 2¾" square opening.
Equipment and Supplies to Make a Custom Picture Frame
Decide the dimensions of your frame. In this case I wanted a 4½" square frame.
Add the length of the four sides together: 4½+4½+4½+4½ = 18
Multiply the width of the moulding my 8. My moulding is 1" wide. 8x1 = 8
Add this to the total of the four sides: 18 + 8 = 26
Add an inch or two to allow breathing room in the recess so the picture doesn't fit too tightly, and to allow for the thickness of the blade as it cuts. 26 + 2 = 28"
Instructions for Making a Custom Picture Frame
Set the angle on the miter saw to 45°.
Firmly clamp the frame moulding in the miter saw, and make the cut.
Set the saw stop for the desired length.
Move the miter saw table to the opposite 45°, and make the second cut.
Repeat for the other three sides of the frame.
If necessary, sand your frame pieces, then finish them. I polished mine with Johnson's Paste Wax. Here you can see the difference between the top three unpolished sides and the bottom, polished one.
Using wood glue, glue each of the corners together. Since I don't have framing clamps, I held the four sides together while the glue dried with painter's tape. All the sides were laid in a straight line, with a length of painter's tape along the outer edge. I painted glue on each cut surface, then "closed" the frame.
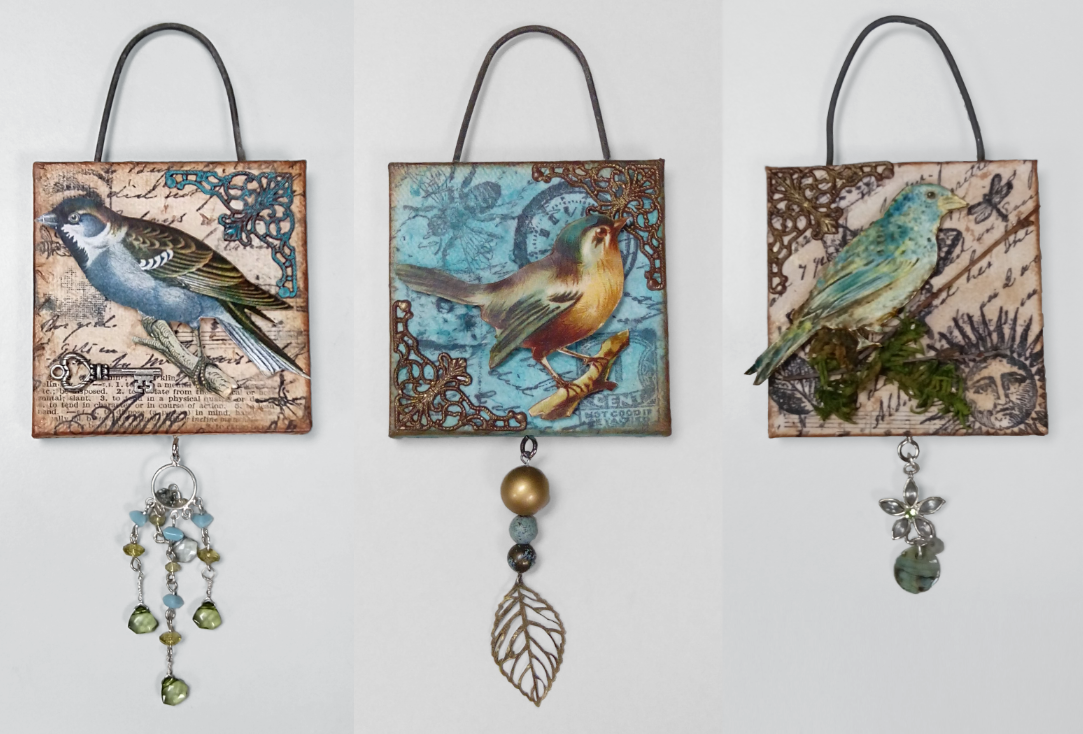
These little canvases work great individually in a small space - like a cubicle or camper. Make a group of them, and a "flock" makes a great statement on any wall! I used birds, but you could easily use any images you like, for example butterflies, fish, sea horses, cats and dogs.
About 6.5" of non-ferrous wire that looks "shabby chic" - I used 3/32" diameter wire I got at a yard sale - I tested it with a small magnet to confirm it was non-ferrous
Toner-based printout of a bird that will fit on the canvas. An inkjet printout isn't ideal because the ink could run if it gets wet.(from the adhesive)
Small Drill Bit (size depends on the size of the wire you're cutting - I used 3/32")
Small needle nose pliers
Steps To Follow
1) Carefully cut out (i.e., fussy cut) the bird you'll use on top of your canvas and set it aside.
2) Cut a length of wire about 6.5" long using the Proxxon Chop and Miter Saw KGS 80 fitted with the Cut-Off Wheel. The cut-off wheel is perfect for cutting non-ferrous metals, like aluminum, copper and brass. A non-ferrous metal does not contain iron, is not magnetic and is resistant to corrosion.
3) Measure the diameter of the wire. I used a metal drill bit gauge. It's one of my favorite tools!
4) Select the appropriate drill bit based on your measurement and make two holes in the top of the canvas. This is where the wire will go to make a hanger for your finished piece. I drilled the two holes while the canvas was still wrapped in plastic to protect the canvas from any tool marks (like from the vise).
5) Stamp images on the white tissue using the archival ink. Be sure you put something under the tissue while you stamp, just in case the ink goes through the thin tissue. You don't want to stain your work surface! Let these dry completely.
6) Collage the stamped tissue on to the canvas using the acrylic medium. Be sure you're collaging so the holes are on the top of your piece! Check out this YouTube video to see how you collage tissue thin materials (like napkins or tissue paper) using Perfect Paper Adhesive (PPA) from USArtQuest. The process is the same for this canvas as it is for the wood frame used in the video. Allow the collage to dry well. You can speed up the process with a heat gun.
7) Glaze the collage using the acrylic glaze. Let it dry completely. You can speed up the process with a heat gun. My favorite is the 360 watt gun made by Milwaukee.
8) Use a thumb-tack to pierce the canvas at the bottom of the frame. Insert the screw eye. You might need to use the pliers to twist it in, but you shouldn't need to drill a pilot hole. Attach charms, trinkets, beads, etc. to the screw eye.
9) Bend the wire in half around a cylinder (like the barrel of a flashlight) to get a smooth curve. Then insert the wire in to the two holes at the top of the canvas. Use the pliers to bend over a small bit of the wire in the back so the wire can't pull out of the top.
10) Attach the bird to the canvas with a pop-dot so it's raised above the canvas
Proxxon bench tools make it easy to create several of these at once so you can have a flock of birds on your wall!
I love Mid century modern architecture. Flat roofs are one my favorite design elements. The mix of experimental materials like steel and plywood also produces fantastic results.
1. The first step is to drill holes through the roof and in to the house for the supporting dowels. The challenge is that the roof is raised up off the birdhouse and sits at an angle. I knew I wanted it to be about 1" off the front of the house and about 1/2" off the back of the house, but didn't want to think about the math to calculate the angle. Then it hit me - just make a "tool" out of SmoothFoam to hold the roof in place while the holes are drilled!
Rest a piece of SmoothFoam on the top of the house. Mark the front and the back edges. Then measure up 1" from the front and 1" from the back. Draw a line connecting those dots. Now you have the exact angle you need, without doing any trigonometry! By the way, it turns out to be about 5 degrees.
3. Use glue dots to temporarily attach the SmoothFoam to the base of the house and the roof to the SmoothFoam.
4. Use a pencil and mark where the holes for the 4 support dowels need to be drilled. Use the rotary tool and a small bit to drill through the marks, past the SmoothFoam and in to the base of the house.
5. Now you can remove the roof and SmoothFoam from the base of the house. Be careful to only remove those two pieces as a unit. Keep them together. Now use the Proxxon Bench Drill Press TBM 115 with the chuck and 1/4" bit to drill the holes in the base. You only need to go in to the base about 1/4-1/2". Drill the holes in to the roof as well. Keep the roof sitting on the SmoothFoam so you're sure you're drilling at the correct angle.
6. Put the SmoothFoam and Roof back on to the house.
7. Cut 4 lengths of 1/4" dowel using the Proxxon Chop and Miter Saw KGS 80. I used (2) pieces that were about 2" long and (2) pieces that were about 3" long.
8. Put some wood glue in to the holes in the roof and insert the 4 dowels all the way in to the base. We want to glue the dowels to the roof (but NOT to the base). Put a weight on top to hold the roof down while the glue sets. The dowels will be sticking up above the roof. Let the glue set completely.
9. Use a rotary tool with a cutting wheel to trim the dowels as close to the roof as possible.
10. Take the roof off of the house and remove the SmoothFoam jig. Save it so you can make more houses in the future! Sand the dowels smooth against the roof using the Proxxon Disc Sander TG 125/E.
11. Spray paint the roof with . Be sure to do this in a well ventilated area. If you're inside, it helps to spray this piece inside a cardboard box to catch any over-spray. Now you see why we didn't glue the roof to the house! Let dry completely.
12. Seal and protect the outside of the house with linseed oil. Rub it in using a cotton cloth (rag). Don't apply it to the inside of the house. Let dry completely.
13. Put some wood glue inside the 4 holes in the house and then put the roof in place. Weight the top to hold it down until the glue sets. Remember, you access the house through the flip-up side for cleaning, so this roof can be put permanently in place.
Your Mid Century Modern Bird House (improved design) is now ready for renters! You can attach it to a post or a wall using pipe fittings you would find at a hardware store, like this flange.
Mid century modern architecture featured simplicity and an integration with nature. Flat planes, including a flat roof, were key elements in this style of architecture. With World War II came experimental technologies and materials like steel and plywood, which were leveraged for building after the war. We can incorporate these design elements to create a mid century modern birdhouse that's updated with what we know about our feathered friends.
Design Improvements
This project was inspired by the Modern Birdhouse created by Chris Gardner back in April 2011 for CURBLY. I started with his design and then added a little "bird know-how" to make sure it was appropriate for today's flying home hunters. I think these four changes make the house even more functional while keeping it's beautiful design.
The original design uses smooth cedar. To make it easier for the young to leave the house when they are ready to fledge, I used cedar that's smooth (finished) on one side and rough (unfinished) on the other. Place the rough side of the wood to the inside of the house.
The original design uses 1/8" Luan plywood for the floor (base). To make the base more substantial, so it's more stable on a mounting bracket, I used the same cedar as the sides.
The original design has as solid base. To ensure there is proper drainage to keep the nest and its contents dry, I added 1/4" drain holes in each corner of the floor.
In the original design, the roof is not permanently attached. You lift off the roof to gain access inside the house to clean it. I was concerned the roof could be lifted off by some of our high-wind rain storms or be pried off by a predator's little paws, so this design attaches the roof permanently and provides a hinged side that can be lifted up to clean the inside of the house.
Proxxon tools make it easy to work on a small project like this. The scale of the tools is perfect for a project this size.
In this post we'll build the floor and walls. In the follow-up post, we'll create the roof, assemble it and finish the house with linseed oil and paint.
What You'll Need
Rough Cedar 1x6, cut to:
(2) 5 1/2" lengths (front and back)
(2) 4" lengths (sides)
(1) 4 x 3-11/16" (bottom)
Luan plywood, cut to:
(1) 8 1/2 x 8 1/2"
1/4" hardwood dowel (oak or maple is preferable to poplar)
Use the Proxxon Scroll Saw DSH/E to cut out the circle. Fit the blade through the pilot hole and then cut around the pencil mark. Sand the finished hole.
Drill 1/4" drainage holes in each corner of the floor (base), about 1" from each edge.
Glue 4 of the five pieces together (front, back, 1 side, floor). The easiest way to do this is to apply glue to all the edges that touch except for any edge that touches one side. Then put all the pieces together and hold them in place with the clamps until the glue is set. You should be able to completely remove the side after the glue has set. You're only putting the side in place to help hold it all together while the glue sets on all the other pieces. Be sure the rough sides face inside the house.
Drill a 1/4" hole from the front in to the side that hasn't been glued, about 1/2" down from the top. Go through the front and about 1/2" in to the side. Do this on each side of the side. Each of these two holes will be fitted with a dowel that will make a hinge, letting you lift the side up to clean the house.
Take the side out and use the Proxxon Disc Sander TG 125/E to remove a bit of the width. You want the side to be able to lift up and down easily. Just sand a bit, try it, and repeat until you feel it opens and closes easily.
Put the side in place and insert the dowel in to one side. Mark the desired length and cut it with the Proxxon Chop and Miter Saw KGS 80 about 1/16" of an inch shorter than your mark. Repeat the process on the other side.
Insert the dowels in to the holes and side and push them in until they are flush with the walls. The side should easily swing opened and closed.
You should have a solid box now, that makes the sides and floor of our mid century modern birdhouse. In my next post, Mid Century Modern Bird House (Part 2 - The Roof and Finishing Touches), we'll create the roof, assemble it and finish the house with linseed oil and paint.