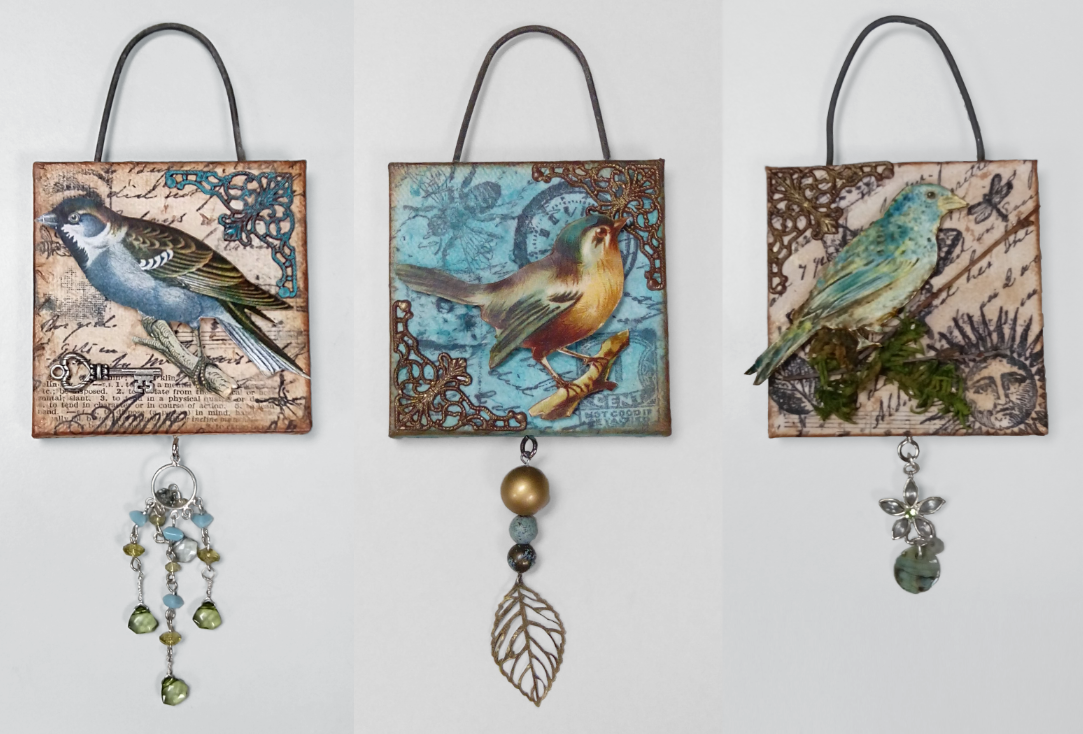
These little canvases work great individually in a small space - like a cubicle or camper. Make a group of them, and a "flock" makes a great statement on any wall! I used birds, but you could easily use any images you like, for example butterflies, fish, sea horses, cats and dogs.
What You'll Need
- 3" x 3" Canvas
- About 6.5" of non-ferrous wire that looks "shabby chic" - I used 3/32" diameter wire I got at a yard sale - I tested it with a small magnet to confirm it was non-ferrous
- Small screw eye - about 1/8" in diameter
- Bits and bobbles of old jewelry, charms, etc.
- White tissue paper
- Stamps
- Black archival ink (NOT dye ink)
- Toner-based printout of a bird that will fit on the canvas. An inkjet printout isn't ideal because the ink could run if it gets wet.(from the adhesive)
- Acrylic glaze, like Perfect Glaze from USArtQuest
- Acrylic medium, like Perfect Paper Adhesive from USArtQuest
- Pop dots
- Thumbtack
- Detail scissors or a craft knife (and mat to cut on)
- Drill bit guage
- Brushes, like these from USArtQuest
- Proxxon Chop and Miter Saw KGS 80
- Proxxon Synthetic Resin Bonded Cut-Off Wheel for the Chop and Miter Saw
- Proxxon Bench Drill Press TBM 115
- Small Drill Bit (size depends on the size of the wire you're cutting - I used 3/32")
- Small needle nose pliers
Steps To Follow
1) Carefully cut out (i.e., fussy cut) the bird you'll use on top of your canvas and set it aside.

2) Cut a length of wire about 6.5" long using the Proxxon Chop and Miter Saw KGS 80 fitted with the Cut-Off Wheel. The cut-off wheel is perfect for cutting non-ferrous metals, like aluminum, copper and brass. A non-ferrous metal does not contain iron, is not magnetic and is resistant to corrosion.

3) Measure the diameter of the wire. I used a metal drill bit gauge. It's one of my favorite tools!


4) Select the appropriate drill bit based on your measurement and make two holes in the top of the canvas. This is where the wire will go to make a hanger for your finished piece. I drilled the two holes while the canvas was still wrapped in plastic to protect the canvas from any tool marks (like from the vise).

5) Stamp images on the white tissue using the archival ink. Be sure you put something under the tissue while you stamp, just in case the ink goes through the thin tissue. You don't want to stain your work surface! Let these dry completely.
6) Collage the stamped tissue on to the canvas using the acrylic medium. Be sure you're collaging so the holes are on the top of your piece! Check out this YouTube video to see how you collage tissue thin materials (like napkins or tissue paper) using Perfect Paper Adhesive (PPA) from USArtQuest. The process is the same for this canvas as it is for the wood frame used in the video. Allow the collage to dry well. You can speed up the process with a heat gun.

7) Glaze the collage using the acrylic glaze. Let it dry completely. You can speed up the process with a heat gun. My favorite is the 360 watt gun made by Milwaukee.

8) Use a thumb-tack to pierce the canvas at the bottom of the frame. Insert the screw eye. You might need to use the pliers to twist it in, but you shouldn't need to drill a pilot hole. Attach charms, trinkets, beads, etc. to the screw eye.


9) Bend the wire in half around a cylinder (like the barrel of a flashlight) to get a smooth curve. Then insert the wire in to the two holes at the top of the canvas. Use the pliers to bend over a small bit of the wire in the back so the wire can't pull out of the top.
10) Attach the bird to the canvas with a pop-dot so it's raised above the canvas

Proxxon bench tools make it easy to create several of these at once so you can have a flock of birds on your wall!
Happy Crafting!
Joe

2) Cut a length of wire about 6.5" long using the Proxxon Chop and Miter Saw KGS 80 fitted with the Cut-Off Wheel. The cut-off wheel is perfect for cutting non-ferrous metals, like aluminum, copper and brass. A non-ferrous metal does not contain iron, is not magnetic and is resistant to corrosion.

3) Measure the diameter of the wire. I used a metal drill bit gauge. It's one of my favorite tools!

4) Select the appropriate drill bit based on your measurement and make two holes in the top of the canvas. This is where the wire will go to make a hanger for your finished piece. I drilled the two holes while the canvas was still wrapped in plastic to protect the canvas from any tool marks (like from the vise).

5) Stamp images on the white tissue using the archival ink. Be sure you put something under the tissue while you stamp, just in case the ink goes through the thin tissue. You don't want to stain your work surface! Let these dry completely.
6) Collage the stamped tissue on to the canvas using the acrylic medium. Be sure you're collaging so the holes are on the top of your piece! Check out this YouTube video to see how you collage tissue thin materials (like napkins or tissue paper) using Perfect Paper Adhesive (PPA) from USArtQuest. The process is the same for this canvas as it is for the wood frame used in the video. Allow the collage to dry well. You can speed up the process with a heat gun.
7) Glaze the collage using the acrylic glaze. Let it dry completely. You can speed up the process with a heat gun. My favorite is the 360 watt gun made by Milwaukee.

8) Use a thumb-tack to pierce the canvas at the bottom of the frame. Insert the screw eye. You might need to use the pliers to twist it in, but you shouldn't need to drill a pilot hole. Attach charms, trinkets, beads, etc. to the screw eye.


9) Bend the wire in half around a cylinder (like the barrel of a flashlight) to get a smooth curve. Then insert the wire in to the two holes at the top of the canvas. Use the pliers to bend over a small bit of the wire in the back so the wire can't pull out of the top.
10) Attach the bird to the canvas with a pop-dot so it's raised above the canvas
Proxxon bench tools make it easy to create several of these at once so you can have a flock of birds on your wall!
Happy Crafting!
Joe

No comments:
Post a Comment