Mid century modern architecture featured simplicity and an integration with nature. Flat planes, including a flat roof, were key elements in this style of architecture. With World War II came experimental technologies and materials like steel and plywood, which were leveraged for building after the war. We can incorporate these design elements to create a mid century modern birdhouse that's updated with what we know about our feathered friends.
Design Improvements
This project was inspired by the Modern Birdhouse created by Chris Gardner back in April 2011 for CURBLY. I started with his design and then added a little "bird know-how" to make sure it was appropriate for today's flying home hunters. I think these four changes make the house even more functional while keeping it's beautiful design.
In this post we'll build the floor and walls. In the follow-up post, we'll create the roof, assemble it and finish the house with linseed oil and paint.
- The original design uses smooth cedar. To make it easier for the young to leave the house when they are ready to fledge, I used cedar that's smooth (finished) on one side and rough (unfinished) on the other. Place the rough side of the wood to the inside of the house.
- The original design uses 1/8" Luan plywood for the floor (base). To make the base more substantial, so it's more stable on a mounting bracket, I used the same cedar as the sides.
- The original design has as solid base. To ensure there is proper drainage to keep the nest and its contents dry, I added 1/4" drain holes in each corner of the floor.
- In the original design, the roof is not permanently attached. You lift off the roof to gain access inside the house to clean it. I was concerned the roof could be lifted off by some of our high-wind rain storms or be pried off by a predator's little paws, so this design attaches the roof permanently and provides a hinged side that can be lifted up to clean the inside of the house.
In this post we'll build the floor and walls. In the follow-up post, we'll create the roof, assemble it and finish the house with linseed oil and paint.
What You'll Need
- Rough Cedar 1x6, cut to:
- (2) 5 1/2" lengths (front and back)
- (2) 4" lengths (sides)
- (1) 4 x 3-11/16" (bottom)
- Luan plywood, cut to:
- (1) 8 1/2 x 8 1/2"
- 1/4" hardwood dowel (oak or maple is preferable to poplar)
- Compass
- Ruler
- Pencil
- Wood glue
- Clamps
- Sand Paper
- Proxxon Table Saw FET
- Proxxon Scroll Saw DSH/E
- Proxxon Bench Drill Press TBM 115
- Proxxon Original German Chuck for the TBM115
- 1/4" Drill Bit
- Proxxon Disc Sander TG 125/E
- Proxxon Chop and Miter Saw KGS 80
Steps To Follow
- Use the Proxxon Table Saw FET to cut the rough cedar to the specified sizes.
- Create a 1-3/8" hole in the front of the house.
- Mark the center of the hole with the pencil. The center is about 1-13/16" from the top, and 2-3/4" from each side.
- Use the compass and pencil to draw a 1-3/8" circle around the center mark.
- Drill a pilot hole using the 1/4" bit and Proxxon Bench Drill Press TBM 115 on the center mark.
- Use the Proxxon Scroll Saw DSH/E to cut out the circle. Fit the blade through the pilot hole and then cut around the pencil mark. Sand the finished hole.
- Drill 1/4" drainage holes in each corner of the floor (base), about 1" from each edge.
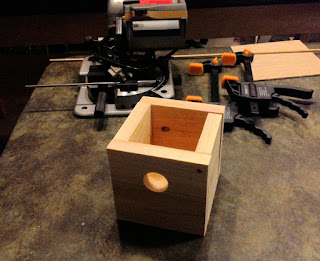
- Glue 4 of the five pieces together (front, back, 1 side, floor). The easiest way to do this is to apply glue to all the edges that touch except for any edge that touches one side. Then put all the pieces together and hold them in place with the clamps until the glue is set. You should be able to completely remove the side after the glue has set. You're only putting the side in place to help hold it all together while the glue sets on all the other pieces. Be sure the rough sides face inside the house.
- Drill a 1/4" hole from the front in to the side that hasn't been glued, about 1/2" down from the top. Go through the front and about 1/2" in to the side. Do this on each side of the side. Each of these two holes will be fitted with a dowel that will make a hinge, letting you lift the side up to clean the house.
- Take the side out and use the Proxxon Disc Sander TG 125/E to remove a bit of the width. You want the side to be able to lift up and down easily. Just sand a bit, try it, and repeat until you feel it opens and closes easily.
- Put the side in place and insert the dowel in to one side. Mark the desired length and cut it with the Proxxon Chop and Miter Saw KGS 80 about 1/16" of an inch shorter than your mark. Repeat the process on the other side.
- Insert the dowels in to the holes and side and push them in until they are flush with the walls. The side should easily swing opened and closed.
You should have a solid box now, that makes the sides and floor of our mid century modern birdhouse. In my next post, Mid Century Modern Bird House (Part 2 - The Roof and Finishing Touches), we'll create the roof, assemble it and finish the house with linseed oil and paint.


2 comments:
Nice work there Joe! I love it!
Love it Joe. Can't wait for part 2.
Post a Comment