Showing posts with label organizers. Show all posts

Thursday, October 20, 2022

How to make a little shelf

 Hi out there.   Still being practical, I have a easy peasy project today.   Little organization projects can help you keep your wrrkshop neat.   Today let's make a little shelf because I need somewhere to put my glue so I can find it.  I wull be using Proxxon tools.


This can all be made out of one piece of 1 x 6" board.  I mainly am going to use my Proxxon mini table saw and my OZI/E delta sander and new cordless Proxxon mini belt sander.

First i want to cut my (U chose a 16" piece of fence board) on the Proxxon mini table saw.  Using the fence, I measure 4 inches from the fence to the saw blade and lock the fence.


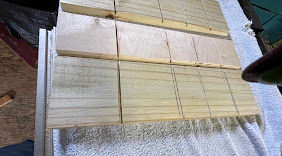
This wood is too thin to simply glue them together, so I am going to make a groove to fit the2 pieces together.   This is easy to do again on the Proxxon mini table saw  I make my first cut 1/2" from the edge of the larger piece.  Remember to set the blade height at 2/3 the height of the board, so in this case at 1/4"


After the first cut I nudge the fence just a tiny bit outward and make another cut.  Look the groove has begun.  I do these 3 or 4 more times until I have the width of the groove the same size as the edge of the other piece of wood.  Now this wood can slip into the groove and this will hold it better than a "butt joint"


Convienetly, the Proxxon cordless mini belt sander is 1/2" and I can use it to smooth and sand my new groove.


next add glue to the groove and place the other piece of wood into the groove.  Make sure it sits at 90 degrees while the glue sets.

I used the Proxxon cordless rotary tool to make pilot holed from the back into the wood after the glue dried to reinforce the bond.  

A couple more pilot holes where i will screw it into the wall.    Now to find a place.


Here is a good place, on the back of the door.   Now I will always find my glue.  

Thanks Proxxon tool company.   and thank you all for visiting.        Carol

Thursday, October 6, 2022

How to make a spice drawer organizer

 Hi everyone.  I have another organizational project for you today.   And I will tell you why I chose this one.   I am very tired of rooting through the spice jars that are up in the cabinet all crammed in together.  I am tired of them all falling out when I reach for one in the back, and..... well, you get my drift.   Let's fix this.   Today I am going to show you how easy it is to turn a kitchen drawer into a well-organized spice rack of sorts.  Check it out.  👀 This drawer holds 40 spice jars, and I can see the labels too.


Equipment and supplies

Proxxon mini table saw

Proxxonr OZI/E delta sander

Ruler or tape measure

pencil

wood glue  (fast setting is best here)

1/4" plywood

wood clamps

Ok, to get started, I first needed to know the dimensions of my drawer, using tape measure or ruler measure your drawer.  Height, inside width, and length.    Remember this drawer will need to open and shut.


I needed 4 dividers for my size drawer considering the sizes of the different spices.  I figured 9-10 spices per level, so this thing is going to hold up to quit a few spice jars.  

I cut my pieces to size using the Proxxon mini table saw.  I need   (4)  19' x 3" pieces for the "backrests", and (4)  19" x  2' for the risers.  This will work well for a drawer that is at least 4" deep.


Next, they need to be sanded so that there is no rough or splintery edges.   The Proxxon OZI/E delta sander makes this a breeze.  


Next, I used 10-minute glue to glue up the pieces.  I simply glued one of the bigger pieces to the edge of one of the smaller pieces then clamped it while it set.  The angle was approx. 90 degrees.

I checked he fit in the drawer, Looks good    Iwas going to glue them together but really no need. 


Let's see how the spices fit.  

That's a wrap.   I think it will certainly help with the spices even though the larger bottles and cans still need to be stored somewhere.  Amazing how they multiply.    

Thanks for visiting.  Hope you can give it a try.  It was super simple   I have some more ideas for the kitchen and elsewhere.  Someday... I just might be able to find whatever it is I am looking for.  😝

Thanks Proxxon,  love your tools.


Friday, June 17, 2022

How to make a Proxxon tool caddy to keep things organized

 Hi again.  It's time I got my act together in the shop.   I have a lot of tools and when I get to working, they end up all over, which I don't mind, but...in between projects I like to get things back in order so that in my next flash of creativity I know where to find them.   Also, if you are like me, 4 or 5 corded tools can get so tangled up together it sort of slows projects way down.   Anyhow, today I am going to fix all that, so that my tools will be at my ready and not cluttering up all my free space at the workbench.

Let's make a Proxxon tool caddy for all our hand held Proxxon tools.   


Supplies needed

1/2" pine or plywood   Need a width of about 6"  I used a dog-erred fence board for part of this hat had been planed very smooth.  (very inexpensive wood that looks great if you spend a little time cleaning it up

1/16" or 1/4' thin plywood or paneling pieces.   Likely you have appropriate scraps for this part.

wood glue,

Proxxon mini table saw

Proxxon mini drill press with drill bits

Proxxon mini bandsaw

Proxxon ozi/e delta sander 

small screws and screwdriver

Proxxon rotary tool with rasp cutting bit.

masking tape.


Let's get started.    Cutting the wood is the trickiest part.  Be careful and, measure and cut accurately and it will go together like a puzzle in the end.    see the cutting dimensions below


I began by cutting some pieces using my proxxon mini table saw  Remember we need the 30 degrees on the long edges of the bottom and sides so I set the gauge on my Proxxon mini table saw to 30.   This way I can cut that angle on both my sides at the same time.    I want the  sides to lean out a little bit.


Next I lined up my sides and bottom and made my lines where I will cut my small slots for the inserts.  The best way to make sure they will fit well is to set the fence for the first cut and run them all through.  Then change the fence for the next cut and run them all through again.


Remove the blade cutter and splitter from the Proxxon table  saw and set the blade height to about 1/8 to 1/4"   Then set the fence and run the boards through making a slot that fits the inserts.


I cut the slot for my inserts using the Proxxon mini bandsaw.   I stacked them up and cut them all at once.

I remembered the cord problem and decided to cut some notches  where I can pass the cord through, then I cut a couple slots out where I plan to put some velcro straps to hold the cords on the outside of this box.   I used the Proxxon mini drill press to start my holes then cut them using the proxxon rotary tool with the rasp cutter to join the holes.


I applied glue to the angled cuts on the sides and bottom, then inserted a couple of my inserts to maintain the shape and taped in using masking tape to hold it until it was dry,  I will reinforce things later with some small screws.  


I finished by gluing in the rest of my inserts and securing the sides with some small screws.


This is going to sit in the center of my workbench.  My tools have a place to be and wont be all over the workbench now.   I will add a handle later but I was anxious for you to see this project.  Looks like I have room for a couple more hand tools.  hint hint.   

I had a good time making this.  I hope you enjoyed the journey.  Till next time have fun and be creative.  Carol     Thanks Proxxon.   I love your tools!


Friday, July 5, 2019

How to make a simple ruler box

Hi everyone!
Here it is early July and guess what?   I went to the store today and they were selling "back to school supplies" already!   Well, seems a little early but I am one for a bargain, so when I saw they were selling rulers for 25 cents I figured I could probably use them for something, so I got me "some".  By "some" I mean 12, but I only used 10 for this project. 😜     Today I am going to show you how to make a little hold it all box for whatever you got that you need to keep together.

 Let's start with what you need.

Supplies and equipment:

10 cheap little rulers (or 3-4 yardsticks)
A thin piece of board  ( I used hardboard) , measuring 12" x 6"
wood glue, 
small wood clamps


The first thing I did was to cut my hardboard to size.   I used the Proxxon mini table saw to do this.  I love the smaller size saw when working with smaller material.  Note I am using the fence for this rip cut.  This keeps my cuts square.


I am going to leave the long sides of my box at 12" So they are all ready to go. 
 I cut my short sides to 6"   No measuring needed, just cut at the 6" mark on the ruler 👀 I use the miter gauge here for my cross cut.


At this point I decided one ruler height was not enough so I glued 2 together to make them taller.  I did that for all my pieces.   I used some wood glue and clamps, and added a little weight to keep it flat and let them dry well.


Once everything was dry I used glue and clamps to build the box.  I glued the sides to each other and to the hardboard piece I am using as my bottom.   It may be a little shaky at this point but we are going to add some dividers and this will strengthen the whole thing.  I used clamps to hold everything securely while the glue dries.


The dividers are more rulers cut to 6" lengths, and glued together for height .  Then these are glued into the box.   You can space them anyway you like, or as you need, for whatever it is you are going to put in there.  Add some cross pieces if you need more little cubbies.


Now that the box is done and it is quite sturdy, fill it with whatever you like.   

Cost to build less than $3.00  Time to build about 1 hr, minus drying time.  Usefulness?  you decide.   But as always, I had fun building it and sharing it with you.  Thanks for visiting.!!!   Carol