Showing posts with label recycle. Show all posts

Sunday, April 21, 2024

How to Recycle Scrap Lumber and Make the Perfect Rustic Farmhouse Shelf

This rustic farmhouse shelf unit is a great project for using lumber scraps. The size can also be easily adapted to the scraps that you have available.


Supplies and Equipment:

  • Proxxon Chop and Miter Saw KSG 80
  • Proxxon Disc Sander TSG 250/E
  • FolkArt Monument Gray Milk Paint
  • Liquid wood adhesive
  • Clamps
  • Hanging hardware
  • Scrap lumber
  • Instruction for making a rustic farmhouse shelf:

    1. Gather lumber scraps. I used slats from leftover lattice.

    2. Cut the blanks for the shelf using the chop saw or Proxxon Table Saw FET. I'll share my measurements, but they are easily adaptable to your needs. The lattice slats were 1½" wide and 3/8" thick. I cut two 7½" lengths for the bottom of the box; one 7½" length for the back brace; two 3" lengths for the sides; two 8¼" lengths for the front and back of the bottom box; and, two 11½" and two 8½" lengths for the back.

    3. Set the longitudinal fence stop to ensure the blanks are identical lengths. 

    4. I did a minimal amount of sanding since I wanted a rustic look, but used the disc sander to smooth out any gross splinters.

    5. With the blanks all cut it's assembly time—glue, clamp, dry, repeat. Start by gluing and clamping the two bottom pieces. 

    6. Next, glue the 3" side pieces in place.

    7. Attach the hanging hardware to the back brace piece.

    8. Assemble and glue the six pieces of the back unit. You can get creative with the four vertical slats for the back. Make them equal or uneven lengths. Square the tops or cut them at angles. This is a rustic piece—they can be a little wonky.

    9. Next, glue the front and back pieces to the partially constructed box.

    10. Finished the shelf as desired, or leave it unfinished. I used a one-to-one dilute solution of milk paint and water.

    11. Display and enjoy your rustic farmhouse shelf.

      Carole

      Sunday, January 2, 2022

      How to Make a Plastic Bottle Cutter to Make Ropes and Ribbons

       I've been fascinated with plastic bottle cutters since I first saw them online. Proxxon tools made it easy to make my own bottle cutter.

      Here are the supplies and equipment that you'll need:

      Let's make the plastic bottle cutter:

      1. Measure and mark the three cutting slits and the blade slot following the diagram.
      2. Cut the lengthwise slits on the bandsaw.

      3. Measure the height of the replacement cutter blade that you are using. This measurement will be the depth of the blade slot. Mark that depth on the side of the blank. Cut the blade slot on the bandsaw.

      4. Cut two pieces of metal ¾" x ¼" for the clamps that hold the blade in place. Mark two screw holes on each.

      5. Use the micro-press to punch the screw holes.

      6. Position the clamps over the blade slot, and mark the holes for drilling.

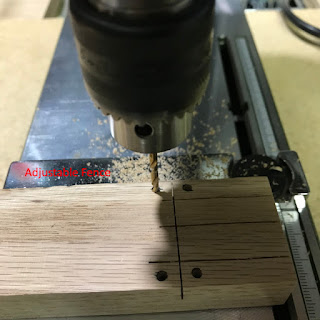
      7. Drill the screw holes using the bench drill press. Use the adjustable fence to ensure accurate placement.

      8. Use the disc sander to sand the surfaces, removing any markings.
      9. Drop the blade, sharp edge down, into the blade slot.

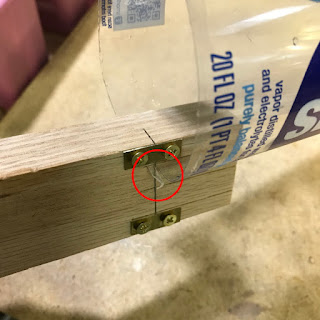
      10. Screw the blade clamps in place.

      11. Cut the bottom from a plastic bottle.

      12. Slide the bottle into the appropriate slot, depending upon the width of the ribbon you want.

      13. Turn the bottle against the blade until you see the ribbon tab emerge.

      14. Then, pull on the tab to cut the ribbon. Continue pulling on the plastic ribbon until you reach the neck of the bottle. Snip the ribbon from the neck of the bottle. Ta-da!! You've just recycled a plastic bottle into several feet of usage ribbon!!


      Carole

      Sunday, April 16, 2017

      Using the Thermocut to Make a Self-watering Planter from a Water Bottle

      With Easter and Mother's Day right around the corner, this self-watering planter makes a great gift. And, since it recycles a plastic water bottle, it helps keep trash out of landfills—a gift to our environment.

      Supplies and Equipemnt for the Self-watering Planter

      Instructions for Making the Planter

      1. Cut the neck from the water bottle.
      1. Cut the cap from the water bottle.
      1. Paint both sections with your choice of FolkArt Painted Finishes. It comes in rust, moss, concrete, and barnwood. I selected the Concrete Painted Finishes.
      2. When the paint is dry, use low temp hot glue to attach the kitchen twine to the inside of the neck section. This will serve as a wick to draw water from the lower reservoir section to the plant in the upper section.
      3. Add a bow to the bottom (water reservoir) section of the planter. (See the full tutorial on making the bow on the Bowdabra blog.)
      4. Plant herbs or flowers in the top (neck) section of the bottle. 
      5. Fill the bottom with water and place the top section into the bottom.

      Sunday, January 15, 2017

      From Free Scraps To a Nifty Checklist Board

      I really get a great deal of satisfaction out of using scraps and recycled materials for my projects. This nifty memo board scores on all counts.

      You'll need these supplies:

      • Scrap of ½" thick MDF or wood that is at least ¾" wider than your roll of paper and as long as you want it 
      • One wire coat hanger
      • Cutting strip from a box of kitchen wrap
      • Roll of adding machine tape
      • 4" length of ball chain
      • 2 ball chain crimps
      • 2 tiny eye screws
      • 2 finishing nail about ¾" long
      • Strong adhesive
      • Acrylic paints, napkin, Mod Podge for decorating

      You'll need these tools:

      The first step is to cut the base piece to your desired dimensions using the Proxxon Table Saw FET. I just happen to have a piece of ½" MDF the right size that I had previously cut. The dimensions of mine are 8"x½"x2¾". You'll also need to cut a small length for the cutting bar. It should be the width of your base piece, and about ½" high and ¼" thick. The dimensions of mine are 2¾"x½"x¼".

      Next, cut the coat hanger into two U shapes. One leg will be as long as your paper roll is wide (mine is 2¼"). The bottom of the U needs to be as wide as the combined thickness of the radius of the paper roll plus the thickness of the base board plus ¼" or so of wiggle room (mine measures 2"). Leave the second leg for now; we'll measure and cut it later.

      Now, measure and mark the placement of the holes on each side of the base board where the wire hangers will go. Mine are 1" from the top of the base board and centered at ¼".

      Drill these holes as deep as your bit will allow, using a bit just slightly larger than the coat hanger wire.

      Measure and mark a point centered on the cutting bar and about 3/8" from each side. Now, position the cutting bar on the base board, and clamp the two pieces together. Mine is about 1" from the bottom of the base board. Using a fine drill bit in the Proxxon Professional Rotary Tool, drill pilot holes for the nails that will hold these two pieces together.

      Now, you're ready to measure and cut the second leg of the coat hanger. Put this leg into the holes that you drilled near the top of the base board. Mark how far they go in, and measure this length from the base of the U and cut off the excess. You should end up with wire hangers that are about this size.

      Now it's time to decorate your memo board. I started with a coat of gesso, but white acrylic paint would work, too. You want to seal the MDF, and the white color allows the true color of your selected paint to show. Don't forget to seal and paint the small cutting bar. 

      How you decorate and embellish your board is totally up to you. I chose to napkin collage the top surface of mine and paint the other sides a complementary color.

      While the napkin collage is drying, cut a piece of cutting strip from a kitchen wrap box the same length as your cutting bar piece, and glue is to the bottom of the cutting bar with a strong adhesive.

      This cutting strip should be thick enough to allow the paper from the roll to slide under the cutting bar. If not, add a couple pieces of cardstock cut to size under the cutting bar. Using the pilot holes that you previously drilled, nail the cutting bar to the base board. Be sure that the cutting strip faces toward the bottom of the board.

      I added two tiny eye screws and a length of ball chain secured with crimps to the top of my memo board for hanging. Add the paper roll by inserting the longer leg into the center of the roll, and the shorter leg into the holes that you drilled to hold the wire hanger. Repeat on the opposite side with the remaining wire hanger. Thread the end of the paper under the cutting bar.

      Now you're ready to put your memo board into use. I've got my grocery list on mine :)


      Carole