
My friend has a bad neck, and she has a laptop computer that adds to her misery by forcing her to look down. And I have a problem that my computer is generating a lot of heat and I know that is not good for it. So, let's make a simple laptop computer stand to solve these problems as we know computers are not going away any time soon. At the beginning of the year my resolution was to find solutions for chronic and nagging or annoying issues. So let's get on with it.
Supplies:
1"x 4"x16" piece of pine board
5/8" dowel approx. 15" long
approx. 6" electrical or duct tape
Plaid paint, I used black (optional)
spray sealant
transfer/carbon paper
pencil
Equipment:
Drill with 5/8" spade bit
Optional supplies and equipment for small catch to hold dowel:
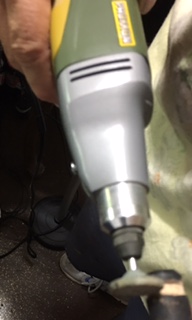
small grinding bit (see photo later)
2 shiny pennies
2 small wood screws
small drill bit
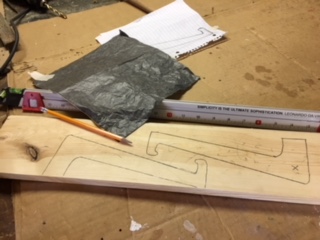
The first thing I did was to draw out a design. Note, I used the red margin line on the paper as my bottom because I wanted to be sure the legs would sit flat. This is one leg of the "stand". Mine is approx. 10 inches long which was the width of my computer. You may need to adjust it for yours. You will need to cut 2 of these.

The "X" on my design is where I plan to cut my hole for the dowel. I chose this place because it is the widest and will be the strongest.
I used carbon paper and the Kapro measuremate 313 to transfer my design to the wood and ensure that my lines were straight.
I used the Proxxon mini band saw to cut out my 2 legs;

Next step is to sand everything using the proxxon OZI/E delta sander.
I like all my edges rounded over so they feel nice and smooth. I love this little sander.

Next, with the spade bit, I drilled the holes where the dowel will slide through.

It's easy to put together now, and....it is easy to take apart so it is portable too. Slip it in your computer case and take it with you.

It's really all done now, but I chose to spruce it up a bit. I painted it black to match the computer. I used black ceramcoat made by plaid paint for this. It goes on so smooth. Then I wound a bit of electrical tape on the inside part of the dowel as a "stopping" point.


I think it looks nice and ergonomically it keeps your wrists straighter so less carpal tunnel (hopefully)


Anybody curious about the penny you see in the first photo?
Here comes the optional part.
I thought over time the hole for the dowel might become slightly bigger with use and the dowel could slip out the sides. Remember we put the tape on the inside so it is secure there but I wanted it to be portable so I needed to be able to remove the dowel. Now when I'm using it I want it to stay. So hence the next few steps......remember this part is optional.
I used the proxxon professional rotary tool to carve out a groove near the end of the dowel:

Now drill a small hole in the bottom part of a penny. Use a small screw to fasten it to the leg so that when you turn it part of the penny will catch on the lip of the dowel. This will keep it from sliding. When you want to dismantle it just twist the penny to release it. Easy peasy...👍 and cheap. 👀😏

That was longwinded directions for a really really simple project. Forget the little penny securing device and you could whip it up in less than an hour. My friend says she likes it a lot and her neck is feeling less abused at the computer.
Thanks for stopping by. Thanks proxxon our sponsor. Thanks Plaid and kapro for your support as well. And thanks Terri Sproul our coordinator.
Catch ya next time Carol
3 comments:
This is a great idea I am making one for my keyboard Thanks again for all your ideas they are truly great and you explain them so well
bj
Carol I love mine. It is the perfect thing to have
my neck not stretched to look up at the screen.
It is also great for typing the keyboard is slanted
so my hands rest on either side ofthe touch pad.
Don't have to move my hands to type just fingers.
I love it and use it all the time. Thank you for
coming up with the neck saver and perfect
position for neck and hands, Great Blog.
This stand looks awesome and I'm sure it would solve some issues that most everyone has. Great idea and a really great project!
Post a Comment