
Why wait until the rush of the Christmas season to craft holiday decorations? Make those decor pieces all year long so you can really relax and enjoy them during the season. This advent calendar is a great project for using scrap lumber. I'll share the measurements that I used, but you can adjust them depending on the lumber you are going to use.

Supplies and equipment:
- 14" x 2½" x ¾" board for base
- 6" x 2½" x ¾" board for tree and star shapes
- 4" length 1/8" dowel rod
- Acrylic paints
- Liquid wood glue
- Proxxon Bandsaw MBS/EP
- Proxxon Drill Press TMB 115
- Proxxon Scroll Saw
- Proxxon Delta Sander
- Proxxon Pensander PS 13
Instructions for making the advent calendar:
- Download and print the Advent Template.
- Mount the patterns on the 6" wood blank. Cover one side of the blank with painter's tape. Mist the back side of the patterns with spray adhesive, and mount on the taped blank. The painter's tape made removal of the patterns easy without leaving any sticky residue.

- Cut the shapes on the bandsaw or scroll saw.

- Measure and mark the bottom center of the tree and star. Mark the star between two of the star points.

- Set the depth gauge on the drill press.

- Secure the shape in the machine vise, and mount on the drill press. Set the parallel fence at the drilling point. Use a bit appropriate for the size of the dowel rod, and drill the hole to the preset depth.

- Leave the depth gauge and parallel fence settings in place for drilling the base.
- Sand the surfaces of the shapes with the Delta sander. I mount my sander in the Precision Vice FMZ so I can have both hands free to manipulate the piece I'm working on.

- Sand the angles on the tree with the pen sander.

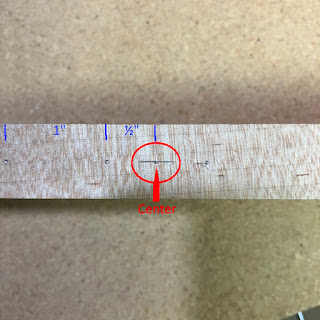
- Measure and mark the holes on the edge on the 14" board. Start by marking the center, the ½" on each side. You now have two holes marked. Do not drill the center mark. Next, working from the marked holes, measure and mark at 1" intervals, ending with six holes on each side of the center mark. this leaves a 1½" border on each side.
- Sand the surfaces of the base with the Delta sander.
- Paint and decorate the tree and star with acrylic paints.

- Glue a 1¾" length of dowel rod in the hole on the bottom of the shapes.
- Add numbers on the base for the advent countdown. Numbers 1 to 12 on one side, 13 to 24 on the other.


Here are some options to consider:
- Board thicknesses from ½" to 1" will work. The board needs to stand securely on the narrow edge.
- Using a board 25" in length allows space for all the advent numbers to show on one side of the board.
- Use the wood finish of your choice, e.g., stain, leave in natural, antique wax, paints, etc.
- Vary the height of the tree or star above the base by increasing the length of the dowel rod.
- Numbers can be added to the base by free hand lettering, stenciling, rub-ons, vinyl adhesive, etc.
.png)
.png)
 |
| Carole |


.png)
