Sunday, May 19, 2024

Step-by-Step Guide to Crafting the Perfect Book Thumb

So, what is a book thumb??? A book thumb, also known as a thumb book holder, is a reading aid that allows you to hold a book open with one hand. Some folks claims that using one can help reduce strain in neck, arms, back, and shoulders. They make great gifts for the avid book reader.

Supplies and Equipment:

Step-by-step Guide for making the Book Thumb

  1. Print the Book Thumb Templates, and select your book thumb model. Mount the selected pattern on your wood blank. Cover one side of the blank with painter's tape. Mist the back side of the pattern with spray adhesive, and mount on the taped blank. The painter's tape makes removal of the pattern easy without leaving any sticky residue.

  2. Cut the straight sides of the book thumb using the bandsaw.

  3. Cut the curved thumb recess using the scroll saw.

  4. Sand the cut surfaces using the disc sander.

  5. Using the disc sander, gently round the outside corners just enough to remove the sharp points.

  6. Sand the inside curved thumb recess using the flexishaft and a sanding drum.

  7. Apply a thin coat of finishing wax to the book thumb, and buff using the angle polisher with a lambswool polishing disc.

  8. Grab a good book, and enjoy reading using your new book thumb.
Carole

Sunday, May 5, 2024

How to make a simple learning game for the kids

 Hello again,   How about we make one for the kids today.   It's going to be a simple tic tac toe game using symbols that are recognizable to children.  Actually if the kids are not too little, let them choose the theme and help with the painting.


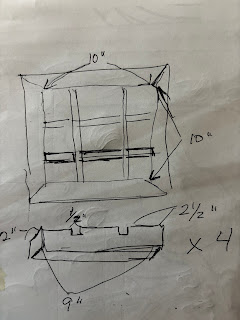
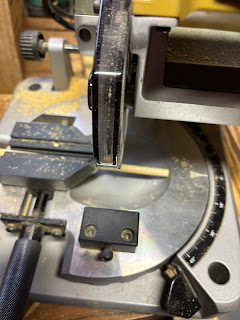
The first thing I did was to make the frame for the game.  This is really easy using the proxxon mini chop saw.  Ive tried a million times to make a decent mitered corner using any number of tools, but always one or more angle was slightly off or bowed a little bit so it just wont fit tight.  But with the Proxxon mini chop saw it is a simple task and if measured correctly, I guarantee it will fit perfectly.  But first, lets cut it to size using the proxxon mini table saw.


Oncw the boards are cut to the proper width move over to the Proxxon mini chop saw and set the guage to 45 degrees and make your first cut. Then measure (the short side) and set it up to cut the proper length.   Measure only the short side.  The long sides will take care of themselves. (refer to picture)  If you are using my measurements, short to short will measure 10'     


Put the frame together around the back piece, glue it then clamp it until it dries completely.    Next we will work of the dividers.

I used the proxxon mini band saw to cut out the notches,


I put it together with glue then put it aside while I work on the tiles.  This is easy using the proxxon mini chop sawWe are going to make (10)  2 1/4" square blocks.  And while we are at it, I am going to cut (10) 2 1/2" long 1/4" diameter dowel pieces. 


Using a drill, I made 1/2" deep holes in the upper right corner of each of my 10 blocks.  This just makes it easy to place the tiles during a rousing game of tic tac toe. 😵

Next, paint, stain or do whatever you or the kids like to decorate your board and the tile pieces.  We opted for dogs and cats, (you need 5 of each) so we painted them on our tiles.  We painted the board black.  We fisinshed it all with krylon triple thick gloss spray..


I think it is done, except it would be nice if we put a stand on the back so it can be verticle.  Lets do that.  I just cut a piece of thin wood.  Using a hinge attach it to the back, just like any old picture frame that sat on the living room tables.

Well that was  fun and not too hard. Im ready to see if the kids llike it.

thanks for visiting today.  Hope to see you next month.  Carol