Hi folks. My friend has asked me to make a spice rack for her kitchen. Says she is tired of all the spices falling out everytime she needs one. And if hers is like mine, I can never find the one Im looking for until I drag them all out. So, today let's make her a spice rack.
The first thing I did was sort through my wood on hand. I found a piece of 1/8" oak plywood and a couple pieces of some pine I felt would work.
1st step was to cut my piece to length. I left the plywood piece as is thinking that it was as good a size as anything else. so I will cut my wood for the outside "box", and shelves to fit it.
The plywood (back), measures 23 1/2 x 15" x 3 1/4 " Sides will be 24 x 3 1/4 Top and bottom 15 1/2 x 2 1/4 x 3/8 There will be 3 shelves which measure 14 7/8 x 2 5/8" x 1/8"
\
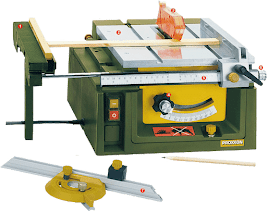
I used the Proxxon mini table saw to cut my wood. And Ill be using this saw in the next steps also.
I need a way to put these thin boards together. I know I cannot use nails or screws so I am going to make some grooves where the pieces will fit together.
I set up the Proxxon table saw to make some cuts partway through my wood. I move the saw blade so that it is about 1/8" high. then I move the fence to 1/4" away from the sawblad and run one long side of each of my sides, top, and bottom pices.. The groove is not quite wide enough to secure the plywood back piece in so I moved the fence out just a little and ran them all through again being careful not to make my groove too wide. I want my pieces to fit snugly.

Looks like it fits but before we glue it we need to make the slots for the shelves.
Do this in the same manner. I took 2 passes to make it the right width.
Make sure both sides are exactly the same.
Now glue the sides, top and bottom together and let the glue dry well. Then slide the shelf pieces in.
I painted it with white primer. My friend will paint it whatever color she wants. Look how it looks when I put some spices in it.
I added 2 sawtooth hangers on the back.
Thats all folks....Thanks for visiting. Come back soon and see what we're making next
Thanks Proxxon, awesome tools. Carol
\

.jpg)


No comments:
Post a Comment