Hi everybody! October has come and gone. The goblins and witches are back wherever shadowy place they came from, and now it is time for the turkeys to come out! Not talkin about me, but about the real turkeys, err.. or at least some turkey look-a-likes for Thanksgiving. Today I want to show you how to make a turkey from a gourd and some gourd scraps using some easy to use proxxon tools, a little putty, and some paint from plaid. Oh and just a little glitter for bling!

Supplies
1 bottle neck gourd plus gourd scraps
small piece of thin leather or felt
Glitter
school glue
gorilla glue
Apoxy sculpt
spray sealer (I used krylon crystal clear)
Equipment
Here is the gourd I chose to be my turkey. I like the long neck and how the "head" tips back just a little bit. Even before I get started, I can see a turkey in this gourd.

The next thing I need is a piece of a gourd I can use to make his tail feathers. The bottom of a different gourd will work perfect I could use a scrap piece of gourd here but I am going to cut the bottom off another gourd using the proxxon mini jigsaw. I want to start with a circle so I use a bowl to mark my line then cut it with the mini jigsaw.


I use the bottom for his tail feathers. I am going to draw, then cut out a really simple pattern.


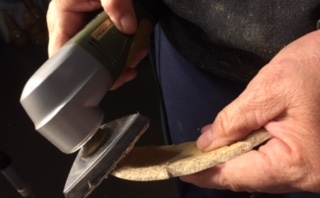
Time to sand all the edges using the Proxxon OZI/E delta sander. Round over all the edges on the wings Also the inside part of the gourd is rough but this is easily smoothed with sanding. This will make for easy painting later.


Time to Paint


A piece of leather for the waddle and he? she? is All done!

That was fun. Truth be told this was super easy. This could be painted and decorated so many different ways. Big and little turkeys everywhere. I hope you give it a try, let the kids paint it.
Everyone have a safe and happy Thanksgiving!! Carol
4 comments:
Love this project Carol well done.
Clear and easy to understand directions.
Congratulations on another winner, Humm
For Turkey Dinner, Sorry could not help
myself.
Love your little turkey. He looks mischievous, LOL.
You did a great job, as always. I always look forward to seeing what you come up with and I'm never disappointed.
Clever way of transforming a gourd into a happy Thanksgiving turkey. (He’s Happy because he’s not part of the menu haha) love it
Carol you done it again its so cute I am making one for my Thanksgiving table The colors are perfect bj
Post a Comment