Sunday, November 20, 2022

How to Make the Perfect Expandable Bookshelf Using Proxxon Tools

While browsing Amazon, I came across this expandable bookshelf, and immediately thought, "I can make that with my Proxxon tools!!" Using their pictures as a guide, I developed my own plans for a bookshelf that expands from 16" to 29" to provide a minimum of 13" and a maximum of 25¾" book space. 


I made this project from pine lumber because I wanted a rustic, farmhouse finish. The bookshelf could be made of hardwoods for a more polished look.


Here are the supplies you'll need for this expandable bookshelf:

  • Eight slats measuring 15" x 1 3/8" x 5/8" (I used 1" x 2" x 8' furring strips)
  • Four 8" x 8" blanks (I used a 1" x 10" x 6' pine board)
  • Thirty-two 8 x 2½" wood screws
  • FolkArt Milk Paint

I used these Proxxon tools to make the bookshelf:

  1. Cut the furring strips and pine boards to size using the table saw.

  2. Sand the cut ends on the disc sander. Since I was going for a rustic look, I didn't surface sand the pieces.

  3. Drill the screw holes in the slats with the bench drill press. The holes need to be 3/8" from the cut end, and 3/8" from each side edge. Setting the adjustable fence to the correct depth for the holes, and using painter's tape to mark a guide for each side of the slat made quick work of the drilling process. You'll see in the photo that I used a piece of waste wood under the slat to minimize tear out.

  4.  Next, install a countersink bit in the drill press, and countersink the holes on one side of the slat. Set the depth gauge on the drill press to ensure consistency.

  5. Finish the pieces with a color wash. I chose a red/brown wash. You'll want to test the look on a scrap. Thin the paint with water—4 parts paint to 1 part water. If you want a more solid color, then use less or no water. 

  6. Work in sections to apply the wash with a brush and immediately wipe with a rag. Let dry thoroughly. If you want more pronounced color, add more coats of the wash, following the apply/wipe procedure. 

  7. Now we assemble the pieces. Secure one of the 8" x 8" pine boards in a worktable vise. Use a square to position one of the slats—countersunk holes up—at the end of the pine board.

  8. Use the professional rotary tool to drill through the existing holes of the slat into the end of the pine board. Screw the slat in place.

  9. Repeat Step 8 on the other side of the pine board.
  10. Position the center slat and drill the holes into the pine board. Screw the slat in place.
  11. Secure another 8" x 8" board in the table vise, and secure the slats from Steps 8, 9, and 10. Use a square to be sure the slats are accurately positioned. You'll end up with one of the sliding pieces of the bookshelf—pine board sides with three slats on the bottom.
  12. Repeat Steps 7 and 8 this time positioning two slats on the pine board. These two slats slide between the three slats already secured.
  13. Repeat Step 11, securing the two slats.
  14. Mesh these two completed pieces together, and close the bookshelf to its most compact position. Lay the bookshelf on its front side. Attach the three remaining slats for the back the bookshelf as shown in the following picture. Green = slats. Red and blue = pine board sides.


Carole

Thursday, November 17, 2022

How to make a silly eyeglass holder

Hello Readers, DIY'ers, and crafty people.


Now I can generally find me a pair of glasses when needed, and I know where to put them when I don't need them.  And there you go.   It is a short little afternoon project.

Today I have a little project you might call silly or fun, but honestly it helps me in my quest to finally get my act together and be organized.  Ha Ha. that will be the day.  But I still love the idea of everything having it's place in this world.  And I have made a little place for my many pairs of dollar store reading glasses.  It is really easy.  I think the kids will love it.
Equipment and supplies:
wood glue, 
1/2: dowel
1/2"drill bit
1" x 4" x 12: piece of scrap wood.
1/4" thick scrap wood for details.  

First thing is to draw the outline of your pattern onto your 12" piece of wood.   You can draw the details as well which will come in handy when you start to paint.

Next using the Proxxon mini bandsaw or the Proxxon mini scroll saw cut out the perimeter of your pattern.  


Next sand it well.  In the picture below I am using the Proxxon cordless mini belt sander.


On the bottom where the little statue will rest on the table I made a cut on the proxxon mini bandsaw with the table tilted slightly so that he will lean back. 


I made a small support I will glue onto the back so he will stand. Just cut out a triangle with approx. 2-3" sides.  (Something for him to lean on)  
Cut your dowel "noses" about 1 1/2" long.  I had 4 faces so I needed 4 of these.

Drill 1/2" holes approximately 1/2 way through the faces where the noses will fit.  I aimed the drill at a slight upward angle, so his nose was tipped a little.


\
I used plaid paints to paint my critters.

Pop in the noses.  Use a little glue if necessary to secure them.

For added interest I cut out a few pieces using the Proxxonj mini scroll saw that will add a little dimension to my guys.  (ears for the cat, eyes for the scarecrow, mustache for the man etc)

Then glue them on.  

Put on the glasses and see how cute it is.  


Thanks for visiting.    Till next time.  Make something just for fun.     Carol

Thanks Proxxon.  

Sunday, November 6, 2022

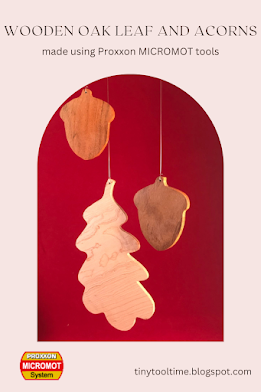
How to Cut an Oak Leaf and Acorns on the Proxxon Bandsaw

 Fall is in the air and the leaves are swirling in the wind. And that means raking, raking, raking. But this oak leaf and acorns won't ever need raked.


Supplies you'll need to make the oak leaf and acorns:

  • Scraps of 1/4" or 3/8" hard woods
  • Fishing line, twine, or narrow ribbon for hanging

Equipment used to make the oak leaf and acorns:

  1. Print the leaf and acorn patterns resizing as desired.

  2. Cover one side of the blank with painter's tape. Mist the back side of the pattern with spray adhesive, and mount on the taped blank.  The painter's tape makes removal of the pattern easy without leaving any sticky residue. 

  3. Cut the shapes on the bandsaw with the extra narrow scroll saw band installed.

  4. Sand the edges of the oak leaf using conical sanding drums and the flexishaft attached to the professional rotary tool.

  5. Sand the flat surfaces using the Delta sander. I have my sander mounted in the Precision Vice FMZ, so that both hands are free.

  6. Drill holes for hanging the oak leaf and acorns using the bench drill press.

  7. Use wood finishing oil on the lambswool pad of the angle polisher for the final buffing.

  8. Enjoy your oak leaf and acorns.

Carole

Thursday, November 3, 2022

How to make a toy wood airplane.

Hi again.  It's time for a little project.  If you have kids, they will like this one and you can get them involved and using their creative skills.  We are going to make a wooden toy airplane.


To start we need some wood.   I used 1/4" birch plywood,

I had some 1/4" flat silver wire, I want to use for landing gear,

2 small 3-4" wire pieces

1 small wood wheel, 2 slightly larger wood wheels. (or buttons)

Proxxon mini scroll saw 

 Proxxon OZI/E delta sander

Proxxon's cordless long neck grinder

Proxxon mini rotary tool with some small drill bits

Plaid paints for decorating.

Paintbrushes, pliers, pencils, etc.

super glue, and accelerator if you got some

First, we need a pattern.   You can use mine if you want or draw your own.


Then transfer that pattern to your wood piece.  I chose the thin wood just to make it easier for me.  But I also cut a big fat body of a plane for a later time when I plan to shape it into a more dimensional plane.  I was very impressed with Proxxon's cordless long neck grinder.  You can take a chunk of wood and "carve" it down in a jiffy using that tool.  


I cut out all the pieces using the Proxxon mini scroll saw


This plywood gets a little rough around the edges when cut so then it is time to sand, sand, sand.  Proxxon's OZI/E delta sander does the trick with little effort.  


The slot for the wing and the tail in the back was cut with the scroll saw as well.  Try to keep the slots thin enough to hold the wings tightly when it is pushed through, but not so tight you break it trying to put it through.  You know, do it just right 🤣


Next, we deal with the landing gear.  I used a 2 1/2" length of the flat wire.  Then I snipped a piece out of the middle so I could easily bend it into a L shape.  I made 2 identical pieces,


Using the Proxxon cordless rotary tool I drilled a small hole 1/4" from the end on the long side.  (on both pieces)

I glued the unpierced sides to the back of the plane as landing gear.   Then threaded the small piece of wire through one side then through the hole in the wheel then through the other wire piece.  I twisted a small loop into the ends of the wire to keep it from "unthreading".

Let the kids paint!   We use plaid paints because of the rich colors.


Now lastly is the tricky part.  The propeller.   I first cut out a small cube and scored a line across it using Proxxon long neck grinder.  I use this slot to fit on the nose of the plane.   
Next I fashioned some propellor pieces and glued them to the square.  These were also made using the scroll saw, then the grinder, and sander.  
I used super glue to glue the propellors to the cube.   Then I slipped the cube which I had rounded a bit over the nose of the plane and glued it on.  It should stay.  

I added a front wheel.  and let's call it done.  I think the kids really enjoyed participating and are pleased with their artsy plane.   This was a fun project.   I basically "winged" it.   LOL.   I know whoever you are out there can have some fun with this.  It's creatively wide open.

Thanks for visiting.   
Thank you Proxxon, I always have fun with your tools.

till next time.... play safe  Carol