I have made a wooden sleigh to use as an arrangement holder but it could also be used to put Christmas candy in or possibly to put Christmas cards that you receive in.
Here is a list of supplies needed for the project:
Proxxon Table Saw
Proxxon Scroll Saw
Proxxon Rotary tool w/ sanding barrel
Acrylic Paint Red
Acrylic Paint Black
Small Nails
Hammer
Cardstock paper to draw pattern on
Pencil
Paint Brush
Embossing Pen/clear
Embossing Powder/Gold
Heat Gun
Plywood 1/4" thick
Artificial gold poinsettias and artificial gold greenery
I started out by drawing a pattern of the project that I was going to make. The straight line pieces I was able to draw directly unto the wood and the curved pieces I drew out unto a piece of cardstock and then traced unto the wood. The pieces were as follows, which will give you an idea of the size of the piece so that you can draw your own pattern:
2 Sled sides approx 8"- T X 6 1/2"- L X 3/8"
1 Sled seat back approx. 4 1/2"T X 5 1/2"W X 3/8"
1 Sled seat bottom approx. 4 1/2"X Sq. X 3/8"
1 Sled foot piece 4 1/2"W X 2 1/2"T X 3/8"
2 Sled Skids/Skis 8 1/2" L X 2" T 1/4"
All cut to shape as shown
I used my Proxxon Table Saw to cut all the straight lines.
And I used my Proxxon Scroll Saw to cut out all of the curved pieces.
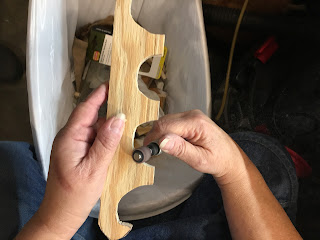
Once all of the pieces were cut out I used my Proxxon Rotary Tool with a sanding barrel to smooth out all of the edges.
I then painted all of the pieces and left a spot to center my skids/skis on the inside of the sides.
I nailed my back, bottom and foot together first and then nailed the sides (which I had already nailed the skids/skis to) to them. This picture gives you an idea of how the sled is put together.
I plan on using this sled as part of my Christmas decorating. It wasn't a terribly complex project and it packs a lot of punch as far as decorating goes I think. If you haven't done so, I would really appreciate you going to the Proxxon website and checking out all the wonderful tools that they have. Who knows, you might want to ask Santa for one or two. Please leave a comment here and let me know what you thought of the project and tutorial. Thank you.
Barbara


5 comments:
Love this Barbara, It is so versatile it can be
used for several things. Name plates at a
Christmas
dinner, Window décor and small gift packaging
and more. I love the projects
that have several uses.
Great Work.
This came out really nice. You did a great job with the cutting and painting, and so many different crafting techniques! I never would have thought about embossing powder. Awesome. Love it!
Looks awesome!
I love it! You could even put your Christmas CD's in it so they could be easily accessible!
Nice job
.
Post a Comment