Showing posts with label Valentine. Show all posts

Sunday, February 2, 2020

How to Make a Valentine Placecard Holder

Valentine's Day is just around the corner!! Here's a sweet project to dress up your Valentine table—a Valentine placecard holder.

Supplies and Equipment for Making the Valentine Placecard Holder

  1. Cut wood blanks to size using the bandsaw.
  2. Draw or trace a heart with flat sides to fit the 2" x 2" blank onto copy paper.
  3. Cover one side of the blank with painter's tape. Mist the back side of the pattern with spray adhesive, and mount on the taped blank. The painter's tape made removal of the pattern easy without leaving any sticky residue.

  4. Cut the heart shape on the scroll saw.
  5. Mark the center of the ¾" side.
  6. Use the center mark as a guide for cutting the card slot on one lobe of the heart shape.
  7. Sand the flat edges on the disc sander. 
  8. Finish sanding surfaces and curves with the Delta sander.
  9. To sand the card slot, fold a piece of sandpaper and slide back and forth in the slot.
  10. Color with FolkArt Ultra Dye. Seal with FolkArt Ultra Dye Varnish.
  11. Host a tea party and use your Valentine placecard holders!!
Carole

Monday, January 6, 2020

How to Make a Framed Heart Cut Out

Get ready for Valentine decorating with this framed heart cut out. Today I'm focusing on the heart cut out. You can see how I made the frame in this blog post.

Supplies and Equipment for Making the Heart Cut Out

Instructions for Making the Heart Cut Out

  1. Measure the back opening of the frame.
  2. Transfer these measurement to the substrate you're going to cut the heart from. I used leftover book covers from this project.
  3. Cut the substrate to fit the frame using the band saw.
  4. Cover the substrate with painter's tape to prepare for mounting the heart pattern, and mark the center of the piece.
  5. Coat the reverse side of the pattern with a fine mist of spray adhesive and center on substrate.
  6. Use the bench drill press to drill a pilot hole hear the edge of the heart outline.
  7. Thread the scroll saw blade through the pilot hole, and cut out the heart.
  8. Now your creativity and personal style come in. Select a backing to go behind the heart cut out. I knit a little square swatch, but you could cut a piece of knitting from an old sweater. You could also use patterned paper, lace, cloth, ribbon, almost anything. 

Carole

Tuesday, February 2, 2016

~Hello Valentine~ NEW DT Project for Proxxon by Sherri Welser

~Hello Valentine~


What fun this sweet paper doll Valentine Girl was to create! Wood is a beautiful base for so many fun and unique projects and incorporating it with these beautiful vintage paper dolls by ArtChix Studio was a blast! Proxxon  tools has made working with wood so much easier~ the tools are so well made and easy to operate! For this project I used a scrap piece of wood that I sanded using the  Delta Sander OZI/E. I love the sander and use it often for my woodworking projects!

~Supplies~

Rectangle piece of scrap wood ( Mine is about 2 1/2 x 9")
Acrylic Paint in red
Inspirational stamp saying and  LOVE stamp
 Archival Ink pad-black and Sepia
Metal key
Weldbond glue
Mod Podge
Piece of lace ( about 5 " long)
Canvas  oval tag
Misc charms to hand off of the lace tie
White Sharpie Marker


1)Cut, sand and paint your rectangle  wooden block and let dry.
2) Cut out the paper doll parts and glue on the wood with the mod podge. Adding different hats , crowns, wings etc is also fun! 

3)Using the Sepia Ink pad, create a distressed look on the wood and edges of paper. 
4)Stamp the inspirational phrase  at the bottom with the black ink .
5) Attach the charms and the canvas tag to the lace.


6) Stamp the word LOVE on the tag.
7) Add Lace through the key and  use the Weldbond glue to attach to the wooden rectangle at the top.


8) Using the white Sharpie Marker add dots all around the edges of the girl.

I hope you have enjoyed this easy but very creative project using some Valentine Inspiration!
~In Love & Light~
Sherri


Sunday, January 3, 2016

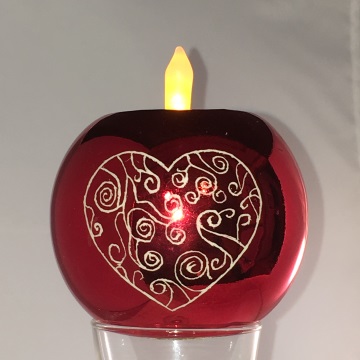
Engraved Valentine Tea Light

With Christmas and New Year's behind us, and all those decorations stored away for another year, the house seems so barren. So, I'm going to bring some of that same decorative festivity to Valentine's Day. I'm starting with this engraved tea light.

I found the plain candle holder at the thrift shop, loved the color, and guessed that the red coloring was just a coating. I guess right!! When I got home, I tested a small spot on the base of the holder, and sure enough—under the shiny, red coating was a white interior. Perfect for engraving!!

First, I created and sized the heart shape in Make-the-Cut. I used my Zing electronic cutter to cut it out of vinyl. (Of course, you could draw the heart freehand and cut with scissors or a craft knife.) I adhered the heart to the candle holder. I wasn't worried about the wrinkles—I just needed a rough outline. 

I etched the outline of the heart using the Proxxon Engraver GG 12 and 1 mm diamond grinding bit. Next, with the same grinding bit, I just doodled with the engraver to add the interior swirls and curls.


Last step was to cover the base with a piece of handmade paper where I'd done the scratch test.


Now I'm all ready for a romantic Valentine's dinner. 
Carole