Sunday, February 19, 2023

Make the Perfect Memorabilia/Photo Board with Proxxon MICROMOT Tools

 This memorabilia/photo board is the perfect project to adapt to your style and the supplies you have on hand. I'll share my list of supplies, measurements, and general how-tos, but I encourage you to change it up to make it your own.

Here are the supplies that I used:

  • 12½" x 22" x3/8" board
  • 1/8" dowel rod
  • 4½" x 1 3/8" x ¼" wood scraps
  • Mini clothespins (found these at a dollar store)
  • Liquid wood glue
  • Acrylic paint
  • 18" length of twine
  • Corner guards

Equipment Used:

Here's the steps for making a memorabilia board:

  1. Decide where you want to position your shelves. I used three, but your board may have fewer or  more—your choice. Measure and mark the shelf positions.
  2. Cut the shelf slits using the table saw. Set the adjustable fence to accommodate your board.

  3. Cut the slits to the depth mark.

  4. Drill holes at the top for hanging.
  5. Next, adjust the angle on the drill stand, and drill the holes for the dowel rod pegs.

  6. If you're using corner guards, skip this step. Round the corners by either sanding them to a rounded shape, or cut the rounded corners using the bandsaw or scroll saw.
  7. Sand surfaces as needed.
  8. Using liquid wood glue, glue the shelves and pegs in place.

  9. Finish the surfaces—paint, stain, wax, leave natural, etc. I painted the board with acrylic paints, but left the shelves, clothespins, and pegs natural.
  10. Thread the 18" length of twine through the top two holes to form a hanger.
  11. Optional: Install the corner guards.

  12. Enjoy your memorabilia/photo board.

Saturday, February 11, 2023

How To Make Picture Frame Ornaments Using Proxxon Tools


Hi everyone.  Today I'm going to show you how I made these miniature ornaments for a tree I have on display in my spare bedroom.  The room has a nautical theme.  Follow along and I'll show you how I made them using Proxxon tools.


Supplies: 
   Proxxon Micro Band Saw   
   Proxxon Miter Saw
   Proxxon Table Saw
   Plaid Paint
   Scrap pine
   Scrap thin Plywood
   Assorted photos
   Wood Glue
   String


First I ripped some thin strips of wood using the Proxxon Table Saw.


Theen taking those strips I ripped out a notch without cutting all the way through.


Turning the strip again I ripped out a notch going the other direction. This made a rabbit on the edge of the strip that the picture will slip into.


I then took my strips and measured the sides to figure out the size I wanted my frames and cut at right angles on the Proxxon Miter saw.


Next I glued the corners together and let dry.


I had found a few ship pictures online and printed them to fit my tiny frames.  I cut backs for each photo out of thin plywood using the Proxxon Micro band Saw that would fit into the backs of each frame.


I used Mod Podge to secure the photos to the plywood backs.


I then tried them in the frames to make sure they fit.


I removed the pictures then painted each of the frames with black Plaid Paint.  I returned the photos to the frames and painted the backs.


Lastly I applied a string to the backs with glue for hanging.


These are going to look so adorable on my little nautical tree.  Thanks for following along...
Colleen


Saturday, February 4, 2023

How to make a little bee house

Well Hi everybody.   Boy has it been cold.  Nothing like a good blast of winter to make me start dreaming of spring.  I'm anxious to plant my garden but I guess since the ground is all white it might be a little early.  But I was reading about bees and how the more the merrier when it comes to the garden.  So, to encourage the little buggers, (I say that fondly), I want to make a bee house.  I read about that too.  Amazing how much reading you can do when the ice outside prevents you from leaving home.  Anyway., bee houses encourage bachelor bees to come to your garden.  These are bees that don't belong to a hive.   I never knew there was such a thing. Live and learn.  So, let's make them a home where they will be happy, and they will pollinate your garden in exchange. 


Equipment and Supplies


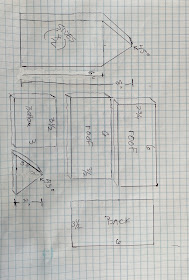
First, we are going to make the house.   It's a simple pattern. Use the pattern below to cut your pieces.  I used the Proxxon mini table saw to do most of the cutting for the structure. The table saw always cuts straight and true.


  I assembled the carcass using wood glue and clamps, then I let it dry really good and then added screws for strength.


Note- the back and bottom are inside the sides.

Next, we will dd the roof and secure it well.  By making one roof side shorter by 1/2" there is no need to miter the roof angle.  It is called a butt joint.

Then we want to fill up the front with anything bees will be able to lodge in.  I used bamboo, because I had some.  Anything that will leave spaces a bee can get in should work.   I used the proxxon mini chop saw to cut my little tubes to length which was 3"   I needed a whole bunch of them (30-40) to fill up the house, so I made a little "stop" so I didn't have to measure each one. (see below), I used hot glue to secure them to the frame,

I couldn't resist decorating the top a little bit.

To mount the bee house, I added a thin wooden slat to the back which is long enough to nail to a fence post or tree.    

All done!   Come on spring and come on bees!


Thanks for visiting, come back soon for more!

Thanks Proxxon, I am loving your tools!  Carol W.