Showing posts with label garden. Show all posts

Saturday, February 4, 2023

How to make a little bee house

Well Hi everybody.   Boy has it been cold.  Nothing like a good blast of winter to make me start dreaming of spring.  I'm anxious to plant my garden but I guess since the ground is all white it might be a little early.  But I was reading about bees and how the more the merrier when it comes to the garden.  So, to encourage the little buggers, (I say that fondly), I want to make a bee house.  I read about that too.  Amazing how much reading you can do when the ice outside prevents you from leaving home.  Anyway., bee houses encourage bachelor bees to come to your garden.  These are bees that don't belong to a hive.   I never knew there was such a thing. Live and learn.  So, let's make them a home where they will be happy, and they will pollinate your garden in exchange. 


Equipment and Supplies


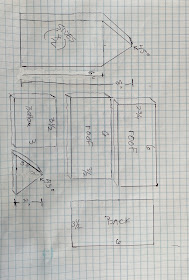
First, we are going to make the house.   It's a simple pattern. Use the pattern below to cut your pieces.  I used the Proxxon mini table saw to do most of the cutting for the structure. The table saw always cuts straight and true.


  I assembled the carcass using wood glue and clamps, then I let it dry really good and then added screws for strength.


Note- the back and bottom are inside the sides.

Next, we will dd the roof and secure it well.  By making one roof side shorter by 1/2" there is no need to miter the roof angle.  It is called a butt joint.

Then we want to fill up the front with anything bees will be able to lodge in.  I used bamboo, because I had some.  Anything that will leave spaces a bee can get in should work.   I used the proxxon mini chop saw to cut my little tubes to length which was 3"   I needed a whole bunch of them (30-40) to fill up the house, so I made a little "stop" so I didn't have to measure each one. (see below), I used hot glue to secure them to the frame,

I couldn't resist decorating the top a little bit.

To mount the bee house, I added a thin wooden slat to the back which is long enough to nail to a fence post or tree.    

All done!   Come on spring and come on bees!


Thanks for visiting, come back soon for more!

Thanks Proxxon, I am loving your tools!  Carol W.

Tuesday, April 26, 2016

~Vintage Embellishing~ Proxxon DT Project by Sherri Welser

~Vintage Embellishing~

"Adorn your Special Projects"

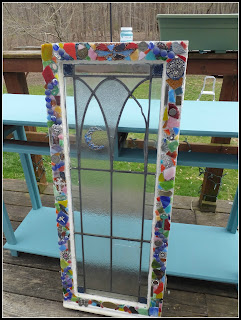
Even before it was a "Thing" I was perusing garage and estate sales looking for fun items to reinvent! I would find all kinds of tables and do the faux marble tops, a church pew was placed in the garden for setting plants on,old bicycles with the metal baskets were planted with flowers and they became unique focals in the flower garden. I have always loved finding these treasures and turning them into  Garden Art! Last fall I found an old church window with beautiful lines and even though some of the glass was broken I had a vision! Recently I found both a long wooden table and an old  wooden sewing machine table( both inexpensive finds at my local ReStore) with the beautiful metal work on it and the word "Singer" across the bottom~ these all are on my radar now to make beautiful again and here you will see several of those items come to life! The church window is finished with beautiful embellishments, words of inspiration,  charms, stained glass, glass beads ,jewels and trinkets of special meaning. In this week's part 1 of 2 posts, I will show you how I prepared the wooden table with fun examples of embellishing. Next time I will show you how I go about embellishing the table itself. This table will be put outside my art studio and used as a serving buffet at the fire pit area. Extra care will be taken also to prep it for outside use. For Part one I have included the supplies below.

~Supplies~
Wooden table of any size
Chalk Paint- ( I used Waverly in Agave)
Chalk Paint natural bristle brush

I began by painting the table with the chalk paint and using the round natural bristle chalk paint brush. I provides a nice even coat when brushing on.


Because I want the look to be "distressed" I am not concerned too much about "perfect" application of the paint. I just want to get a nice coat of paint on and let dry.

Once fully dry, using the Proxxon sander with a medium coarse grit sanding pad I start to "distress" the edges of the table to give  it that worn and aged look.


Now that the table is prepared for the creative part I will share with you some embellishing ideas below!


I use a lot of unique beads, jewelry findings, metal charms, inspirational charms, stained glass,and fun odds and ends to create the mosaic type feature that I am going for to adorn these vintage items.


So get your table ready and next time we will have so much fun embellishing the table top with all of these fun and unique items for a beautiful one of a kind piece!! See you next time!