Showing posts with label vintage Christmas. Show all posts

Tuesday, December 22, 2015

~Baby It's Cold Outside~ Proxxon Design Team Project!!

~Baby It's Cold Outside~
Created by Sherri Welser


Christmas is my very favorite time of the year and living in Upstate NY we have plenty of "Baby It's Cold Outside" moments! So here is a very fun and easy project to spread a little Holiday cheer and hold some favorite pairs of mittens! 

~Supplies~

Piece of plywood ( 9 x 21 in) with 2 holes drilled and sanded using the Proxxon Delta Sander OZI/E
Letter Stencils
White crackle paint (  I used Ranger Distress Paint)
Red Clothes Pins ( or paint them yourself)
Red ink Pad (  I used Ranger "Barn Door" Distress Ink)
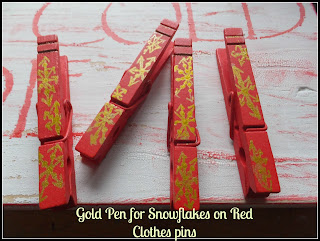
Gold Pen ( Signo Uniball)
Gold Paint
Ribbon for hanging
Glue Gun
Glitter glue

1) After preparing your board by sanding using the delta sander OZI/E,( light grit) paint a coat of white crackle paint and let dry. Lightly sand the board to distress it a but more.
2) Using the 'Red Barn" Distress Ink Pad lightly go around the edges of the board and across the front adding a distressed/aged look.
3) Using your stencil and red ink pad, fill in the letters of the stencil to spell out "Baby I'ts Cold Outside" ( I used my finger to apply the ink inside the letters)
4) Use the gold pen to draw some snowflakes on the clothes pins and glue to the board at the bottom with the glue gun.
5) Using the ribbon, attach to each side and add some fun paper ephemera
6)Add a little glitter glue to the top to add holiday magic to your project!
7) Add some fun gold doodles to the letters using both the gold pen and gold paint.
You now are ready to grab your favorite mittens and hang them up! 


Hope you enjoy this fun vintage style project and Happy Holidays!!

Wednesday, December 16, 2015

Christmas Ribbon Tree With Pearl Star

Happy holidays everyone! Tammy here with a fun ribbon Christmas tree tutorial using my favorite Hot Wire Cutter from Proxxon Tools.

Supplies used:
Tree form
Ribbon
Straight pins
Smoothfoam
Ann Butler Designs Iridescents from Earth Safe Finishes
Star image

How I made it:

Cut ribbon pieces about 6 inches 
Fold them in half and secure each one with a straight pin.


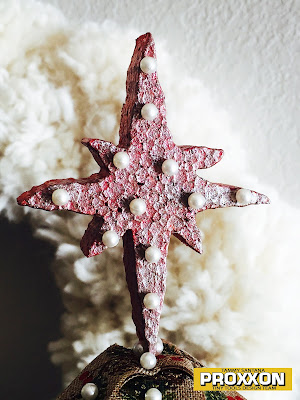
Print and cut out a star image and trace the image onto a piece of Smoothfoam
Cut the Smoothfoam as shown in this tutorial video:
I painted my star with Ann Butler Designs Iridescents from Earth Safe Finishes in the Russet color
I added pearl push pins as decorations to the star 
Secure the star to the top of the tree with more pearl push pins.
I love how my tree turned out! It looks so cute with the Rustic Christmas Wreath I made in my last post. I hope this gives you some ideas on how easy it is to use the Proxxon Hot Wire Cutter
The possibilities are endless!

I love to see your projects! Tag me on Instagram @TammySmithSantana

xoxo Tammy


Wednesday, December 9, 2015

Create a Vintage Christmas Scene in an Illuminated Rustic Shadowbox


My partner, Joe Morgan, loves vintage decorations, especially Halloween and Christmas! A Rustic Shadowbox made from reclaimed lumber (pallet wood) was the perfect frame to showcase some of the miniature animals he has collected. This vintage Christmas scene is illuminated with 20 LED battery powered lights.

Proxxon tools make it easy to work on a small project like this. The scale of the tools is perfect for a project this size.

What You’ll Need


Steps to Follow

1. Cut the paper to fit the shadowbox and adhere it with the quick dry adhesive. This makes the background for your scene.


2. Use Smoothfoam to make the contour of the ground. First, decide on the maximum height (most likely at the back of the scene, the depth (give yourself about ¼” from the front to show the wood of the shadowbox) and the length (the opening of the shadowbox). The foam in our shadowbox is about 1” tall, 8” wide and 2-3/4” deep. Use the bench top Proxxon Cutter THERMOCUT 115/E hot wirecutter to cut the foam block to the desired dimensions.


3. To continue making the contour, use the handheld Proxxon Hot Wire Cutter THERMOCUT 12/E to “carve” the contour of the ground. Make it slope to the front and dip up and down, just like snow drifts.

4. Adhere the Smoothfoam to the shadowbox using quick dry liquid adhesive.


5. Decide where you want lights to shine through the back of the shadowbox and mark the spots lightly with a pencil. Use the ProxxonProfessional Rotary Tool and drill bits to drill the holes. You can vary the size of the bits if you want different sized “spots” of light.


6. Adhere the lights to the back of the shadowbox using hot glue. Line up each bulb with a hole you drilled. Work your way from one side to the other. We tried adhering the lights with electrical tape, but it didn’t stick. Other tapes didn’t work well either. Hot glue worked perfectly!


7. Cover the back of the shadowbox with black felt. Adhere it with quick dry adhesive. This prevents light from peering out the back of the box when you place it on a shelf. You can also adhere the back of the battery box to the shadowbox. Just be sure to position it so you can slide the top back and forth to change the batteries!


8. Cover the Smoothfoam with quick dry liquid adhesive and apply the snow glitter.

9. Build your scene and adhere the pieces to the foam with quick dry adhesive.

10. Optionally, decorate the front of the box with vintage sparkle pipe cleaner, adhered with quick dry adhesive.

 Do you collect vintage decorations and trims! Everyone at Create N Craft loves the look of old-time goodies! Check out the boxes we went through to decorate our shadowbox!


What are your favorite vintage finds! We would love to know. Mention what you like in the comments below.

Happy Crafting!
Joe Rotella

Tuesday, December 8, 2015

~Santa Clause is Coming to Town~ PROXXON DT Wooden Whimsy Project by Sherri Welser


Santa Clause is Coming to Town"
Wooden Whimsy by
Sherri Welser

Christmas time  is my most favorite time of the year and I love to decorate my house with beautiful white lights and whimsy! To create this whimsical wooden piece I used wooden scraps from the recent building  of my  art studio. The Santa shape was a broken piece of 2 x 4 so I just went with that shape(  it resembled an old fashioned Santa with his tall hat on). For the birdhouse hole I just found a 2 x4 with a knot hole in it! I also wanted it to look distressed so I did some steps below to create that look. So come and join me for some holiday whimsy!

~Supplies~
Scrap pieces of 2 x 4 - from 1-2 feet in length
Acrylic paints ( white, black,skin tone,red,blue and green)
Modeling paste
Palette knife 
Glue gun/glue sticks
Crooked wooden stick for the walking stick
 Vintage metal key
Paper  holiday ephemera
Gold Gel Pen

~Steps~
1) Decide what size you want to make your wooden cut outs and cut them using the Proxxon Scroll Saw DSH-E
2) Using the Delta Sander OZI-E sand the edges of the pieces.
3) Using the acrylics paint all your wooden pieces and let dry. I used the Tim Holtz line of distressed crackle paint for the birdhouse in white after using a blue ink pad to add some color as a distressing factor.I also added a small broken piece of stick for the perch on the birdhouse.
4) Distress  the edges of the other pieces with a sepia ink pad.
5)To assemble, I used the glue gun to glue things in place.
6) Use the skin tone paint and paint an area on Santa for his face and beard.
7)Use the modeling paste to create the  beard on Santa and the effect of snow on the wooden pieces with a palette knife and let dry.
8) Use your chosen items of ephemera for decorating your whimsical pieces. Glue down with your glue gun.
9) Use your gold gel pen to do some detail work on Santa.
This is such a fun creative project and I hope you have as much fun as I did!


 Have fun and Happy Holidays!!