Friday, January 12, 2018

How to make a recipe stand


Supplies:
wooden clipboard
2 small nuts and bolts preferably with rounded heads
1 x 3x 10 inch board.  I used cedar
2 small 4" long 1/4" dowels
Plaid's coastal paints  I used Largo blue and lemonade.
gesso paint for priming the board
Krylon matte spray  (optional)
Mona Lisa film sanding sheet.

Equipment:
Proxxon OZI/E detail sander
Proxxon mini table saw FET
Drill and drill bits  1/8" and 1/4"
Plaid's special design roller
Paint tray

The first step is to prepare the clipboard.  I took the clip off of the board to facilitate painting it as a flat surface.  I did this using the 1/8" drill bit.  It came off easily and left 2 small holes which we can use later to refasten it.

 Next I painted both sides with white gesso and let this dry well. Then sanded it with a really fine  piece of Mona Lisa film, sanding sheet.


I chose to paint my back ground with Plaid's lemonade yellow coastal paint. It is a beautiful color!   I used two coats and then let it dry completely.


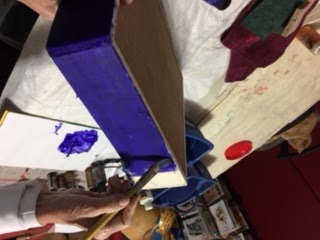
Here comes the fun part.  Using Martha Stewart's Largo Blue coastal paint I used the design roller to roll on the beautiful design.   Instructions come on the package are super simple to follow.


Use the Matte spray (if desired) to seal the paint.   This paint does not require a sealer, however since I will use it to hold recipes I used it so that food splatter could be cleaned off easily.

Now put the clip back on.  I used the 2 small nuts and bolts.   The nut should go on the front side but will be under the clip and not cause any problems.


Now to make the stand.
First cut your wood to size using the Proxxon table saw FET


We need a slot for the clipboard to rest in.  To do this you will make a slot (dado) to fit the clipboard.  The splitter and the blade cover on the table saw need to be removed for this.   I adjusted the blade to approx. 1/4" depth and set the blade to tilt to 15 degrees.  This is so the clipboard will lean slightly.   Using the fence set about 1/2 inch from the blade run your piece of wood over the blade.  Important the blade should not cut completely through the wood, but about halfway   This is going to make you a narrow groove.   This groove is too thin for the clipboard to sit in so you will need to move the fence just slightly farther away and run the board through again to widen the groove.  After you do this check the fit with the clipboard.  You may have to run it through a third time.  You want it to slide in easily but not be overly loose.  


Sand all your sides and edges using the Proxxon OZI/E detail sander.    Seal the wood with sealer of your choice.


I noticed that the clipboard wanted to tip over backwards but I did not want to make the stand any bigger so I drilled 2 1/4" holes 1/2" deep into the back edge so that I could insert the dowels to stabilize it.  These can be removed when storing to save space.   


this is the backside

I would like to thank  and Proxxon Mini Tools for their support and for supplying tools to make these projects
I would also like to thank plaid paints  
  For sending paints and new products and Patterned Rollers to do these projects.  
Plaid has some new and exciting paints to try. 
Last but not least Terri Sproul our point of contact , coach and leader. Also the person who jumps in to help whenever and wherever it is needed.
I also want to thank all of  our supporters who come and visit and like the blogs.  Without you this would not be possible. 


Friday, January 5, 2018

How to make a cute little train from yard scraps

Hey everybody, welcome to winter.!  Now that Christmas is over I thought it was time to get a head start on spring and do a little yard work before it gets too darn cold. We have a giant boxwood bush that was just getting out of control.  So time for pruning.  This left me with an abundance of limbs of all sorts and sizes.  
Hmm..... what can I do with this?

How bout we make a train?


Supplies and Equipment:

Wood pieces (limbs) of various sizes
wood plank (for mounting train)
wood glue   (I used gorilla glue for wood)

3 LED tea lights  (optional)
1 1/4" forstner drill bit  (optional if using tea lights)

OK, first thing to do is to cut our pieces to size.   I did not measure anything, I simply cut the pieces to sizes I liked and that looked pretty good together.   I made some flat sides so that they would sit well.  I cut a tall piece and a smaller piece for the engine plus a smokestack.  Then I cut 3 pieces for the cars.


I cut a whole bunch of wheels using the Proxxon mini table saw.   In the end I think it needs 16 wheels.  This was fun and so easy.  This table saw is amazingly quiet which I feel helps take out the fear factor of a big table saw.   And, the cuts are extremely smooth.    But, you still have to watch your fingers as it is very sharp.
.


The smoke stack sits atop the curve of the engine part so it needed a little adjusting to make it sit flush.  This is easily done with the Proxxon scroll saw.  Just make a little concave cut in the bottom.  This can be fine tuned using the Proxxon OZI/E detail sander


I used a 1 1/4" forstner bit to drill some recessed holes into the top of the "cars" because I wanted to put some tea lights in them so that the train might be used as a night light.  This step is purely optional.  A person might want to glue some rocks on top, paint them black like coal,  or flowers, or ...  This could easily be decorated for Christmas.   


OK,   now glue everything to the wood plank and let dry well.  If this is for a child I would advise maybe adding some screws in the bottom for stability, but glue works just fine if it is not going to be handled roughly.  


All done..  paint or decorate as you choose. 
toot toot....

From trash to train.   This was fun and made so easy with Proxxon tools.   If you haven't already, you really should check out their line of tools at www.proxxon.com  They are built especially for the crafter in mind, smaller in size but accurate to a fault.   Have a happy and safe New Year everyone.!

Sunday, December 31, 2017

How to Make a Statement Piece of Jewelry

This piece of jewelry really does make a statement—as it should. Any statement piece is easy to identity because it is chunky, unique, and attention-grabbing. This statement necklace is meant to be the defining piece of your outfit. It will set you apart from the crowd.

Supplies for Making the Statement Necklace

  • 2" x 10" x ¼" piece of MDF
  • Four gold tone focal beads
  • Eight 6mm glass beads in a color to coordinate with you choice of napkin
  • Twelve 3mm to 4 mm glass beads in a color to coordinate with you choice of napkin
  • 12" to 15" 24 gauge brass jewelry wire
  • 14" to 20" gold tone jewelry chain (depending upon the length of your finished piece)
  • One jewelry clasp with jump rings
  • Gesso
  • Mod Podge
  • Napkin with design of your choice 
  • Classic Gold Liquid Leaf by Plaid Enterprises
  • Pattern for kite-shaped pieces

Equipment for Making the Statement Necklace

  1. Prepare and mount the pattern on the 2" x 10" piece of MDF. To apply the pattern to the MDF, cover the MDF with painter's tape, spray the reverse side of the pattern with adhesive spray, and adhere the pattern on top of the painter's tape. The painter's tape allows for easy removal of the pattern. 
  2. Cut the necklace pieces using either the band saw, table saw, or scroll saw.
  3. Sand the edges of the pieces on the disc sander.
  4. Measure and mark ¼" from the tip of the piece and half the width of the piece for drilling the hole to attach the piece to the necklace.
  5. Mount the marked piece in the machine vise and attach to the drill stand.
  6. Drill a hole for attaching the piece to the necklace.
  7. Repeat Steps 4 through 6 for each piece.
  8. Coat all pieces with gesso.
  9. Using Mod Podge and a napkin with a design of your choice, napkin collage the front of each piece.
  10. When the Mod Podge is dry, paint the edges and reverse side of each piece with Classic Gold Liquid Leaf.
  11. String MDF necklace pieces, focal beads, and glass beads on jewelry wire, and form a closed loop at each end of the wire.
  12. Attach 7" to 10" of jewelry chain to each end of the wire.
  13. Attach jewelry clasp to the ends of the chain.
  14. Wear your statement necklace, and enjoy all the compliments that you'll receive.

Thursday, December 28, 2017

How to Make a Lap Desk

How to make a lap desk using proxxon tools


Before I start with the instructions I want to say thank you for the time we have been blogging. We started as a team and we wish to close out the year as a team. So this project was a combined
team project. Carol worked on the desk and I selected the project and did the painting.


This is a photo of the finished product.


Tools used 

Proxxon Mini Table Saw
Proxxon OZI/ E detail sander 
Proxxon Rotary Tool and small drill bit
Screwdriver

Supplies 

Wood of your choice we used 1/4" Poplar ( sides, back and front)
and 1/4" Birch plywood for Top and Bottom. 
2. Small Hinges
Plaid Folk Art paint
Krylon Crystal clear
Latch (optional)

See the cutting design below and cut your wood accordingly.


The Proxxon table saw worked beautifully for  this, it cuts fairly smoothly, even with the birch plywood which is notorious for splintering . This cut was for the sides and is cut at a 100 degree angle. 


After cutting the sides  back and front you will need to cut some dados in them for the bottom piece to slide into.  This is to ensure sturdiness.

To do this you need to take the splitter off the proxxon table saw.  Set the blade height to about 1/8" and set the fence about 1/4" from the blade.  Run the bottom of the sides, back and front across the blade to make a thin slot. Then move the blade slightly farther away from the fence and run them across again to widen the slot so that the bottom will slide in place. When sides bottom and front are put together they should all line up perfectly making a nice support for the bottom.  


Sand all the edges using the Proxxon OZI/E detail sander.


When you get the wood cut and are building the box remember that the sides will lay outside of the front and back. 


These were glued with wood glue, clamped with a corner clamp, and allowed to dry.   


Cut across the top (lid) piece three inches down from the top. this is glued to the back and the sides on the tall side of the frame. Clamp and let dry. After the desk is painted  you will attach it to bottom part of the lid with small hinges.


The box is now  partially assembled and will be painted in two sections.  After everything dries well we will put the hinges on and attach  the lower part of the lid to the top.


Painting


I started the painting with the sides of the box.  I chose

a dark blue to base coat the entire lap desk.  I left the inside unfinished. 


Since this is being made as a Christmas gift for a young girl,
Emma, who is a grandchild of our neighbor, I chose the design of a large sunflower for the top of the desk.

Line up the top and bottom, attach the hinges and the lap desk is finished.  

finished lap desk


Some of the colors I used are as follows.
Burnt Sienna 943
Burnt Umber 462
Daffodil Yellow 2912
White
Classic Green 2554
Old Ivy 927E
Hauser light green 459
Some combining of color mixed were used
to gain changing values.

I would like to thank Proxxon Mini Tools and Plaid Paints
for their continued support for this blog. I would also like to thank Terri Sproul our point of contact and gracious guide and helper.  
Wishing everyone a Happy, Healthy and
Prosperous New Year. 

Friday, December 22, 2017

A Special Christmas Gift

Today I want to show you a project that I finished and which arrived in Aberdeen, Maryland yesterday. What does a woman want who knits and crochets? Why a yarn bowl of course!

The Supplies Needed for this Project Are:
Origami paper (or whatever you prefer)
Resin
Sandpaper
Paint Brushes
Wood burner
Picture and Quote
Pink Adirondack Ink
Q-Tips

I started out with the usual moldy, dirty, gourd. After washing the outside and drying it, I cut the gourd open and cleaned out the insides. I used my Proxxon Jig Saw to cut the gourd open and once the inside was cleaned out, I used it once again to cut the opening into the side of the gourd. This is where your yarn would come out.
I then used the blade to cut around the top of the gourd to start rounding it. When all was clean both outside and in, I mixed up the resin according to the instructions and poured it into the bottom of the gourd to give it more stability.
Gourds are so lightweight that I felt the resin was needed for a little extra weight also. When this step was finished I started covering the inside of the bowl with the paper and the Mod Podge
I loved the colors in this paper and it left the inside looking so pretty. I added an extra layer of Mod Podge over the top of the paper it was dry for extra protection.
I used a shade of Blue Plaid Acrylic Paint to go around the top edge and around the edge of the 
curly-que. Once that was dry I then drew the pattern onto the back side of the bowl and wood burned it into the gourd. I used a touch of pink alcohol ink on a Q-Tip to color the ball of yarn.
After the project was complete, I used Plaid Acrylic Sealer to seal the yarn bowl both inside and out.
In case you're having a hard time seeing the back of the bowl, it says "I make string pretty". I think this is a gift that will be used for many years. Actually, as long as someone takes care of it, perhaps it can be handed down a few generations. That would be awesome. I hope you liked this project and that it might inspire you to make it for someone you know. If so you need to go to: www.proxxon.com and get these super tools for yourself and make your work go much easier.

Barbara