Showing posts with label jewelry trinkets. Show all posts

Monday, May 15, 2017

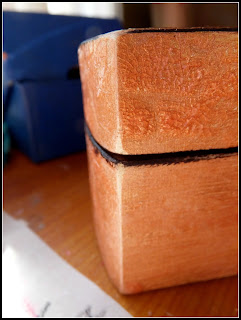
"Faith In A Box"~ Proxxon and Plaid Paints Design Team Project by Sherri Welser

"Faith In A Box"


 With Proxxon  Tools and Plaid  Folk Art Paints
by Sherri Welser

Creating this unique and fun wooden box project  " Faith In A Box"with Proxxon Tools and Plaid paints!  I love sweet little wooden boxes and wanted to find a way to paint and embellish and create that "Vintage" look. Using Plaid Folk Art  Brushed  metal paints , Proxxon Delta Sander, fun techniques and embellishments, I was very pleased with the outcome!

~Supplies~ 
Wooden box ( hinged) Approx 5 x 3
Tissue paper ~Vintage design
Mat medium gel
Clear crackle paint
Sepia stamp pad
Bits and pieces of old jewelry
Inspiration metal words
E-6000 adhesive

1) Paint the wooden box with  the copper metallic paint.

2)Brush the clear crackle gel over the paint and let dry.

3) Cover the inside of the box with the tissue paper. Gluing down with the mat medium.

4) Using  the Proxxon Delta sander, sand the corners and edges to create that "worn look"


5)When crackle paint is dry, randomly brush the outside with the sepia ink pad to create that aged look. Add some of the  Gold Brushed  metallic paint for highlights.


6)Decorate the top and front of the box with metal inspirational words and jewelry pieces gluing in place with the E-6000 adhesive.


You now have a sweet little box of your own to store special trinkets!


Tuesday, February 21, 2017

"Vintage Treasures"~ Design Team Project for Proxxon Tools by Sherri Welser

 "Vintage Treasures"

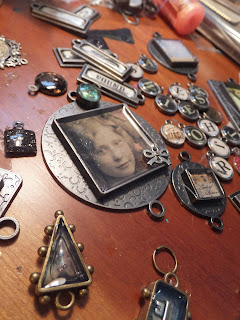
Embellish your Vintage family photos and show them off with some fun adornments and Proxxon's Drill Press! I absolutely love all things vintage / jewelry and when I saw these beautiful cabinet cards in an antique store I knew I had to find a way to honor them and bring them back to "life".
Below I have included the supplies and instructions for creating your very own Vintage Treasure!

~Supplies~
4 x 6 Vintage Cabinet Card ( these are the heavy card stock mounted photos)
Metal ,glass bead,charms and trinkets
Flat circular metal pieces for the outsides of the holes,buttons ect
chain
Epoxy resin ,vintage ephemera, bezels  ect if you would like to create your own bezels
Weldbond Glue
Jump rings
Metal connectors for hanging
 Vintage style Paper flower


 1) Gather all your trinkets and charms and decide where you would like them to fall on the chains. 


2)Cut your chain to desired length and cut at different intervals to create visual interest. 4 lengths in all
3) Mark where you would like the holes to be at the bottom of the photo and drill holes using the Drill press.  The drill press works well because of the stiffness of the card stock.
4) Take the circular metal pieces and place on top of the holes making sure the hole you just made and the hole in the metal line up. Glue metal pieces on using the Weldbond.

5) Attach jump rings to  the holes in the bottom of the photo here and to connect the chain where you have a break adding in the embellishments. This way you can connect the items together to hang down.


6) Add the charms, bezels and fun items on the chains having them fall at different lengths.
**To create your own bezel it is very easy by using a blank bezel , measuring paper ephemera to fit inside the bezel, gluing that down and then adding the epoxy resin over and let cure about 24 hrs


7) Using the metal connectors glue onto the top  of each corner of the photo with the ring end up.
8) Using a jump ring on each side attach the beaded chain to create a "hanger"
9) Attach a paper flower in the middle for added visual interest with the Weldbond Glue


I hope you have enjoyed this fun and creative way to add new life to old Vintage Photos!

Tuesday, May 10, 2016

~Vintage Embellishing Part 2~ Proxxon Tools Design Team Project by Sherri Welser


~Vintage Embellishing Part 2~


Welcome back to the second part of my vintage embellishment table project!! The reason why it is called "vintage" is because I wanted a project where I incorporated small old jewelry trinkets and charms and then that grew into adding inspirational messages and basically anything that held meaning to me. The other piece I made before this was actually 
 an old church window and it did have a very Vintage feeling to it!


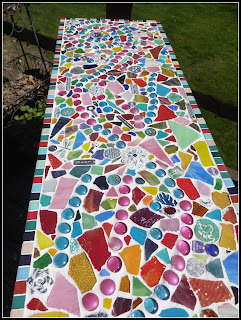
Here you see the table after all the pieces were glued down.. it's now ready to grout!


~Supplies~

*Mosaic grout~ I bought the  grout that is for glass and glass tiles as it doesn't scratch the more delicate glass objects. I found it at Michaels and you will need at least a 12 oz for a 3 ft table.
* Rubber Gloves
* Damp Towel
* Grout Sealer


  Here you see the difference between the grouted area and the non grouted area. I just used rubber gloves to apply


  When Applying make sure you push the grout down in all the empty spaces  with your rubber gloves on and wipe off any excess 
( this is a messy job!)


Here you see the finished table and the last step is  to seal with a grout sealer/protective layer. You can either use a spray sealer or a brush on. I decided I wanted another decorative element so also added these metal tiles on the bottom shelf. This is a beautiful piece that will add a special decorative and sentimental element to any room! And it all starts with great tools! I love Proxxon Tools for all of my projects, they are very versatile easy to use and the craftsmanship is wonderful!


Hope you have enjoyed this fun embellishing project and see you next time! I will be offering an online workshop for creating these beautiful pieces in June! Visit my website for more details www.indigoearth.artfire.com

Workshop listed soon!