~Vintage Embellishing Part 2~
Welcome back to the second part of my vintage embellishment table project!! The reason why it is called "vintage" is because I wanted a project where I incorporated small old jewelry trinkets and charms and then that grew into adding inspirational messages and basically anything that held meaning to me. The other piece I made before this was actually an old church window and it did have a very Vintage feeling to it!
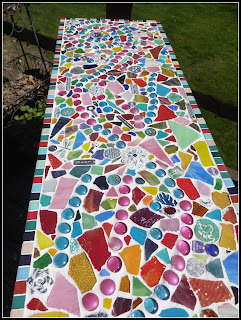
Here you see the table after all the pieces were glued down.. it's now ready to grout!
~Supplies~
*Mosaic grout~ I bought the grout that is for glass and glass tiles as it doesn't scratch the more delicate glass objects. I found it at Michaels and you will need at least a 12 oz for a 3 ft table.
* Rubber Gloves
* Damp Towel
* Grout Sealer
Here you see the difference between the grouted area and the non grouted area. I just used rubber gloves to apply
When Applying make sure you push the grout down in all the empty spaces with your rubber gloves on and wipe off any excess
( this is a messy job!)
Here you see the finished table and the last step is to seal with a grout sealer/protective layer. You can either use a spray sealer or a brush on. I decided I wanted another decorative element so also added these metal tiles on the bottom shelf. This is a beautiful piece that will add a special decorative and sentimental element to any room! And it all starts with great tools! I love Proxxon Tools for all of my projects, they are very versatile easy to use and the craftsmanship is wonderful!


No comments:
Post a Comment