Friday, October 27, 2023

 ~Vintage Story Telling Blocks~


by Sherri Welser

I love everything Vintage and when I had purchased some blocks I had something fun in mind! Follow along with me as I take you on a "story telling adventure"!

Supplies

Proxxon OZI 115/e

 6 Square wooden blocks

White crackle paint( Ranger  brand is what I used)

Copper acrylic paint

Sepia stamp pad

Brown stain wax (craft)

Tim Holtz Victoriana paper cut outs and ephemera

Mod Podge 

Large buttons or jewelry components

E6000 glue

Sepia Stamp pad


I started by taking the Proxon Ozi with sand paper  on the attachment and  rounding off the corners so they weren't so square. 


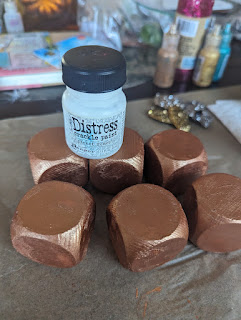
After rounding them over I painted on a base coat of the copper acrylic paint covering each block 


I then applied the  Distress White Crackle paint in a thick layer over the copper paint.


 Let completely dry... To deepen the cracked look I applied some brown stain wax to get in all cracks and give that" vintage look"


I then added fun little Victorian ephemera such as flowers, butterflies and  old fashioned children
I used the distress Sepia ink pad to age the edges of the papers . 


I previously had chosen the jewelry "tops" for the blocks so at this point I was ready to apply them with the E 6000

After attaching the paper ephemera and gluing the Jewelry items on top I added some inspirational words " as to tell a story"


I always enjoy finding  unique and different ways to create from every day items! I hope you have been inspired to create your own "story"....




Wednesday, October 18, 2023

How to Recycle an Old Frame into the Perfect New One

I needed a specifically sized frame to display one of my bobbin lace pieces. Yes, in addition to creating with my Proxxon tools, I make bobbin lace. With no read-made frame available, I decided to make my own using Proxxon MICROMOT tools and an old frame that I found at a local thrift shop.


These are the supplies and equipment that I used:

Here's how I transformed an old frame into a perfect new one:

  1. Here's the thrifted frame with dimensions of about 20" x 16". I needed the picture area for my new frame to be 15" x 4".

  2. The first thing I did was to tear away the backing and remove the old mat and picture. When the backing was removed, I could see that the frame was held together with corner staples—ones that there was no way I could remove.

  3. I used the bandsaw with the miter gauge set to 45° to cut away the stapled section at each corner. I was left with ­four lengths of picture framing.

  4. Next, I used the chop and miter saw to cut each side using the 45° pre-set stops and the longitudinal fence stop to insure accurate lengths.

  5. Now I was ready to glue and clamp the sides together forming my new frame.

  6. I used a glass cutter to cut the glass from the thrifted frame to fit the new frame.

I'm thrilled with my new frame. It cost a small fraction of what a purchased custom frame would have, and I have the satisfaction of knowing I made it myself!!


    Carole

    Sunday, October 15, 2023

    Building A frame For A Trade Sign


    Hi everyone!  This is part 3 of building my trade sign.  This is the final step aside from painting it, which will come at a later time.  Follow along with me and I'll show you how I built the frame. 


    Supplies:
      Clamps
      Wood Glue
      Brad Nailer and Brads
      Pine Trim Molding


    First, I needed to cut, glue and clamp the trim across the curved top of the sign.  Using the 6table saw I cut a length of trim with excess on both sides. Knowing that this piece had to be flexible, I needed to soak it in water.  I wish I had taken a photo, but I forgot.  I soaked it in our pool for two hours. Removed it and bent it across the top curve.  Using clamps, I held it in place till it dried.


    Once it was dry, I removed it. I cut it to size with a tiny bit extra. I then glued it and re-clamped it.  Next came the sides. I held a piece of trim up to figure the angle I needed to cut it. I wanted that piece to slide up under the top trim.  I marked it and cut the angle with the band saw. Checked for length and trimmed using the table saw.  I applied glue and attached the side. I repeated for the other side.


    I measured and cut the bottom trim. When all the pieces were glued, I used the brad nailer and brads to secure everything.


    Lastly, I used the Belt Sander to sand off each corner for a perfect fit.


    My project is complete, except for painting.  That's coming at a later date. I'll be sure to post a picture when its painted!  Thanks for following along  :-)
    Colleen


    Saturday, September 30, 2023

    Easy Glass etching

     Hi everyone.   

        Today I want to show you something different.  I want to show you how easy it is to etch on glass,  In fact, almost any glass surface can be etched using the Proxxon engraving tool. You will be amazed at how easy this is to do.   I know I was.  


    Supplies and Equipment

    1. a glass surface to etch on  

    2. Proxxon engraving tool

    3 Etching bit which is a diamond coated burr.

    4 Safety glasses

    5 a pattern or drawing to work from (unless you are awfully brave and feel like winging it.


    I chose a very simple pattern to do today.  

    It has a couple elements and some writing so I can show off the tool.   

    1st step is to either draw it on the cup or what we are going to do which is to place it on the inside of the glass where we can trace over it with our engraver tool.


    Now enjoy the video.   Please excuse my multiple faux pas.  I am a rank amateur as a videographer.  


    Here is the final result after I added a few more touches.  I put the liquid in the cups to emphasize the engraving.   Mike has his cup and I have mine,  I don't see how they can confused now.  😵


    I forgot how fun the Proxxon engraving tool was.   Personalize something for someone and it becomes special.  A few ideas; wedding aniversaries, baby births, birthdays, graduations etc.   Have fun.  

    Thanks for visiting.  Come back soon for some more creative fun.  Carol

    Sunday, September 17, 2023

    How to Make the Perfect Leaf Print Night Light Using Proxxon Tools

     First, I must confess that I've totally copied this night light project. The original was conceived, designed, and executed by Colt, a ten year old Proxxon woodworker. Yes, you read that correctly—ten years old. If he can make it, so can you. 

    I've taken Colt's idea and broken it down into easy to follow step so you can create a similar night light.

    Here are the supplies and equipment that you'll need:

    Instructions for making the Leaf Print Night Light:

    1. Cut the wood blank to size using the bench circular saw.

    2. Print and cut out the leaf template. Transfer the leaf outline and veins onto the wood blank. 

    3. Using the bench drill press and a 1/64" drill bit, drill holes along the outline and veins about 3/8" to 1/4" apart.

    4. Color the leaf with crayon, marker, or acrylic paint. Trace the outline and veins in black.

    5. Hot glue the finished leaf print blank to the night light.
    6. Enjoy!! 

    Here's Colt working on an unrelated project, but it's too cute not to share. 

    Carole

    Sunday, September 10, 2023

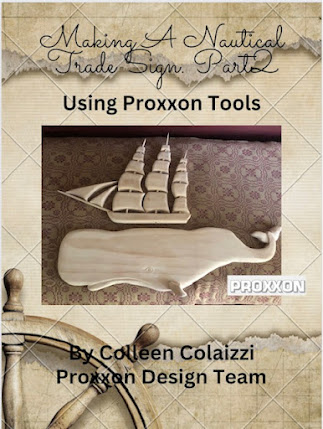
    Making A Nautical Trade Sign Part 2


    Hi everyone.  Today I'm continuing on with may trade sign.  This will be part 2.  The ship will be above the whale when everything gets assembled on the background board which will be part 3.  Follow along with me to see what tools I used and how I made it  :-)


    Supplies:

       Scraps of clear pine  3/4" thick
       3/8" wood dowel rod
       Wood Glue
       Drill


    First, I tried to decide how big I wanted to make the ship. I laid a piece of pine above the whale to figure the length. I then drew the ships hull on and cut out with the scroll saw.


    I cleaned up the edges using the Proxxon Disc Sander.


    Next, I cut some dowel rod for the masts.  Using my drill I made a hole in the hull, at an angle for the front pole.  I sanded the pole to a point with the disc sander and inserted it in the hole.


    Next, I drew out the masts on the 3/4' clear pine and cut out with the scroll saw. 


    I started to lay out my pieces to see how the looked and were lining up as far as size.  After I was satisfied, I continued on with the rest of the rows of masts.


    Now I needed a way to connect the masts together.  I drilled a hole in the top and bottom of each one and inserted small pieces of dowel that I cut on the Micro Band Saw.


    After all the holes were drilled, I started to sand each piece.  I initially started with the belt sander, which worked great. Because I had so many pieces, I switched to the Long Neck Angle Grinder.  It seemed to work much quicker.  I sanded them to give them a 3D look.


    Using the small pieces of dowel, I connected all the masts together.


    Here's how it looks sitting above the whale.  


    This completes part two!  Part 3 will be making the board they get mounted on, then painting everything and assembling it all.

    Thanks for following along.  See you next time!
    Colleen :-)