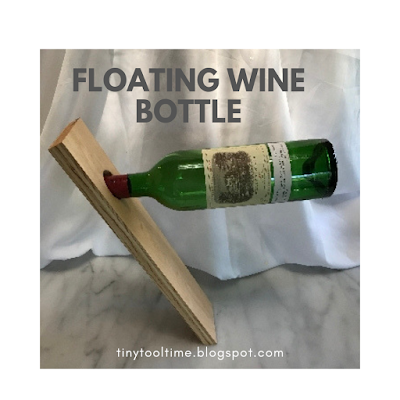
This floating wind bottle pillar will amaze your friends!! It's also a great project for working with the angle adjustments on your Proxxon tools.
Supplies and Equipment for Making the Floating Wine Bottle Pillar
Instructions for Making the Floating Wine Bottle Pillar
- Set the longitudinal stop on the table saw so the cut board measures 3¼" wide.
- Measure and mark a line across the width 15" from the top.
- Adjust the angle of the bandsaw to 27° and cut on the marked line. This is the bottom of the pillar.
- Measure and mark a line 3 1/8" from the top. Measure 1 5/8" from one edge and mark a cross line. The intersection of the two lines is the center of the 1½" hole that you will drill.
- I pulled out DH's big drill for drilling the 1½" hole for the neck of the wine bottle.
- Sand the edges on the disc sander. Adjust the angle of the table to 27°to sand the bottom end of the pillar.
- Sand the surfaces with the Delta Sander, using progressively finer grits of sandpaper.
- Apply the finishing of your choice to the floating wine bottle pillar—paint, stain, wax. I chose a paste wax finish.
- Amaze your friends with a floating wine bottle!!


2 comments:
Looks like a magic trick! Love it, Does the kit come with wine? Just kidding. clear tutorial, I might just make one.
Wow now aren't you clever? That is such a neat project and I can see it being quite a conversation piece. Great project Carole!
Post a Comment