Friday, January 27, 2017

Proxxon Tools and Birds?

I used some of my Proxxon tools to create a lovely little bird picture. I love birds and have had the pleasure of viewing many of them since I've moved. Pelicans, Cormorants, Coots, Seagulls and Cranes spend the Winter here, but there are many small birds who have been coming to the feeder. I have several different paper napkins in my stash and when I came across one with a chickadee on it I had to make something with it.

These are the supplies I used:

Proxxon JigSaw
Proxxon Belt Sander
Proxxon Oscillating Sander
1 piece of thick pressed cardboard
white gesso
1 napkin
1 stamp
ink
ruler
pencil
mod pauge

These are the tools that I used and the adapter.
I used the ruler and pencil to mark a 4 X 4 square on the cardboard and then used the Proxxon JigSaw to cut it out.
Once I had cut the cardboard piece out, I used my  Proxxon Belt Sander and also the Proxxon Oscillating Sander to smooth out any imperfections. The sanders did an awesome job. After this step was finished I painted the piece with white gesso and once that had dried I painted it with Mod Pauge. I then separated the two pieces of napkin (front and back) and laid the piece with the printing on it across the board and smoothed it out. I used ink to go around the edges to give it an antiqued look and also used ink and a stamp to stamp "I am seeking" on the piece. "My Sanctuary" was already part of the piece. I used a Micron Pen .05 to bring out the bird a little more and then spread Mod Pauge over the top of the piece to seal it.


Here are two pictures of the finished piece setting on a little easel. I think this would make a cute gift, if put inside a basket along with some other things don't you? Make sure that you go on over to the Proxxon Tiny Tool Page to see these and other tiny tools that you need to have in your work space!


Barbara

Friday, January 20, 2017

#Love Mixed Media Canvas

Hi everyone Steph Ackerman here today with a mixed media canvas.

 
I began by gluing tissue paper to an 8" x 8" canvas, allowing lots of wrinkles to show.

 
Once the canvas was dry, I sprayed several colors of Tattered Angels Glimmer Mists about the canvas.  While drying, I used the Hot Wire Cutter to cut a heart from Smoothfoam.  The Hot Wire Cutter cuts Smoothfoam like butter - smoothly and easily.
 
 
Next, I used the Proxxon Precision Rotary Tool on a large metal embellishment.  I used the small round sanding bit to scuff up the embellishment. 
 
 
I then used the tiny ball sanding bit to get into the crevices. 

 
I painted the heart and stamped #love about the heart and added some  metal embellishments on top. 
 
 
I painted the metal embellishment and it nestled perfectly above the heart.
 
 
I added stickers about the canvas,  Then I randomly stamped #love in black ink and tiny hearts in pink ink.


Now you are ready to hang your canvas.


Sunday, January 15, 2017

From Free Scraps To a Nifty Checklist Board

I really get a great deal of satisfaction out of using scraps and recycled materials for my projects. This nifty memo board scores on all counts.

You'll need these supplies:

  • Scrap of ½" thick MDF or wood that is at least ¾" wider than your roll of paper and as long as you want it 
  • One wire coat hanger
  • Cutting strip from a box of kitchen wrap
  • Roll of adding machine tape
  • 4" length of ball chain
  • 2 ball chain crimps
  • 2 tiny eye screws
  • 2 finishing nail about ¾" long
  • Strong adhesive
  • Acrylic paints, napkin, Mod Podge for decorating

You'll need these tools:

The first step is to cut the base piece to your desired dimensions using the Proxxon Table Saw FET. I just happen to have a piece of ½" MDF the right size that I had previously cut. The dimensions of mine are 8"x½"x2¾". You'll also need to cut a small length for the cutting bar. It should be the width of your base piece, and about ½" high and ¼" thick. The dimensions of mine are 2¾"x½"x¼".

Next, cut the coat hanger into two U shapes. One leg will be as long as your paper roll is wide (mine is 2¼"). The bottom of the U needs to be as wide as the combined thickness of the radius of the paper roll plus the thickness of the base board plus ¼" or so of wiggle room (mine measures 2"). Leave the second leg for now; we'll measure and cut it later.

Now, measure and mark the placement of the holes on each side of the base board where the wire hangers will go. Mine are 1" from the top of the base board and centered at ¼".

Drill these holes as deep as your bit will allow, using a bit just slightly larger than the coat hanger wire.

Measure and mark a point centered on the cutting bar and about 3/8" from each side. Now, position the cutting bar on the base board, and clamp the two pieces together. Mine is about 1" from the bottom of the base board. Using a fine drill bit in the Proxxon Professional Rotary Tool, drill pilot holes for the nails that will hold these two pieces together.

Now, you're ready to measure and cut the second leg of the coat hanger. Put this leg into the holes that you drilled near the top of the base board. Mark how far they go in, and measure this length from the base of the U and cut off the excess. You should end up with wire hangers that are about this size.

Now it's time to decorate your memo board. I started with a coat of gesso, but white acrylic paint would work, too. You want to seal the MDF, and the white color allows the true color of your selected paint to show. Don't forget to seal and paint the small cutting bar. 

How you decorate and embellish your board is totally up to you. I chose to napkin collage the top surface of mine and paint the other sides a complementary color.

While the napkin collage is drying, cut a piece of cutting strip from a kitchen wrap box the same length as your cutting bar piece, and glue is to the bottom of the cutting bar with a strong adhesive.

This cutting strip should be thick enough to allow the paper from the roll to slide under the cutting bar. If not, add a couple pieces of cardstock cut to size under the cutting bar. Using the pilot holes that you previously drilled, nail the cutting bar to the base board. Be sure that the cutting strip faces toward the bottom of the board.

I added two tiny eye screws and a length of ball chain secured with crimps to the top of my memo board for hanging. Add the paper roll by inserting the longer leg into the center of the roll, and the shorter leg into the holes that you drilled to hold the wire hanger. Repeat on the opposite side with the remaining wire hanger. Thread the end of the paper under the cutting bar.

Now you're ready to put your memo board into use. I've got my grocery list on mine :)


Carole

Friday, January 13, 2017

A Simple Votive Holder made with Proxxon Tools

You know, having Proxxon Tools in your workroom really make the projects that you tackle a lot easier. With Valentine's Day as our next holiday, I thought that I would make a simple votive holder with a Valentine theme to it.

These are the items needed:

Proxxon Jig Saw
Proxxon Belt Sander
Red and Gold Acrylic Paints
Thin lace
Votive candle
Gourd (small) (I picked one that also was shaped like a hershey kiss)
Heart Pattern
Pencil

Here's my gourd with the heart pattern which I cut out of cardstock traced on it.
I used my Proxxon Jig Saw to cut the heart out and then cleaned out the inside.
 Once cleaned, I used my Proxxon Belt Sander to smooth out the edges and any spots inside that needed it.
I then painted the inside of the gourd gold, and the outside red. I did paint the stem gold also. I then glued some thin lace all the way around the heart. I think it set the heart off.
And here's the finished holder with the lit votive in it. I think it turned out super cute and the Proxxon Tools that I used made the project so easy to accomplish. I think this would be rather romantic set on the table Valentine's evening.

Barbara


Friday, January 6, 2017

Stencilled Wall Hanging

Hi everyone Steph Ackerman here today with a stenciled wall hanging. 


Begin by adding gesso to a panel.  Allow it to dry then use the Delta Sander to sand the surface.  This give the surface some "teeth" so the spray inks will shine.


Spray on an assortment of Tattered Angels Glimmer Mists, allowing each color to dry before adding the next color.  To work faster, consider heat setting each layer.


Once the panel is dry, place the stencil in place and use molding paste to create a 3 dimensional look to your wall hanging.
 

Allow to dry completely, then paint Tattered Angels High Impact Paints randomly on the words.


Add a flower to the left corner, then use the Model Building Set to create 3 holes in the right corner.  


Slip beads onto wire and insert into the holes.  Bend the beaded wires into a pleasing design.


Create a hanger with some rope.

 
Remember to have no fear of the future.
 
Thanks for stopping by.


Wednesday, January 4, 2017

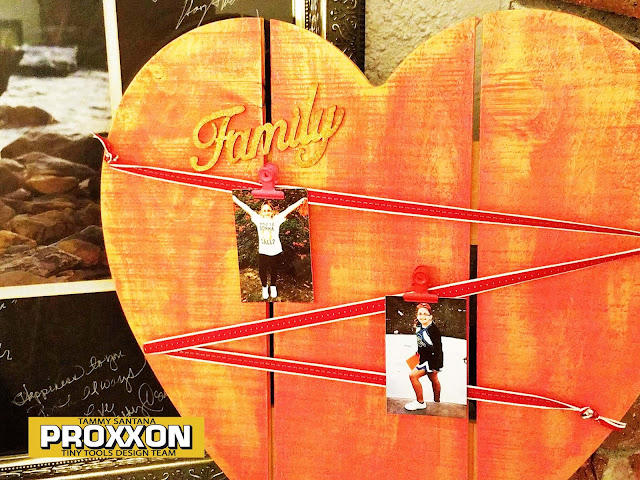
Photo Display Mini Heart Wood Pallet


Hi everyone! Tammy here with you today, with a fun wood pallet project. I love creating home décor items with my Proxxon Delta Sander and this one is definitely one of my favorites.
Here is how I made it...

Supplies:
Proxxon Delta Sander
Heart shaped mini wood pallet
Red paint
Gold metallic paint
Glitter paint
Die cut "Family"
Ribbon
Eye hooks

Directions:


Knock down some of the grain of the wood with the Proxxon Delta Sander.


Paint with red paint, let dry completely


Dry brush metallic gold paint lightly onto the wood to create a rustic effect


Add a glitter painted "Family" die cut with Glue Dots


Add eye hooks and ribbon

 Add your favorite family photos and enjoy! I hope this has given you some unique ideas on how to use your Proxxon Delta Sander.
 Let’s be friends!


Sunday, January 1, 2017

Unique Fan Guard Sticks Made with Proxxon Tools

In addition to working with Proxxon Micro Tools, I am also a bobbin lace maker. I wanted something special for a half fan that I made, so I decided to make my own unique fan guard sticks.

Tools and supplies for making the fan guard sticks:

While I had a set of fan sticks, I wasn't thrilled with the guard sticks, so I decided to make my own using my Proxxon tools. I chose a length of bubinga wood for the fan guard sticks. The piece that I had was about 15"x4", so the first step was cutting a 1/8" thick strip from this length. I began by setting the blade height on the Proxxon Table Saw FET to be sure that the cut would go all the way through. You can see that the blade is set just a bit higher than the depth of the bubinga.

I used the longitudinal stop to guide the length of wood through the blade.

The result was a 15"x1/8" strip of wood, ready to be fashioned into fan guard sticks.

After cutting the 15" length in half, I measured and traced my desired shape onto the thin strips of wood.

Next, was shaping the guard sticks on the scroll saw.

Last step for the fan guard stick was to drill a pivot hole at the bottom end using the Proxxon Professional Rotary Tool mounted in the drill stand. This bubinga wood cut so smoothly that it didn't even need sanding!! Great wood to work with. I love bubinga.

Now to mount the lace onto the fan sticks. I used an archival, water soluble adhesive to glue each fan stick to the lace. Here the lace it ready to mount onto my newly made guard stick.

Here's picture of the finished fan—mounted on the fan sticks with my custom made guard sticks!! 


Carole