Sunday, April 3, 2016

Fallen Fairy

For Easter my grand daughters received a fairy garden, but this little fairy succumbed to a tragic fall and broke her wing.

This needed more than just a dab of glue. It was my Proxxon Engraver to the rescue!! I began by marking corresponding marks on the broken wing and the fairy's body. With a 1/64" bit in the Proxxon Engraver I drilled three holes in the wing and three in the body.

Here you can see the holes in the body.

Starting with the wing, I put a dot of E6000 adhesive on the tip of a very fine pin before inserting it into the wing.

Three pins were inserted into the holes on the wing that I'd drilled using the engraving tool.

When the glue was set, I used wire cutters to shorten the pins.

After coating the exposed shortened pins and the wing surface with a thin layer of E6000, these shortened pins were inserted into the corresponding holes on the fairy's body. The injured wing was stabilized with a rubber band while the adhesive dried.

Here she is, back in her native habitat. All better, ready to fly. None worse for the wear.


Carole

Friday, April 1, 2016

Upcycled Family Shelf

Hi everyone Steph Ackerman here today  to share how I upcycled and repurposed a wood family shelf.  Whether you make a shelf or purchase an unfinished shelf, it's quite easy to customize a shelf that fits your décor. 


Supplies:
Proxxon Tools:  Delta Sander
Ann Butler Designs Iridescents - Berry, Onyx
Wood Shelf

This shelf had some texture and detailing that was definitely not pleasing to the eye.  Since the shelf is a nice size, I wanted to upcycle it.  Out came my Proxxon Delta Sander and I got to work sanding off the bulky texture. 

 
Because of it's shape the Delta Sander was able to get into the smallest of areas.  Sanding this shelf would have taken me hours with a sanding block, but using the Delta Sander cut down my sanding time dramatically. 

 
Using Ann Butler Designs Iridescents, I painted the letters and the edges of the shelf with Berry Iridescents. 
 
 
Then I painted Onyx Iridescents on the top for a dramatic effect. 
 
 
Now the shelf is ready to display all kinds of knick knacks.
 
 
Thanks for stopping by today.


Friday, March 25, 2016

A New Name Tag Made from a Gourd Scrap!

One of the things the Missouri Gourd Society asks it's members to do during the yearly Gourd Festival is to wear a name tag made from a scrap of gourd. I've had one that I made the first year that I was a member but had said I was going to make a new one for this year's festival. Well that festival is coming up in just a few weeks, April 8, 9, and 10. So I thought for my project this week I would just go ahead and make mine.

Items needed for this project: 
Proxxon Jig Saw STS 12/E
Proxxon Belt Sander BS/E
Proxxon MICROMOT Tool Clamp No 28 410
Proxxon Delta Sander OZI/E
Proxxon Footswitch FS
Woodburner
Inks/Stains
Embossing Pen and Powder
Paint
Mini Bottle Gourds Cut in half
Scrap Gourd to cut your name tag out of
Cord
Beads

This name tag was meant to be a fun project and I did have fun doing it. To begin with I cut a tag out of a scrap piece of gourd that I found after digging through many pieces, using the Proxxon Jig Saw STS 12/E. ( I save just about every scrap piece of gourd that I have)


 Once the piece was cut out, I used the Proxxon Delta Sander OZI/E. I started the sanding on the edge and back of the piece.
I then hooked up the MICROMOT Tool Clamp and the Proxxon Belt Sander BS/E to finish the sanding.


And I should mention that if you are doing any sanding, always wear a respirator of some sort to protect your lungs, especially with gourd dust.

Once I got all of the sanding and prep work done I used a pencil to lay out my design and then wood burned my letters into the piece. I colored the gourd piece with some ink and then glued the mini bottle gourd halves to the gourd piece and then used a PITT Pen to write on them "Show-Me Gourd Society".  I then glued a Razorback hog on the front, painted the back of the piece and used my embossing pen to go around the edge and used black embossing powder around the edge. When all was done I added the cord with some beads on it to wear it around my neck. Here's the finished result:
In case you didn't know, the Razorbacks is the name of the University of Arkansas' sports teams, and Missouri is the "Show-Me State". Arkansas doesn't have a gourd society so our little "patch" belongs to the Missouri Gourd Society. Those little tiny bottle gourds are no more than an inch and a half tall.
I'll have fun wearing this!

Barbara


Wednesday, March 23, 2016

Japanese 4 Hole Stab Binding Book

Books in Japan date back to as late as the 8th century AD. Traditionally, books were made of washi (Japanese paper). Because washi doesn't easy yellow or become brittle with age, ancient Japanese books are remarkably preserved, with some dating back to the 11th century!

Fukuro toji (袋綴じ), or "bound-pocket books“ were created using stacks of double-wide paper, individually folder and sew on the loose edge - the edge opposite the crease. This increased the strength of each page and allowed for the use of very thin papers. Stab binding is a type of Fukuro toji. Traditionally, the holes for sewing were made with a book awl. Using a Proxxon Bench Drill Press TBM 115 simplifies the process and makes it quick and easy to create a wonderful little book.

These instructions make a 6" x 4" book that has 16 pages (32 sides).


Both kits include everything you need, including pre-cut decorative and text weight papers, thread, thread, instructions with illustrations and a needle! All you need to supply is scissors, glue and bulldog clips and a way to make the holes.


What You'll Need

  • Two pieces of 7" x 5" decorative paper (front and back covers) 
  • Two pieces of 6" x 4" text weight paper (the "end papers") 
  • One piece of chipboard 6" x 4" to use as a template - cereal box will work 
  • 16 pieces of 12" x 4" text weight paper (the "book block" or body of the book) 
  • A 2" square piece of bookcloth to make the protective corners 
  • 40" of decorative thread (like embroidery floss) 
  • 12" of linen thread (to sew the inside binding) 
  • Scissors 
  • Good quality paper glue, like Alene's Tacky Glue 
  • Scrap paper to glue on 
  • Toothpick 
  • Needle 
  • 1/4" Bulldog clips 
  • Bone folder (optional) 
  • Small scrap of wood to use under the book when using the drill press 
  • Proxxon Bench Drill Press TBM 115
  • Proxxon Original German Chuck for the TBM115
  • 1/16" Drill Bit 
  • 3/32" Drill Bit


Steps To Follow 

1) Fold the sixteen 12" x 4" papers in half along the short dimension. Burnish each fold well so you have a nice, sharp crease. A bone folder works great for this, but you can also use your fingers or the edge of a ruler.

2) Stack the 16 pages together. Add an end paper to the top and the bottom of the stack. Carefully line up the stack and secure it with bulldog clips. Mark 4 holes to be used to sew the book block together. Each pair of holes is 1" from the top/bottom of the book and are 1/2" apart. Be sure your marks are on the spine edge (the loose edge) of the book. Remember, in a traditional Japanese book, the folded edges are opposite the spine.


3) Use the Proxxon Bench Drill Press TBM 115 fitted with the Original German Chuck for the TBM115 and the 1/16" drill bit to drill the four holes. Put a small scrap of wood under the book block to reinforce where you're drilling.


4) With the linen thread, sew the bookblock together. Sew each pair of holes individually and tie the thread ends tightly with a square knot. I like to hold the first half of the knot down with a toothpick while tying the second half. Having a friend help hold the toothpick in place makes this much easier! Trim the ends to about 1/2" I like to put a very tiny bit of glue on each knot and tiny dots to glue the tails in place. You only need a very small amount of glue!


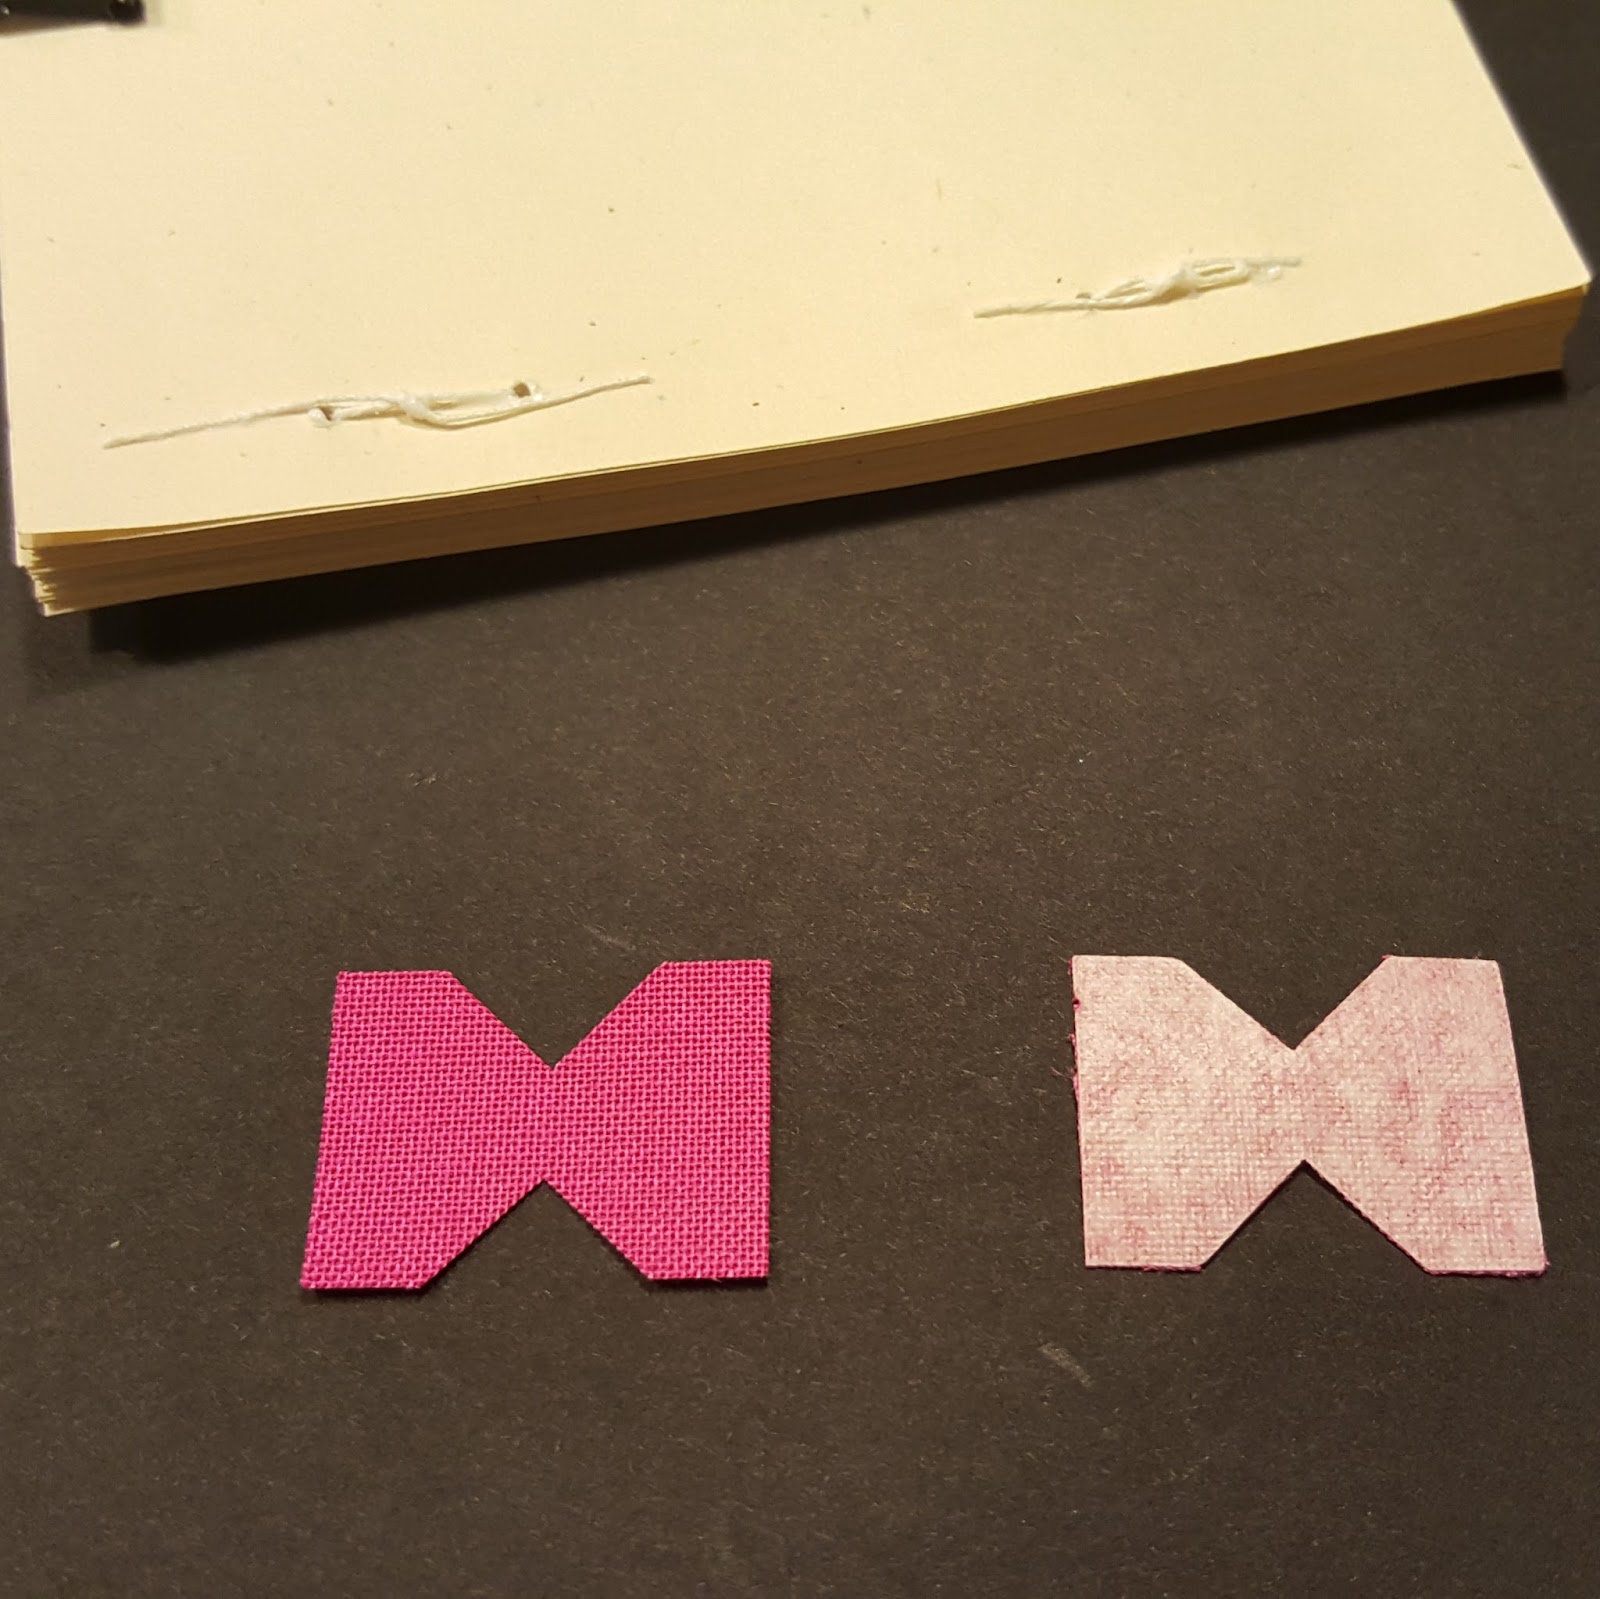
5) Cut the bookcloth in to a "butterfly" shape measuring 1" wide and 3/4" tall. Start with a rectangle 1" x 3/4". Then cut out two darts. The dart measures 1/2" wide along the edge and 1/4" tall. That leaves 1/4" in the center of the butterfly, which is the same as the thickness of our book block.


6) Put some glue on the paper side of each butterfly and place each one on the spine edge of the book block. Wrap the edges tightly around the block. The results are nicely mitered corners. Put the book block aside.


7) Use the chipboard template to fold the decorative papers to make the 4" x 6" covers. Place the chipboard in the center of the 7" x 5" piece of decorative paper. Trace around it with a pencil. Fold the edges up around the chipboard to make crease lines. Remove the chipboard. Draw diagonal lines across each corner. Cut away the corners. Fold each of the 4 sides down on to the back of the paper. Put a very small amount of glue under the fold to hold it in place. The resulting piece of paper should be 6" x 4" with a nicely folded edge and mitered corners. DO NOT glue the chipboard to the paper! It is only a template used for folding and should not become part of your finished book.


8) Adhere the front and back covers to the book block using a very thin layer of glue. Be careful to check that the papers are facing the right direction when you're holding the book. Mark 4 holes for the stab binding along the spine. Japanese stab bindings traditionally have the holes equally spaced. In this example the holes are 1" apart and start 1/2" from the top and bottom of the spine.


10) Use the Proxxon Bench Drill Press TBM 115 fitted with the Original German Chuck for the TBM115 and the 3/32" drill bit to drill the four holes. Put a small scrap of wood under the book to reinforce where you're drilling.


11) Sew the binding. Double thread a needle and knot it twice, leaving a 1" tail. Open the book to the third page. Sew from the inside through the 2nd hole from the bottom. Pull the thread through. This buries the knot inside the book. You can trim the tail later (and even add a little drop of glue to really secure the knot inside the book.


13) Continue sewing. Wikibooks has great illustrations, like the one below, that shows step by step how to sew this binding.


14) I like to finish the binding by sewing up through the last hole, then back down in to the same hole but coming out an interior page of the book. Pull the thread almost all the way through, leaving a small look. Then put a drop of glue where the thread is, push the needle out through the spine and trim the edge. This pulls the thread through the drop of glue, permanently adhering in to the inside of the binding.


Happy Crafting!
Joe
www.createNcraft.com

Sunday, March 20, 2016

Colored Pencil Necklace

After making the doll-sized set of colored pencils for her American Girl doll, my grand daughter decided that she wanted something that would go along with Kit's pencils. So, we came up with this necklace.

Chloe picked out the colored pencils that she wanted, and I used my Proxxon scroll saw to cut 1 1/4" lengths from some old pencils. I set the guide on the scroll saw so each pencil piece would be exactly the same length.

Next, I used the Proxxon Engraver fitted with a 1/32" bit to drill a small hole in the end of each piece to accommodate a tiny screw eye.

I used jump rings to attached the pencils to a length of jewelry chain, and added a few beads from my stash to complete the necklace. Now, Chloe (the grand daughter) and Kit (the doll) can go every place in style.

Carole

Friday, March 18, 2016

Happy Easter with Proxxon Tools

Hi everyone Steph Ackerman here today wishing you an early Happy Easter.


Supplies:
Proxxon Tools:  Hotwire Cutter
Smoothfoam


I used my Cricut to create a paper bunny in the size I wanted.  The I just traced around it on a piece of Smoothfoam.


The Hotwire cutter cuts Smoothfoam quickly and easily and there is no flaking.  The wire heats up quickly and I was able to cut the bunny out very quickly.  I like to cut away the larger unnecessary portions of the Smoothfoam while creating my project.


 And this is my Easter Bunny.  I love how she turned out!
 
 
Since I had some left over Smoothfoam, I also cut out some Easter Eggs as well as part of an Easter Egg so I could nestle them together.

 
I covered the bunny with molding paste to give the illusion of fur, the added a tail which was a Smoothfoam ball that I cut in half using the Hotwire cutter.


While waiting for the molding paste to dry, I worked on the Easter Eggs.  The Easter Eggs were stamped, stenciled and inked before adhering to the bunny.  Assorted colors of dew drops were added for fun.  I purposely didn't add molding paste to the lower portion of the bunny because I wanted the Easter Eggs to sit flush on the bunny.
 
 
Once the molding paste dried, I applied pink ink to her ears and nose and added a large wiggly eye.  To finish, I tied a ribbon around her neck.

 
She is the perfect Easter decoration and the Hotwire cutter made it so easy to create this Easter project.
 
What do you think?
 
Thanks for stopping by today.
 
 
Steph