Wednesday, December 14, 2016

Simple Last Minute Gift

 Hello friends. Larissa here with you today showing you how I made this supe simple last minute gift idea.


I found this little crate in the Dollar Section at my local craft store. The boards were a little loose. I used some glue to straighten them up decided to use it as a cute little container that can actually sit on a desk to hold the gift.
Supplies I used: 
Crate container


After gluing all the boards together and it dried I used the Delta Sander and sanded everything smooth. 

I could not decide which color to paint it. The person I am giving it to has a lot of natural wood pieces in her house. Everything is white and natural. So I decided to just add some satin dye to it to give it a nice finish and leave it the natural color. 


I filled the crate up with a favorite glue and will place it in a cute gift bag. 


When you don't have a lot of time for a last minute gift these little crates are perfect. You could also fill them with candy or even Tea Bags. My friend is a crafter and uses glue like cazy so this was perfect. 


Hope you enjoyed my post today. Have a Merry Christmas everyone.

Larissa Pittman 
www.muffinsandlace.com


Friday, December 9, 2016

Christmas/Winter Pins/Brooches made from Gourds?

Hello everyone! I hope everyone is enjoying the Holiday Season. If you wear Christmas/Winter Pins/Brooches, I would like to show you some that I created and let you know how easy it is to make them.

The items needed for this project are:

Proxxon Jig Saw
Proxxon Delta Sander
Gourd Scraps/Wood Scraps
Acrylic Paints
Black Marker
Embossing Enamel
Pin Backs
Embellishments
Spray Sealer

This really is an easy project to do. I used gourd scraps but you could just as easily use some light weight 1/4 in. wood.
I however used gourd scraps and my trusty Proxxon Jig Saw to cut 2 circles and an ornament shape. If you look close, you can see the circle. Once the shapes were cut out, I used my Proxxon Delta Sander to smooth the back and sides of the pieces and then used my paint to cover the front, side and back of the pieces. I then used my embossing enamel to cover the front and sides of the pieces. When they cooled off, I used my markers and paint to finish my designs and spray sealed them. Once dry, I glued the backs on and also the little embellishments. This is the result:
I plan on wearing everyone of them at one time or another during the Christmas Season and also during the Winter. They didn't take very long to make but they sure are cute!

Barbara


Wednesday, December 7, 2016

Rustic Snowman Christmas Ornament Tutorial

Hi everyone! Tammy here with you today with a fun rustic Christmas ornament tutorial. I love Christmas time and making ornaments has always been a family tradition in our home. This year we have a rustic theme for our Christmas tree and this fun snowman ornament fits perfectly! 
This is how I made it...

Supplies:
Wood pieces
Ribbon
Fine tip Sharpie marker


Directions:
Use a medium size drill bit and create small holes in the top of a small piece of wood, two holes in the middle piece, 


and one hole in the top of the bottom pieces of wood.


String ribbon through the holes and tie double knots to hold the wood pieces together.


Add decoration to the wood pieces with the Sharpie and hang on your tree! 


I love how this turned out! It really goes with our theme this year. I hope this shows you how easy it it to use the Proxxon Model Building and Engraving Set to create Christmas ornaments of your own.

Let's be friends!


Sunday, December 4, 2016

Standing Wooden Christmas Angel

Christmas is such a festive time of the year!! I just love creating decorations, especially ones that can be used for many years to come. This wooden angel is one such decoration.

Here are the supplies you'll need to make your own angel:
  • 1/8" craft plywood
  • Round toothpick
  • Sandpaper of various grits (150-220-440)
  • Quick dry craft adhesive
  • Acrylic paint
  • Small paint brush
  • Glitter

I used these Proxxon tools:

The pattern originally was designed for paper arts, but I felt that it would easily translate to wood. After printing the pattern, I covered the wood surface with painter's tape. Next, I sprayed the back of the pattern with spray adhesive, and put that on top of the painter's tape. The spray adhesive holds the pattern in place, and the painter's tape makes removing it a breeze.


I cut out the angel using the scroll saw.

I used the Delta sander to sand the surfaces of the angel. I started with 220 grit sandpaper and finished with 440 grit. (NOTE: Depending on the surface condition of your wood, you may need to begin with a courser grit sandpaper, i.e. 150 grit, before proceeding with the finer grits.) I manually sanded the detail line in the wing with a piece of 440 grit sandpaper.

Surface sanding with the Delta sander
Manually sanding wing detail
You could drill a small hole at the top of the angel's head for hanging as an ornament. But I wanted it to stand, so I drilled a small hole the size of a round toothpick at the bottom of the angel to form a support stand.

Drilling hole for toothpick support
Close up of support stand
Next, glue the toothpick support in place. Then, paint the angel with acrylic paints. On one of my angels, while the paint was still wet, I liberally dusted it with glitter. Use your own ideas and creativity to  finish your angels.

These standing wooden angels will be part of our Christmas celebrations for years and years.
Carole

Friday, December 2, 2016

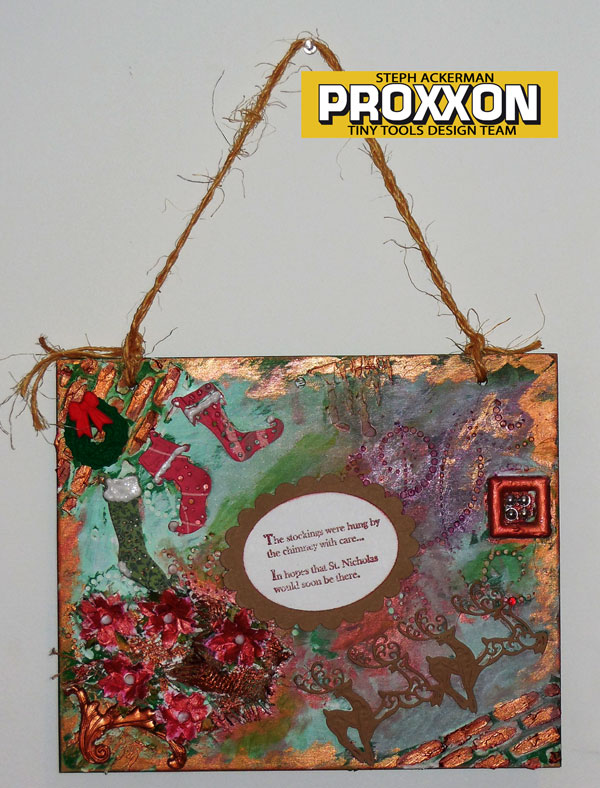
Christmas Wall Hanging

Hi everyone Steph Ackerman here today with a Christmas Wall Hanging.  Now that Thanksgiving has passed, it's time to start thinking about Christmas.


I started with a sheet of plywood that I cut with the Scroll Saw.  After some light sanding with the Delta Sander, I stained the panel with Folkart Ultra Dye Paint in Emerald City.  Of course it needed some additional sanding so I used the Delta Sander again to sand it down.

 
I dry painted some Plaid Milk Paint in Petticoat across the panel.  Next, I used the Precision Rotary Tool to create holes in the panel so I could add string.  Then I used modeling paste with a Clearsnap Artscreen  to create a pattern of swirls on the panel.


I painted Paverpol on a burlap strip then used additional Paverpol to adhere the burlap strip to the panel. 
 

In the corners I used the Crafter's Workshop stencil with molding paste, then continued adding assorted elements - die cuts, flowers, resin bits, additional stenciling, etc, until I was happy with the panel. 


I then painted a layer of gesso over the entire panel, leaving some of the green background showing.


Once dry, I added selective colors about the panel using Tattered Angels Glimmer Mists, Plaid Milk Paints and Prima Metallique Paints.

 
I decided I did not like the "Past Present Future" in the center of the panel, so I used the Delta Sander to remove the words.  I replaced them with a stamped and die cut phrase.

 
Finally, I added a second layer of reindeers and Christmas stocking die cuts.  To the stockings, I added some white paint.   I created a clay element from Makin's Clay using a Prima mold, painted it with Prima Metallique Gold, then placed it under the pointsettias.  I also created a clay wreath, placing it on the hearth above the stockings.  A red pearl was added to the lead reindeer.
 

A touch of gold painted around the panel added some vibrancy to the panel.

Why not try using a wood panel today.  It's the perfect blank canvas that can be use for so many projects.

Thanks for stopping by.


Friday, November 25, 2016

Time to prepare for Christmas!

I have my last show of the season today and I'm still in the process of moving. But in the meanwhile I thought I came up with an awesome project to show you. Recently I participated in an ornament exchange and one of the people who was in the exchange was Misty Orlove and she had brought in a unique item that I used the idea for in my project. Instead of an ornament made out of a gourd like everyone else she had a better idea and brought in a very large Christmas bell.

While I was trying to come up with something to pass along to you, I thought why not a Christmas bell like the one that Misty had made? I was at the house that I'm moving from and was limited in what I had on hand, but tops cut from gourds was not one of them. (smile) I liked the bell that Misty had made so much that I decided to make a door hanger with two gourd tops and here is what I used in this project:

Proxxon Jigsaw
Proxxon Delta Sander
Proxxon Drill
Red Acrylic Paint
Gold Acrylic Paint
Extreme Glitter Paint in Red and Gold
Black Metallic Acrylic Paint
Lots of Red Glitter
Decorative Spray
Wide Red Ribbon
Large Jingle Bells
Wire
Wire Cutters
2 Gourd Tops
Paint brush
Sealer

I started out with two tops that I had picked out of my big scrap pile. After cutting off the stems, I re-cut the tops with my Proxxon Jigsaw to the same height and sanded the edges with the Proxxon Delta Sander. I then painted all but the inside edge with the Metallic Black paint. When that was dry I then took my Red acrylic paint and gave each top a good coat of paint.

When that paint was dry, I coated the tops with the Extreme Red Glitter paint and sprinkled Red Glitter liberally over the paint while it was wet.
(Now that's some sparkle!)
Now this paint and glitter took a while to dry so I just let it set overnight. Before I got started back on the project the next day, I made a bow out of the wide ribbon and put it together with the decorative spray that I got to go with it.
Once the glitter and paint was dry I sprayed the gourd tops a couple of times to seal the glitter to it. I then painted around the bottom edge of the tops with Gold Acrylic paint and then with the Extreme Gold glitter paint. I didn't put extra glitter on that part.

Once everything was good and dry I drilled a hole in the top and side of each of the bells, threaded gold wire through two of the Jingle Bells for each of the tops and used wire to put the two tops (bells) together and string the Jingle Bells into each one. I then used the wire to attach the bow and decorative spray to them also. Here's the end result:
I think this turned out so well that I will take this project to the new house this weekend and put it on the front door! You don't have to buy all of the things that you decorate your house for Christmas with, you can make quite a few of them yourself.

Barbara

Sunday, November 20, 2016

Tea Light Holder

With Christmas just a few short weeks away, I'm beginning to think about holiday decorations. One of my favorite things is arranging beautiful table settings for our Christmas dinner. This year I created these tea light holders to grace each place setting.

For this project I used:

I began by printing the pattern and adhering it to the MDF using painter's tape and spray adhesive.  I covered the surface of the MDF with painter's tape. Next, I sprayed the back of the pattern with spray adhesive, and put that on top of the painter's tape. The spray adhesive holds the pattern in place, and the painter's tape makes removing it a breeze.

Next step was to cut out the two pieces using my Proxxon scroll saw.

It cut so smoothly no sanding was required, so I moved right on to painting each piece. So I could paint all the surfaces at one time, I pushed a heavy corsage pin into the notch on each piece. I used the pin to hold the piece while I was painting it, and I clamped the pins to suspend the pieces while they were drying.


After painting, I used soft cloth to gently buff on Folk Art Milk Paint Finishing Oil.

I'm looking forward to using these tea light holders to brighten my holiday table.


You can find the pattern for this tea light holder on the Scrollsaw Workshop website.

Carole