Friday, December 25, 2015

A Special Project for our Family in Japan

A lot of people know that my husband and I recently made a trip to Tokyo, Japan to visit for a couple of weeks with our oldest son and his family that is with him. After returning we made a special gourd piece which is going in the mail to them as one of their Christmas gifts this week. Here's a little bit on it and the wonderful Proxxon Tiny Tools that we used to create it.

Supplies Used in this project:

1 Med/Large Gourd
Proxxon Delta Sander OZI/E
Proxxon Super JigSaw STS 12/E
Heat adjusting Wood Burner
Dremel or similar tool with burrs
Paints (Acrylics)
Sealer (I use Kamar Varnish)

When starting out, after cleaning the outside of the gourd, I used my Proxxon Super Jig Saw to cut around the gourd to open it up and create a bowl.

Once this was done, I cleaned out the inside and sanded the inside and the top using my Proxxon Delta Sander. 

Sorry but I forgot to get the picture before the inside and top of the gourd was painted. You can tell from the picture though just how smooth I was able to get the interior.

I then wood burned the designs on the gourd and carved and sanded (with my Proxxon Delta Sander) Mt. Fuji and carved out around the cherry blossoms and Shrine. When I completed my part I turned the gourd over to my husband who painted the designs and I finished it off with the background and sealer. This is what the piece looked like when finished from several sides:

Oh yes, we added some 10 cent yen pieces to further decorate the gourd. Hopefully this will be a family heirloom and remind them of Japan when they are no longer there and also to remind them of our visit. What do you think of the project? Has anyone used any of the Proxxon Tiny Tools, such as the Jigsaw or Sander? Comments are certainly welcome and appreciated.

Barbara

Tuesday, December 22, 2015

~Baby It's Cold Outside~ Proxxon Design Team Project!!

~Baby It's Cold Outside~
Created by Sherri Welser


Christmas is my very favorite time of the year and living in Upstate NY we have plenty of "Baby It's Cold Outside" moments! So here is a very fun and easy project to spread a little Holiday cheer and hold some favorite pairs of mittens! 

~Supplies~

Piece of plywood ( 9 x 21 in) with 2 holes drilled and sanded using the Proxxon Delta Sander OZI/E
Letter Stencils
White crackle paint (  I used Ranger Distress Paint)
Red Clothes Pins ( or paint them yourself)
Red ink Pad (  I used Ranger "Barn Door" Distress Ink)
Gold Pen ( Signo Uniball)
Gold Paint
Ribbon for hanging
Glue Gun
Glitter glue

1) After preparing your board by sanding using the delta sander OZI/E,( light grit) paint a coat of white crackle paint and let dry. Lightly sand the board to distress it a but more.
2) Using the 'Red Barn" Distress Ink Pad lightly go around the edges of the board and across the front adding a distressed/aged look.
3) Using your stencil and red ink pad, fill in the letters of the stencil to spell out "Baby I'ts Cold Outside" ( I used my finger to apply the ink inside the letters)
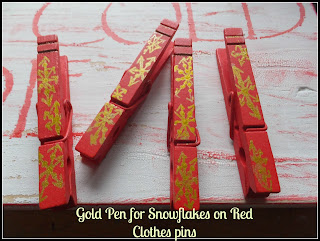
4) Use the gold pen to draw some snowflakes on the clothes pins and glue to the board at the bottom with the glue gun.
5) Using the ribbon, attach to each side and add some fun paper ephemera
6)Add a little glitter glue to the top to add holiday magic to your project!
7) Add some fun gold doodles to the letters using both the gold pen and gold paint.
You now are ready to grab your favorite mittens and hang them up! 


Hope you enjoy this fun vintage style project and Happy Holidays!!

Sunday, December 20, 2015

Retro Birds Gift Tags

I've been making lots of Christmas decorations and gifts with my Proxxon scroll saw!! These sweet retro birds are easy to do, and can be used in several ways. I'm using them as gift tags. Of course, they would be great as ornaments, too. Or, how about a whole flock grouped together as a mobile?

I designed the pattern in Make-the-Cut, and used the print and cut feature to print the pattern. When I mount the pattern to the wood, I start by covering the surface of the wood with painter's tape. Next, I spray the back of the pattern with spray adhesive, and put that on top of the painter's tape. The spray adhesive holds the pattern in place, and the painter's tape makes removing it a breeze. Here is the pattern mounted on my piece of wood. 

Then, right to my Proxxon scroll saw to cut out the birds.

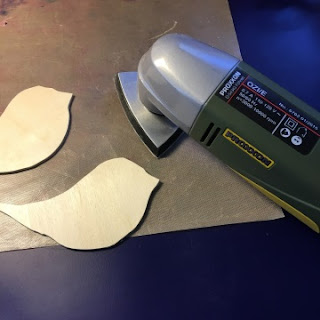
Next step is a light sanding with the Delta sander.

Back to Make-the-Cut and my Zing electronic cutter to cut out the papers for each side of the birds.

I drilled a hole in each bird for attaching a cord for hanging, then used burnt umber acrylic paint on the edges of the wood blanks. When the paint was dry, I glued the papers to the birds and added a twine hanger. They're already to fly away to a new owner attached to a Christmas gift.

Here's the pattern for the retro birds:

Carole

Friday, December 18, 2015

Noel Wreath

Good morning everyone, Steph Ackerman here with a new Christmas post as a member of the Proxxon Tiny Tool Design Team.  Proxxon's tools are definitely fun to work with and perfect for projects, both big and small. 


Supplies:
Proxxon Tools:  Hot Wire Cutter
Smoothfoam
Art Anthology Paints
Rubber Dance Art Stamps
The Robin's Nest Dew Drops
May Arts Ribbon
Christmas Picks
Wood Wreath
Mesh
 
I wanted  a niced size "Noel" for a wreath I had in mind so I began by sketching out Noel on a sheet of Smoothfoam.


Next, I turned on the Hot Wire Cutter and began to cut.  The Hot Wire Cutter heats up quickly so I was able to begin right away.  I began by cutting away the larger pieces I didn't need.

 
Because I needed to cut out the center of the "o" and the "e", I cut through the letters with the Hot Wire Cutter and simply cut out the centers.  As this was going to be decorated and placed in a wreath, I wasn't too concerned with the extra cuts I had to make.

 
Now it was time to decorate.  I began by painting the letters red and green.  To avoid cross painting, I used painter's tape to block off the letters while I painted.


Once dry, I randomly stamped some Christmas images from Rubber Dance Art Stamps and added some Dew Drops from the Robin's Nest. 


To create the wreath, I pulled out a wood wreath and wrapped it loosely with some red and white mesh.  I then created a bow and tied it to the bottom.  I inserted some Christmas flora about NOEL, then adhered it to the wreath.


 What do you think?

Thanks for stopping by today.


Wednesday, December 16, 2015

Christmas Ribbon Tree With Pearl Star

Happy holidays everyone! Tammy here with a fun ribbon Christmas tree tutorial using my favorite Hot Wire Cutter from Proxxon Tools.

Supplies used:
Tree form
Ribbon
Straight pins
Smoothfoam
Ann Butler Designs Iridescents from Earth Safe Finishes
Star image

How I made it:

Cut ribbon pieces about 6 inches 
Fold them in half and secure each one with a straight pin.


Print and cut out a star image and trace the image onto a piece of Smoothfoam
Cut the Smoothfoam as shown in this tutorial video:
I painted my star with Ann Butler Designs Iridescents from Earth Safe Finishes in the Russet color
I added pearl push pins as decorations to the star 
Secure the star to the top of the tree with more pearl push pins.
I love how my tree turned out! It looks so cute with the Rustic Christmas Wreath I made in my last post. I hope this gives you some ideas on how easy it is to use the Proxxon Hot Wire Cutter
The possibilities are endless!

I love to see your projects! Tag me on Instagram @TammySmithSantana

xoxo Tammy


Friday, December 11, 2015

Thunder Gourds - How to

These are called "Thunder Gourds" and as you can see I make different looking ones, but the purpose of each one is to create the sound of thunder.

The Supplies Used in this project are:

Medium/Large Gourds ( I have found that the bigger the bottom of the gourd, the deeper the sound)
Synthetic Drum Head
Adjusted/Stretched Spring (Similar to the spring on a screen door)
Wood burner (on some)
Paints, Stains
Suede cord
Drill
Proxxon Jig Saw STS 12/E
Foot Switch FS
Heat Gun (Not a blow dryer, it won't get hot enough)
Glue ( I use CA glue from Satellite City in California)

To start with you need to cut the bottom off your gourds:
Can you see the pulp inside the gourd in the top or bottom picture? Well every bit of that pulp and the seeds have to be cleaned out before you can continue with this project. There are many different tools which can be used to clean a gourd and once you get all of the stuff out except for a few little pieces left behind, you can use drywall screen and then sandpaper to get the inside very smooth.

Drill a hole on either side of the top of the gourd, thread your suede thru each outside of the gourd and tie into a knot on the inside but then pull your threaded suede up on the outside for a hanger.

After it's cleaned you can paint the inside to give it a nice look. I then burn different designs onto the outside of the gourds and use paints or inks to color the gourd or the design.
    
As you can see, the saw is used to cut holes of different shapes and sizes into the gourds. You must put holes in the gourd in order to let the sound out. 

Once all of this is done, you sand the bottom of your gourd flat, apply a thin bead of glue around the edge and attach the synthetic drum. After the glue is dry, trim your drum to the edge of your gourd and use the heat tool to shrink the drum tight to the bottom of the gourd. (There is a video on YouTube showing you how to do that) 

Take the end wire of the spring and puncture a hole in the bottom of the drum and then twist your spring onto the drum head. 

Grasp the top of your gourd and shake it and listen to the sounds of thunder coming out! The first few Thunder Gourds that I made, scared our oldest dog 'cause he's terrified of thunder and lightning! lol Now he turns and looks at me to make sure it's me and not the weather before he gets scared.

Once again, my Proxxon saw has made my Gourd Art making easier!!

Barbara Moore

Wednesday, December 9, 2015

Create a Vintage Christmas Scene in an Illuminated Rustic Shadowbox


My partner, Joe Morgan, loves vintage decorations, especially Halloween and Christmas! A Rustic Shadowbox made from reclaimed lumber (pallet wood) was the perfect frame to showcase some of the miniature animals he has collected. This vintage Christmas scene is illuminated with 20 LED battery powered lights.

Proxxon tools make it easy to work on a small project like this. The scale of the tools is perfect for a project this size.

What You’ll Need


Steps to Follow

1. Cut the paper to fit the shadowbox and adhere it with the quick dry adhesive. This makes the background for your scene.


2. Use Smoothfoam to make the contour of the ground. First, decide on the maximum height (most likely at the back of the scene, the depth (give yourself about ¼” from the front to show the wood of the shadowbox) and the length (the opening of the shadowbox). The foam in our shadowbox is about 1” tall, 8” wide and 2-3/4” deep. Use the bench top Proxxon Cutter THERMOCUT 115/E hot wirecutter to cut the foam block to the desired dimensions.


3. To continue making the contour, use the handheld Proxxon Hot Wire Cutter THERMOCUT 12/E to “carve” the contour of the ground. Make it slope to the front and dip up and down, just like snow drifts.

4. Adhere the Smoothfoam to the shadowbox using quick dry liquid adhesive.


5. Decide where you want lights to shine through the back of the shadowbox and mark the spots lightly with a pencil. Use the ProxxonProfessional Rotary Tool and drill bits to drill the holes. You can vary the size of the bits if you want different sized “spots” of light.


6. Adhere the lights to the back of the shadowbox using hot glue. Line up each bulb with a hole you drilled. Work your way from one side to the other. We tried adhering the lights with electrical tape, but it didn’t stick. Other tapes didn’t work well either. Hot glue worked perfectly!


7. Cover the back of the shadowbox with black felt. Adhere it with quick dry adhesive. This prevents light from peering out the back of the box when you place it on a shelf. You can also adhere the back of the battery box to the shadowbox. Just be sure to position it so you can slide the top back and forth to change the batteries!


8. Cover the Smoothfoam with quick dry liquid adhesive and apply the snow glitter.

9. Build your scene and adhere the pieces to the foam with quick dry adhesive.

10. Optionally, decorate the front of the box with vintage sparkle pipe cleaner, adhered with quick dry adhesive.

 Do you collect vintage decorations and trims! Everyone at Create N Craft loves the look of old-time goodies! Check out the boxes we went through to decorate our shadowbox!


What are your favorite vintage finds! We would love to know. Mention what you like in the comments below.

Happy Crafting!
Joe Rotella