Wednesday, June 28, 2017

Wooden Flag for the 4th

Hello friends. Larissa here today with a fun easy project for the 4th.


You will need: 

Plaid Folkart Outdoor Acrylic Paint: Engine Red, Cobalt and White 
Piece of scrap wood
Paint Brushes

Painters Tape 
Vinyl Cutting Machine or Stickers

First off I grabbed a small piece of scrap wood and drew an even rectangle with my pencil. Then I cut it out using the Proxxon Table Saw. 


Once I was done cutting with takes no time at all with this amazing Saw, I grabbed the Delta Sander and smoothed the edges and the top of the piece of wood. 


I used painters tape and taped off the sections to paint. Once dry I gave it all a second coat. I then cut out stars and the God Bless America out of vinyl using my silhouette and adhered them onto the flag.


As you can tell it is a super simple project you can make for the upcoming holiday or for any day. I will be hanging it somewhere outside. 

Hope you enjoyed my post today. Have a wonderful rest of your day and Happy 4th.. 


Friday, June 23, 2017

The coolest painted rock shadowbox made with Proxxon Tools!

Once again I've completed an amazing project with my Proxxon Tools. This one was fun and quirky too! I had planned on making something very simple but it morphed into more.

The supplies needed for this project:

Proxxon Drill
Proxxon Table Saw
Proxxon Scroll Saw
Wood pieces for shadowbox construction
Canvas Board
Gesso
Acrylic Paints
Rocks
E6000 Glue
Upholstery Tacks
Small lightweight brad gun
Regular Masking Tape
Plaid Coastal Paint Lagoon
Plaid Color Shift Paint-Black
Ruler
Ribbon

Lately I've been having my husband save all the little pieces of leftover wood that he has from his projects and so I picked out a couple pieces that I thought would work for a shadow box. I first had to use my Proxxon Table Saw to slice off some of the wood to make the board even.
I then measured my wood pieces to the width and length that I was going for to fit the canvas board. I set my Proxxon Table Saw machine up to cut 45 degree angles and cut four pieces which could then be put together to form the beginning of the shadowbox. I used my husband's brad gun which is not a heavy duty one to put small nails into my wood to make the sides.
Once the sides were together, I painted them with the Plaid Color Shift-Black. I also primed the canvas board with gesso. As you can see I picked up some rocks to use to paint owls on.
I used the Plaid Coastal -Lagoon for the background and the Plaid Coastal - White for the sky and various acrylic paints for the tree. I tried several ways of positioning the rocks before I decided how I liked them and then painted them with Gesso first .
This let the color adhere better and made it look more even. This is an in process picture.
Here's my finished owls on branches! I attached the owls to the canvas board with E6000 and made sure it was quite dry before the last part of the project. You wouldn't think, because the rocks are so small that they are heavy but they do have a little weight to them and I didn't want one falling off.

I purchased some plexiglass for the front but it wasn't a really necessary step, even though I think it made it look better. Once I was to that point I measured the plexiglass to fit the front of the box and put masking tape along the lines I was going to cut. ( I was told this would keep the blade from making too much of a serration on the edge )
Once that was done I cut through the plexiglass using my Proxxon Scroll Saw . ( Just a note, it's important to use the appropriate cutting blades for the material that you are cutting ) I then pulled all the tape and the protective film off the front and back of the plexiglass. I measured where I wanted to put the brads in on the front of the box and drilled holes through the plexiglass with a diamond burr in my Proxxon Drill . I then put the nails through the plexiglass and nailed them into the wood. After I finished that I cut a piece of ribbon, tied a knot in both ends and nailed them into the back of the wood to hang the picture from.
How do you like it? I do appreciate you leaving a comment on my posts and also for looking at the Proxxon Tools and Accessories .  Hope I've inspired you to buy yourself a tool that you can easily use.

Barbara 


Tuesday, June 20, 2017

"Feather Your Nest" Proxxon Design Team Project by Sherri Welser


~Feather Your Nest~


 by Sherri Welser for Proxxon Design Team


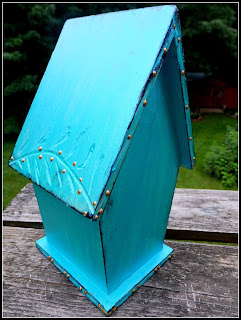
Join me as I create this sweet birdhouse using Proxxon Carving Tool and FolkArt Color Shift Paint ! Visit the Proxxon Blog for how to create this fun project!

~Supplies~
Proxxon Carving Tool
Small gouge blade for tool
Wooden pre- made birdhouse
FolkArt ColorShift Paint in Aqua
Paint brush
Small stamp with saying
Black ink pad
Liquid Pearls by Ranger in Copper

1) Begin by carving a curvy line at each of the bottom roof areas using the carver tool with the small gouge blade

2)  Carve some leaf shapes


                                                  3)   Add some small details on the roof and bottom base


 4)Start painting the color on using 2 coats


 4) I then used a stamp with a saying for underneath the hole and wiped the stamp pad over the roof, sides and base


5) Add the Liquid Pearls around the stamped saying ,roof , base and to highlight the  carved vines


"You now have a sweet little birdhouse to call your own"
Happy Creating!

Sunday, June 18, 2017

How to Make Wooden Salad Tongs

For the perfect green salad you need the perfect pair of salad tongs. These handmade wooden tongs are just the ticket.

These great tongs can be used for more than salad—how about retrieving a slice of toast from the toaster, or lifting an ear of corn from the pot. An added bonus is that they fold flat for storage. Let's get started, and make a pair.

Supplies for the Salad Tongs

  • 12" x 3" x ¼" food-safe hardwood (I used maple, but cherry would be another option.)
  • 1½" length of 1/16" brass rod
  • 2 5/8" brass washers
  • 2 bamboo skewers

Equipment for the Salad Tongs

  1. Using the table saw, cut the wood into two 10¾" x 1¼" strips.
  2. Move the work to the band saw, and cut two 5" kerfs on one end of each tong piece. Refer to the accompanying drawings.
    Finished kerfs
  3. On Piece A cut 2" from the outer slats using the band saw.
  4. Move the work to the scroll saw, and on Piece B cut 2" from the center slat.
  5. Sand the pieces using the Delta sander with 150 grit sandpaper.
  6. Soak the pieces in water for an hour. Weight them down so they don't float. I used a food storage container filled with water.
  7. After they have soaked, wedge a piece of the bamboo skewer under the center slat in each piece. When the wood dries, these will form the "spring" for the working tongs.
  8. Heat the pieces (with the skewer still in place) to dry the wood. Keep the heat gun moving so you don't scorch the wood. This step is optional. It dries the surface of the wood, but you still need to set the pieces aside overnight to dry thoroughly.
  9. The water bath may have slightly raised the grain of the wood, so when the pieces are thoroughly dry finish sanding use the Delta sander with 220 grit sandpaper.
  10. Using a 1?16" bit, drill a hole ½" from the top and centered on the side of each piece for the brass rod.
  11. Line the pieces up with Piece A on the left with the center "spring" facing up. Piece B is on the right with the center "spring" facing down. Fold Piece B to the left so it rests on top of Piece A. 
  12. Thread the brass rod through the holes, adding a brass washer on each side of the center slat.
  13. Trim the brass rod almost flush on one side. File until it's flush. This will flare the end to hold it in place. Repeat the trimming and filing on the other side.
  14. Close the tongs, and mark the inside bottom edges. Adjust the table of the band saw to 45°, and cut a taper on the ends of each tong piece.
Here are pictures of the finished salad tongs.

Friday, June 16, 2017

4th of July Decorations

Hi everyone, Steph Ackerman here today with some 4th of July Decorations.  With summer here and the 4th of July getting closer, it's time to start thinking of party decorations.   


I found these adorable party hats and thought they'd make a fun summer banner.


I used the Proxxon Rotary Tool to drill holes in each hat.  Then I  threaded Whiskers Graphics twine through each hole and tied them together creating the banner.


I die cut SUMMER from Rinea Silver/Silver Glossy Foiled Paperthen matted each letter with cardstock.  Finally, I adhered each letter to a hat. 


Because I wanted a dual use for the banner, I used the Proxxon Hot Wire Cutter to cut ovals from Smoothfoam to fit inside each hat.


I glued the Smoothfoam ovals inside each hat.  Then I placed a battery operated candle in each hat and surrounded it with some raffia.


Once it gets dark, all you need do is take down the banner and turn on the candles.


Thanks for stopping by today.


Wednesday, June 14, 2017

Save the Mermaids

Hello friends. Larissa here with you today with a handmade wall decor piece Save the Mermaids.
I made this for my daughter since she loves mermaid things.

I took a piece of plywood and drew a mermaid tale on it with a pencil.  I then cut it out using my scroll-saw. Once I was done I sanded the edges so they would not be rough.


I then painted the tale using Plaid paint. I used a couple of different colors to give it a two-toned look.

I let the paint completely dry. 
Once dry I took a small paint brush and wrote the words out using black paint. 


I added a few silver stars around the tale. 


Acrylic Paint Black, Aqua and Turquoise 

Plywood
Paint Brushes
Silver Stars
Liquid Adhesive 

I hope you enjoyed my post today, Have a wonderful day friends.

Larissa Pittman