Sunday, February 28, 2021

Make a Wooden Knot Puzzle

 Make this wooden knot puzzle with Proxxon tools, then challenge friends to unknot and reassemble the puzzle.


Supplies and Equipment

  1. Mount the pattern pieces on hardwood blank. Cover one side of the blank with painter's tape. Mist the back side of the pattern with spray adhesive, and mount on the taped blank. The painter's tape makes removal of the pattern easy without leaving any sticky residue.

  2. Cut the shapes using the bandsaw.

  3. Use the bench drill press to drill a pilot hole for the scroll saw blade. (See this post about a scroll saw blade hack.)

  4. Cut the interior on the scroll saw.

  5. Sand the edges on the disc sander.

  6. Finish with wood oil or paste wax.
Oh, by the way—here's the solution!! :)


Carole

Thursday, February 18, 2021

Table top picture holders

 OMG I got the best idea for all you travelling artists.  So simple, convenient, beautiful, and PORTABLE.   This is a table top picture holder.   Check it out!  Using Proxxon tools it takes about 10, ok...20 minutes to make.


Easels are so cumbersome when travelling, but pictures won't stand up by themselves.  I got a solution and when travelling you can throw a dozen of these in a box and I promise they won't break

Supplies and equipment needed.

Scrap lumber  1/2' to 3/8" ;thickness works well  12-14" long  2" wide

Proxxon mini bandsaw  or Proxxon mini scroll saw

Proxxon OZI/E delta sander      

Finish of your choice

Here is a template to go by.  This pretty much holds most of my framed pictures, however, if you have a larger picture you can adjust the height at the curve and the size of the opening to pretty much accommodate any size.   Really big pictures may need added length.  


After choosing some appropriate lumber, I transferred my pattern onto the wood then I used the Proxxon Mini bandsaw    to cut out my pieces.   


Next, I used the Proxxon OZI/E delta sander to smooth everything.   I used the sander to round over the edges a little to give it a finished look.   I love this little sander.   I used the 80 grit coarse paper to start.  


After I applied a finish, I sanded it lightly using 240 grit and applied another coat of finish.   It  is really  smooth and looks great.   What I find really neat about this sander is the hook and loop system of attaching the sand paper.  I can take the coarse paper off and put on some fine paper, but then I can \put the coarse back on and don't have to waste any when I need to change grit.

 There it is all done and doing it's job.   I am making a bunch of these for my art class.

Thanks for visiting.   Thank you Proxxon for making the tools that make making fun,
Till next time, stay safe   Carol


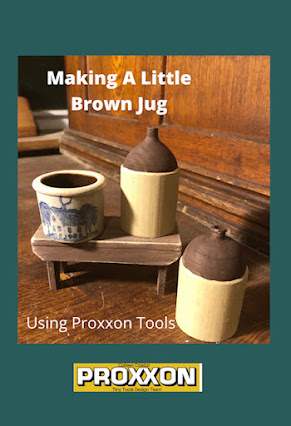
Making A Little Brown Jug


Hi everyone!  I'm continuing to make small accessories for the tiny houses I'm building (which I'm selling as fast as I can make them).  I thought a little brown jug would look cute along side the little bench I built.  I'm going to show you how to make one using the Proxxon Micro Woodturning Lathe.  follow along to see how I did it.


Supplies and Equipment

  Proxxon Micro Woodturning Lathe

  Proxxon Five Piece Chisel Set

  Proxxon Micro Bandsaw

  Proxxon Bench Drill Press

  1 1/4" round wood dowel

  Plaid Paint

  Sand Paper


Attach the dowel rod to the lathe.


Turn the lathe on and cut in a few reference lines.


Using the chisels begin shaping the jug.  Try different chisels to get a feeling for what each one is capable of.


Once I was satisfied with the shape I removed it from the lathe.


Using the Proxxon Mini Bandsaw, I carefully cut it away from the rest of the dowel.


Using the Proxxon Bench Drill Press, drill press I drilled a small hole in the top.


I sanded lightly with a small piece of sandpaper and painted with Plaid paint.


This is my finished product.  I think they look cute sitting on the tiny bench.  Can't wait to display them with my next cabin.  Till next time .... Colleen


Sunday, February 14, 2021

Make a Wooden Spa Soap Board

 Enhance your bath sink with the elegance of a spa with this wooden soap board.


Supplies and Equipment

Instructions

  1. Clamp blank on the mill table.

  2. Insert 3mm milling cutter in the machine.
  3. Set the height of the blade to determine the depth of the channel.
  4. Set the Y axis hand wheel dial to 0. The Y axis controls the table movement right and left.
  5. Set the X axis hand wheel dial to 0. The X axis controls the table movement front to back.

  6. Mill the channels in the soap dish as deep as the X axis allows. Make evenly spaced channels by turning the Y axis hand wheel 8 complete revolutions, and stopping at 0. 

  7. For each channel: raise the blade; rotate the Y axis 8 revolutions; lower the blade; mill the channel. Note: Depending upon the depth of the channel, it may be necessary to mill the channel in two shallow passes rather then one deep pass.
  8. Turn the blank and realign to complete milling the second half of the channels. 
  9. Cut away excess at each end on the bandsaw. The excess provides room for the clamps.
  10. Complete detail sanding with the Delta sander.
  11. Enjoy!!
Carole

Friday, February 12, 2021

Bestill My Valentine Proxxon Heart With Kisses


It wasn't hard to be inspired with one of my favorite holidays, not necessarily because of the romantic aspect but the colors.  I love red and pink together and all the chocolate goodies. I am a big home decor addict as well as my dollhouse obsession so the Proxxon tiny tools are such a blessing for these little projects, especially for Valentine's.


I just got my Proxxon Scroll Saw all setup, my most favorite tool ever and tried a couple of ideas that just did not translate well, just a learning curve and super cold weather so nothing would dry fast enough.  I am in charge of the decorations at work and had a package of glass containers and a few bags of Hershey's Chocolate Kisses. What could I do with this new toy?  The jars did not afford me a whole bunch of real estate but I decided to make simple hearts, paint, distress, and attach to the front. 

Although they appear simple it took all afternoon of playing to get them right with different ways, popsicle sticks, birchwood, chipboard, and foam. You should see my table stacked with all kinds of misfit wood pieces, its rather funny.  And no, I am not sharing a photo.  It is far too embarassing.

So lets get started...


I decided on the birchwood sheet.  Cut down a small strip and draw the proper size heart to cut.  Cut out three hearts.  Once cut, you will need to sand with the Proxxon Sander.


First, we start with the scroll saw and cut out the hearts that we have drawn on the wood.  This process actually took a bit, as I wanted to go slow and get the best shape I could.  There was still plenty of elbow grease to be had, though.  


Once cut, sanded and shaped with the Proxxon Delta Sander OZI/E and cover with paint.  I used Prima Marketing, Inc's Finnabair Impasto.  This paint is THICK and only needs one coat making the process easier.  I used a brown paint as well to give the hearts some depth.


Once I attached the hearts to the front of the glass containers, I then painted the silver lids in the same red.  When it dried, I sanded it to be distressed and show the silver through the paint.  Gives it a vintage look that matches my home decor.


Load them up with Hershey's Chocolate Kisses to finish it off.  I am in love with this project, although simple it has a beautiful impact on the decor.  Sometimes simple is more.


Thank you for stopping by

Thursday, February 4, 2021

How to make a traveling Chinese Checkers set

 Hello again.   Hey have you  ever gone on a road trip with restless kids in the backseat?  They about to drive you nutty?   When are we going to get there...  This little project today will help them pass some time in the car and give you a little peace and quiet...hopefully.  

 We are going to make a miniature traveling Chinese Checker set that you can take in the car.

You can't really tell by the picture but this little game is about 6" x 6".   It has holes and pegs rather than marbles to keep the pieces in place and not rolling all over.   And we will make a lid for it to keep it all safe when not in play.    

Supplies and Equipment

( 1))   6 x 6 piece of 3/8" wood of your choice + extra leftover pieces (needed for lid) 

(1) 6 x 6" piece of 1/8" wood (birch plywood works good)

                                    Proxxon Professional rotary tool  + 3/16 drill bit       

Proxxon mini drill press     

 Proxxon mini bandsaw

                                                                             Proxxon OZI/E delta sander

                                                                                 ruler

                                                                                       3/16' dowel 

                                                                                      wood glue

                                                                                    60 pony beads  (10 of each color)

                                                                                   wood burner or permanent fine 

                                                                                        plaid paints

                                                                                        masking tape


Let's get started.  

Here is the template that I used.   Point to opposite point is about 5 12"  or 14 cm   I noticed that the holes are approximately 1 cm  or .apart on the line. so for this project I just found it easier to use centimeters.   All rulers seem to have them anyway. All that said,  I copied and resized this picture then cut it out.   Way easier than measuring it.

So next I covered my 3/8"" board with masking tape then placed the template on top of the tape and taped it down.  

Using my Proxxon Professional Rotary tool, in the Proxxon mini drill press with  a 316" drill bit I drilled my holes 1/4" deep  according to the diagram. then removed the template and tape.


I connected my lines with a woodburning tool, but you can use a fine tip permanent marker and a ruler.   Then it was sanded well using the Proxxon OZI/E delta sander.


Using the beautiful colors of plaid paints, I painted the playing fields.   I have matching pony beads.


To make the pegs.   I used the Proxxon mini band saw to cut the 3/16" dowel into 1/2" lengths, applied some glue and stuck them in the pony beads.  This left a 1/4" peg that will fit into the holes on the playing field.


Onto the lid
To make a long story short,   I cut a spacer out of the thicker base wood and glued it too the thin 1/16"in lid piece then added  hinges.  See picture below.    I embedded  little magnets on the lid  and play board opposite the hinges so it would stay shut.  Those little rare earth magnets are strong!

As you can see I did some further decorating with my woodburner.  

insideoutside

It slides easily under the seat in the car for road trips.  

That's it.   Give it a whirl, It wasn't hard to make.  I might just make a whole stack of mini games for family time.  

Thanks for visiting.   

Thank you Proxxon Love your tools!!!   Thanks Plaid, love your paint!     Carol