Showing posts with label Hotwire Cutter. Show all posts

Wednesday, April 15, 2020

Enjoy the Little Things

Hi everyone.  During this Corona Virus and quarantine situation, I hope that you are taking time to enjoy the little things.  That is the theme of my current project.  When I came across this stencil I knew it would be a great focal point for a project.


I began by drawing a light bulb on a piece of foam.  You could also take a stencil or large die cut to draw the design on the foam.


Then I simply cut out my design using the Hot Wire Cutter.  It's so easy to cut any project from foam using the Hot Wire Cutter and the results are amazing each time.  Plus, it's quick and easy.  Simply follow the design turning the foam to cut out all the elements.


Look at the great result I was able to achieve.  And I always save my left over pieces of foam as I never know when they will come in handy for another project.


Once it was cut out, I began decorating.  I started by painting the bulb with Martha Stewart's Home Décor Paint in Eggshell and then the electric portion with Folk Art Coastal Texture Paint in Seal Grey.  Once dry, I placed a stencil on top, and used modeling paste and spray inks to achieve the look I wanted.


Next, I proceeded to finish adding paints and inks to my project.


I finished by adding some chipboard elements I found in my stash.  Each was painted with Plaid Paints then adhered around the light bulb.


Again, don't forget to enjoy the little things during this trying time.

Thanks for stopping by.


Wednesday, March 18, 2020

How to create Butterfly Wall Art

Hi everyone, Steph Ackerman here today creating butterfly wall art.


Do you have a little girl in your life who loves butterflies?  Here's an easy way to make any number of butterflies for her room.


Draw the design on foam, then use the Hot Wire Cutter to quickly and easily cut out the butterfly.


Paint the butterfly with assorted colors of Plaid paints.  I used lavender for the base.  Once dry, I placed a stencil on top and added purple and blue paints.  Black was added to the antenae.  To finish, I selected an assorted of dew drops from the Robin's Nest to decorate the butterfly.

It looks like she's flying, doesn't it?

Thanks for stopping by.


Wednesday, February 7, 2018

Happy Valentine's Day

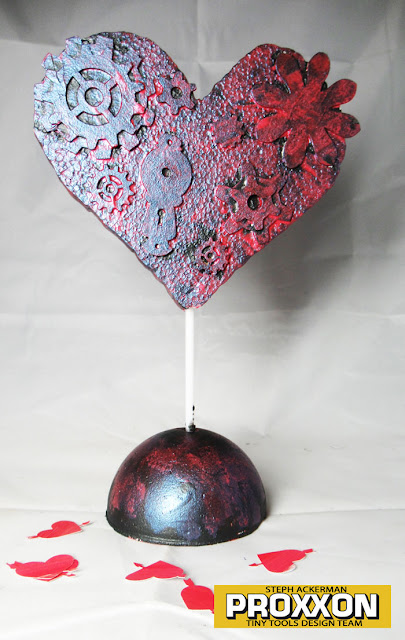
Hi everyone, Steph Ackerman here with a new Valentine's Day project using the Hotwire Cutter, Smoothfoam foam balls and Sheets and Plaid Paints.


I drew assorted sized hearts on a sheet of Smoothfoam.


Following the lines, I cut around the hearts.


Next, I painted heart with Folk Art Color Shift Acrylic Paint in Red Flash.


I placed assorted chipboard pieces on the heart, then gessoed everything.


Then I painted the heart with Folk Art Brushed Metal Acrylic Paint in Black.  I cut a Smoothfoam ball in half to create a stand for my heart.


Once dry, I dabbed Folk Art Color Shift Acrylic Paint in Red Flash.  I love the marbleized effect.


Thanks for stopping by.


Friday, September 16, 2016

Creepy Halloween Tombstones

Hi everyone Steph Ackerman here today.  With Halloween creeping up on us, it's time to create some Halloween decorations.


It's always fun to create something different and using the Proxxon Hotwire Cutter, you can create some amazing projects.

 
I started by drawing 2 tombstones on a 12" x 12" panel of Smoothfoam.  I cut them apart so I could easily work on each tombstone independently.


Smoothfoam cuts like butter with the Hotwire Cutter.

 
Each tombstone was painted with black paint.

 
White glossy paint was added to the cross on this tombstone.


To make them a little spooky, I added spider webbing around the tombstones and placed spiders on top.


They will look great in front of the house this Halloween.


Thanks for stopping by.

Steph

Wednesday, August 24, 2016

Coffee Time

Hello friends. Larissa here today with a fun way to make a wreath.
I am addicted to coffee theme items. Whether it be stamps or actual coffee cups. So today I decided to try something a little different.

Products Used:
Proxxon Hotwire Cutter Thermocut 
SmoothFoam 2x4x8 Block 
Plaid Folk Art HomeDecor Vintage Victorian Paint

Plaid Folk Art Brushes
The Stamps of Life Coffee4two Stamp set
Versafine Onxy Black ink
Grapevine Wreath
Canvas Letter
Beacon Premium Tacky Glue
Pink Sheer Ribbon 
I drew a light pencil drawing of a coffee cup on the Smoothfoam. Then I cut it out using the Hotwire Cutter.  Still think this machine is the best thing ever made.

I then cut the cup three times. 


I painted each cup using the Plaid Home Decor Paint. I used one coat on each cup.
I then stamped the image on top of the each cup using Versafine Onxy Black Ink. I have to admit that the stamping is super smooth and easy. 


I then added some ribbon to the wreath with a big bow.

I added this wreath in my kitchen above where my new coffee station will be. I will post pictures on Instagram and such when I get it all finished. 


I hope you enjoyed my post today. Have a wonderful day friends.

Larissa Pittman
www,muffinsandlace.com


Friday, April 22, 2016

Live the Life You've Imagined

Hi everyone Steph Ackerman here today and I'm using the HotWire Cutter to create to create an embellishment for my canvas.


Supplies:
Proxxon Tools:  Hotwire Cutter
Smoothfoam
Ink
Paint
 

Using scraps of Smoothfoam, it's easy to create elements that add detail and dimension to your projects.  I drew an arrow on a scrap of Smoothfoam then used the HotWire Cutter to cut it. The HotWire Cutter makes it so quick and easy to cut any elements you need.


Next I created the background of my canvas using stencils, paints and spray inks.  I added some music paper, gessoing it in place and love that you can still see some of the music notes. 

 
Once the gesso dried, I added additional stenciling over the music paper with sprays and inks.  I also randomly stamped a script stamp around the canvas for some additional dimension and detailing, lighter in the center of the canvas and darker along the edges. Chipboard gears were added to the right side and my focal elements were added atop some torn and inked map paper.


I continued adding elements until I was happy with their placement.  The arrow was painted to coordinate with the colors in my canvas and placed in the corner to balance the canvas.


 Thanks for stopping by today.
 
 
Steph
 

Wednesday, January 6, 2016

Cute Valentine Themed Crate


Hi everyone and Happy New Year! Tammy here with a cute idea for a Valentines holder for your child's desk at school. My daughter asked me to make something for her to collect Valentines at the class party in, and this is what I came up with.

Supplies used:
Proxxon Hot Wire Cutter
Proxxon Delta Sander
Mini crate
Black chalkboard paint
Hot pink paint
Red glitter paint
Adhesive
Ribbon
Chalk marker
"Love" wood piece

How I made it:
Sand the wood crate with the Proxxon Delta Sander
Sand the "Love" wood piece with the Proxxon Delta Sander
I used chalkboard paint to paint the crate
I used hot pink paint to paint the "Love" wood piece
I added some red glitter paint on top of the hot pink paint
I cut and heat sealed some Valentine's ribbon with my Proxxon Hot Wire Cutter
I added the ribbon to the top of the crate and glued the "Love" wood piece to the front
I added my daughter's name to the side with the chalk marker
I also added her name to the front with the chalk marker
I really love how this project turned out! It was so easy to decorate with the help from my Proxxon Delta Sander and Proxxon Hot Wire Cutter!

I love to see your projects! Tag me on Instagram @TammySmithSantana

xoxo Tammy