Thursday, July 1, 2021

How to make a box kite

 OK, I want to bring out the kid in you this week.  We are going to make a box kite using our Proxxon tools and hopefully it will fly and so will your spirits.  Trust me!


Supplies and equipment:

6    1/4" x 36" dowel rods

4   Walmart bags

2-3 drinking straws

kite string or suitable substitute

scissors

gorilla glue

contact cement 

plastic tape

measuring tool  yardstick or tape measure

speed square if you got one. 

Proxxon scroll saw

Proxxon profession rotary tool

Patience  ha ha

Here's our plan


Let's get started.   The first thing to do is to  cut (4) 14" pieces of dowel   These will be our cross pieces.  I used the Proxxon Scroll saw to do my cutting.  But I could have used my Proxxon mini bandsaw just as well.  You choose,


I made some indents using the Proxxon professional rotary tool.  This will help keep the parts from slipping while I lash them together.  


I lash them together in the middle with string, wrapping it around every which way until it kind of holds it together as an X.  Then I applied a drop or 2 of gorilla glue to strengthen it.   Gorilla glue is very strong but also very light.


Meanwhile I cut my straws into 2-3" lengths.  I need 8 of these.  I cut them about half way through at their halfway point.   These are really going to help keep things together.  I don't know if you noticed how hard it is to stabilize two round things together...😆
I slipped those over the 4 outside 36" dowels at the 6 " mark.  Note the picture below as how to use the straws.  


I put a drop of glue into 2 adjacent dowel sticks straw holes in each of the 4 36" dowels  then put two pieces of each cross members into the straws then propped them up to dry.  Try to keep them at pretty much 90 degrees to each other.


When it is good and dry turn it over and do the other sides just the same.   Now we have a skeleton.

Part 2, making the skin.

  Take 3 Walmart or similar bags and lay then out straight as you can.  Measure 12 inches out of the middle so that when cut it turns into a big loop.  Cut it down the side so you now have a sheet of plastic 12" wide.  Starting at one corner secure the plastic to the side using contact cement.  Then wrap the plastic around the frame as far as you can get.  I got around 3/4 of the way so I needed to add another length of plastic bag.  I attached the second plastic  to the first with a line of contact cement and finished the journey around the frame.  I cut off the excess and secured the end to the first piece at the first corner.  To add strength and durability to the wispy plastic I took clear packing tape around all the edges of the plastic.    

Part 3  Kite string

First let me say.  "goooood luck"   I went to Walmart, dollar tree, dollar general, etc etc.  I believe they have done away with it.  I did find a kite at dollar tree with a miniscule amount of string.  So use what you can.  Light but strong.  I finally chose yarn.  
Cut a piece 36 inches long and secure it to the top of the kite and the top of the bottom section of the kite.  (12" up from the bottom).  About 12- 14" down from the top, tie a small loop.  Attach your "string to' this loop.

Hey,,, guess what.  If there is some wind outside we are ready to fly.    I had to wait 3 days to get enough wind for take off.   But it was worth it.!  You are never too old to fly a kite!  Try it.  

                                                                                                                                                                                                   ↖Me, having a great day.    
Thank you all for visiting.  I do hope you give it a try.  Invite the kids or grands so you have an excuse.to play.    I had soooo much fun.

Thank you Proxxon for your fine tools that make making stuff so easy.  
Till next time.   Carol


Sunday, June 20, 2021

How to Make an Exotic Hardwood Spreader

 This project combines two of my favorite things—beautiful woods and lovely kitchen utensils. I used a length of 1/8" thick bloodwood for this spreader. I love its unique coloring and graining and how it sands to an almost glass-like smoothness. If you're making any kitchen utensils, always be sure that the wood you select is food safe. 


I used these Proxxon tools:

  1. Print out the Spreader Pattern. Mount the spreader pattern on blank. Cover one side of the blank with painter's tape. The painter's tape makes removal of the pattern easy without leaving any sticky residue. Mist the back side of the pattern with spray adhesive, and mount on the taped blank.

  2. Cut the shape on the bandsaw, or you can use the scroll saw.

  3. Use the disc sander to round the edges of the handle. Taper the edge of the blade to form a wedge with the bottom sanded into a knife edge.

  4. Mount the Delta sander into the precision vice, and continue shaping and sanding the piece. Working on the mounted Delta sander makes fine detail sanding easier. Use progressively finer sandpaper grits—150 and 220.

  5. Next, complete the piece with hand sanding use 320 and 400 grit sandpapers.

  6. Finish the spreader with a coat of butcher block oil.

Enjoy your hardwood spreader!!

Carole

Thursday, June 17, 2021

How to make a custom wood box without measuring anything

 Hi everyone.  I have a good project for you today, easy and stress free.


Let me tell you why I chose this particular project.   I take art lessons and am currently working on a pastel picture.  Well, I have to take my supplies to class and the pastels I have came in a flimsy plastic thing I won't even call a container.  See below.


I took it to class but first dumped them in my car, then dumped them again in class.  If I am going to tote them back and forth I need a sturdier container.

First of all, I enjoy making boxes, but I was rushed this time and took some shortcuts that actually worked out well.   This project features the Proxxon mini miter and chop saw, as well as the Proxxon mini table saw and of course, Proxxon's OZI/E delta sander.


The first thing I did was trace around the bottom of my plastic thingy I wont call a container, then cut it out for the bottom  In the picture below I am using the Proxxon mini band saw to do my cutting.


The next step was to mark the height of the sides.  I didn't want to measure so I simply put the plastic thingy next to the wood I would use for side and made a line for the height


I cut slats of wood the height I just measured on the Proxxon mini table saw.  I made them as long as the wood was and will cut them to size next.


I laid the plastic thing beside the wood and marked where the corners of the plastic were, then took the wood slat over to the Proxxon mini chop saw,  The marks on our wood will be the short side of the mitered corner.  I set the miter gauge to 45 degrees, then placed my wood slat with the sides up into the holding slot and cut my 45 degree angle. I made 2 of these for my long sides then repeated the process for the short sides.


Now I have all my pieces cut and it is time to glue them together.   I made a glue bead around the bottom and where the sides met up  with the bottom and clamped it all together.  If you have corner clamps this is the time to use them. I used a lot of clamps.  


When it was good and dry I turned it over atop another piece of thin wood and traced an outline outside the sides for the top.   I cut it out using the Proxxon mini bandsaw and attached my hinges and latch to form a lid.
My plastic thingy fit nicely inside to hold my pastels.  Mission accomplished.  Looks pretty good and is very functional.  


Thank you all for visiting,  Hope this tutorial is a help in someway.  Remember you can customize the size of this to what you need.  Proxxon makes these small projects easy.  Thanks Proxxon.   
Till next time, play safe  Carol


Monday, June 7, 2021

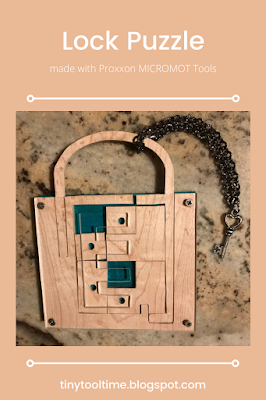
How to Make a Lock Puzzle

 If you like puzzles, this Lock Puzzle is just for you. It's a great project to make with Proxxon tools.


Here are the supplies and equipment you'll need:

Let make the Lock Puzzle:

  1. Mount the pattern for the puzzle pieces on blank. Cover one side of the blank with painter's tape. The painter's tape makes removal of the pattern easy without leaving any sticky residue. Mist the back side of the pattern with spray adhesive, and mount on the taped blank.

  2. Cut the outer dimensions on the bandsaw.

  3. Drill a pilot hole for the scroll saw blade. Cut the interiors on the scroll saw.

  4. Add directional marks on the backs of the puzzle tiles to facilitate accurate assemble.

  5. Using the drill press, drill the marked holes in the tiles. Use a piece of waste wood under the tile to avoid tear-out. secure the waste wood and tile against the adjustable fence.

  6. Follow Step 1 to mount the pattern on the plexiglass.
  7. Cut the exterior of the plexiglass on the bandsaw. Drill a pilot hole in the plexiglass to accommodate the scroll saw blade. Place a piece of waste wood under the plexiglass for a cleaner hole. Cut the interiors on the scroll saw.

  8. Cut the base on the bandsaw. Optionally, the base can be painted with acrylic paints.
  9. Glue the grid for the tiles and the base together. Let dry thoroughly.

  10. Insert the puzzle tiles in the grid/base. Add plexiglass on top. Securely tape the edges with painter's tape. Measure, mark, and drill holes in each corner for brass screws. Screw the layers together.

  11. Now, solve the puzzle to open the lock. When you give up, you can find the Lock Puzzle Solution here.

Carole

Thursday, June 3, 2021

How to make a crab bank

 Hello again.   Time to make something.  I thought and thought about what we should make and all that thinkin got me crabby.  Ha ha, what a lame lead in, but anyhow, today lets make a crab bank.  A nice little place for all out loose change.  

I learned in the process of making this bank that there is an easy way and a hard way of doing it.   I chose the hard way because, well just because the easy way did not dawn on me until I was just about finished.   I will show you my way, but if you are wise I would read on through to the easy way  that  I will show you in the end.

The first thing I did was to make myself a pattern.   I used some various items to draw the different diameter of circles I would need.  I used an oatmeal box, a coffee can, and a smaller toffee can.

  
Using the oatmeal box as a guide I draw my circle on the Plexiglas.  Before cutting it out I want to drill the holes that I need to fasten it to the next piece.  This is easily done using the Proxxon mini drill press.


I finish my holes then cut out the Plexiglas piece using the Proxxon mini bandsaw.  Note, I am leaving the protective paper on it for now,  I don't want it getting scratched up.

I cut all my circles according to my pattern (see above) and set them aside for now

Then I cut all the rest of my pattern pieces on the Proxxon mini bandsaw as well.


I used the Proxxon cordless hand held belt sander to sand and add texture to my legs and claws.

Next I painted everything bright red!  Crab color!

Now time to glue this up.  It goes like this.  The front piece, then the 2 spacers and then the back piece.  When I is dry you can attach the plexiglass to the front with 4 small screws.  (this is how you get your money out later)  I used the Proxxon cordless rotary tool with a small drill bit to predrill my holes.

Let the layers dry overnight

Now I have a fat ring.  I drilled 2  1/4" holes about 1/4" deep in the top of my ring in the middle section.  And I drilled 1/4" holes about 1/2" deep into my 2 1" wood balls.  These will be the crab eyes.


I attached all the arms and legs with glue and small dowels.  It was so wobbly, but I did get it done.  BUT, there is a better way.   When cutting the crab's inner circles, add the arms and claws to the middle circle.   It will be much easier and more stable in the end.

Use this pattern.  

I had fun building this.  And I already have a start for my vacation fund.  Another 10-20 years I'll have enough to go somewhere.    Thanks for visiting.   Thanks Proxxon, I enjoy your tools.

Till next time  Carol