

I've seen similar feeders on Pinterest but they looked a bit "rustic" with hard edges and exposed joints. I also wasn't sure how functional the ones I saw were, because I didn't see any that provided for drainage in the seed tray. I knew the time was right to tackle this re-purposing project when I came across an empty gin bottle at an estate sale today (free!) and my new
Proxxon MICRO Bandsaw MBS/E was sitting in my living room, waiting to be used.
I grabbed some scraps of rough cedar 1x6 left over from the bird house project and set to work on a table in our spare bedroom. Most of the bench top Proxxon tools include an adapter to connect a vacuum cleaner, making them great to use in the house. Practically all the saw dust collects in the vacuum! While I worked on the wood pieces, Joe Morgan worked on the metal embellishments.
The Pattern/Measurements
The bottle I used was about 12" tall, so these measurements are based on that. This is a bird feeder, not a fine piece of furniture, so don't worry about being precise. Here's how I figured out the measurements for my feeder so you can see how you might adjust them to fit the bottle you're using.Rough cedar 1x6 is about 5-1/4" wide. So, a circle that fits over that would be 5-1/4" in diameter. The half-circle would be 2-5/8" tall.
You need 3/4" from the bottom of the bottle to the top of the feed tray so there's room for the seed to come out.
The feed tray base (without counting the "lip") is 3/4" thick.
So, the length of the back piece is: 18-3/4", which is 2-5/8" (top half circle) + 12" (bottle) + 3/4" (space from neck to tray) + 3/4" tray + 2-5/8" (bottom half circle)
The base trays are 4-3/8" long (from the back piece to the tip of the half-circle). The part that holds the neck of the bottle is 3-1/4" long.
What You'll Need
- Rough Cedar 1x6, cut to these lengths. I used the Proxxon Table Saw FET, but the Proxxon MICRO Bandsaw MBS/E would work too.:
- (1) 18-7/8"lengths (back piece)
- (2) 4-3/8" lengths (to make the seed tray)
- (1) 3-1/4" length x 3" wide (bottle neck holder)
- A wine bottle. I used a gin bottle because I liked the flat sides
- A piece of metal decorative tape or flashing about 1" wide by 12" long. If you use flashing, you can cut it on the Proxxon MICRO Bandsaw MBS/E and then run it through an embossing machine to give it a neat texture. I found 1" metal decorative tape at my local big box craft store.
- Compass
- Ruler
- Pencil
- Wood glue (I prefer Titebond)
- Staple gun
- Clamps
- Long zip ties (about 5)
- Sand Paper
- Linseed Oil
- Screws or sawtooth picture hanger to hang the feeder
- Bird seed
- Small funnel
- Proxxon Table Saw FET
- Proxxon MICRO Bandsaw MBS/E
- Proxxon Bench Drill Press TBM 115
- Proxxon Original German Chuck for the TBM115
- 1/4" Drill Bit
- Proxxon Disc Sander TG 125/E
- Proxxon Rotary Tool with a small drill bit (like Complete Model Building and Engraving Set)
- (1) 18-7/8"lengths (back piece)
- (2) 4-3/8" lengths (to make the seed tray)
- (1) 3-1/4" length x 3" wide (bottle neck holder)
Steps To Follow
Read these steps before you begin the project so you understand why they are in this particular order. I found this order really makes this project simple and quick.
1) Using the compass, draw the half-circles at both ends of the back piece and on one end of one seed tray and one end of the bottle neck holder.
2) Draw a line 3/4" inch in from the sides and half-circle of the seed tray from Step (1).
3) Use the Proxxon MICRO Bandsaw MBS/E to cut the curves on the ends of the back piece and on the end of the bottle neck holder. When you're cutting large curves, be sure to cut "relief cuts" around the curve. These allow waste pieces to fall away as your cutting, making it easier to follow a long curve.


4) Use the wood glue to bond the tray lip to the feeder tray. Be sure the flat ends of the "U" line up with the end of the feeder tray. Clamp these two pieces and let them dry.


5) Use the Proxxon MICRO Bandsaw MBS/E to cut the outside curve of the tray assembly from Step (4). The Proxxon bandsaw can easily handle this thick piece (about 1-1/2" thick!) and by cutting them when they are assembled, you are guaranteed the edge will be perfect across both pieces.


6) Use the Proxxon Rotary Tool with a small drill bit to drill lots (about a dozen) small holes in the bottom of the seed tray for drainage. I didn't think to do this until after I glued the pieces together. It would be easier to do that now while the piece can lay flat on your work bench. Keep the holes small enough so seed doesn't fall through them.


7) Create a 1-3/8" hole in the bottle neck holder.
- Mark the center of the hole with the pencil. The center is 1-1/2" from the edge and 1-1/2" from the top of the half circle.
- Use the compass and pencil to draw a 1-3/8" circle around the center mark.
- Drill a pilot hole using the 1/4" bit and Proxxon Bench Drill Press TBM 115 on the center mark.
- Use the Proxxon Scroll Saw DSH/E to cut out the circle. Fit the blade through the pilot hole and then cut around the pencil mark. Sand the finished hole with sandpaper.
8) Sand the edges of all the exterior curves. The Proxxon Disc Sander TG 125/E really made sanding the curves easy. It smooth out any jagged parts of my cuts. I held the pieces flat against the sander to get the curves smooth. Then I held the pieces at an angle against the sanding wheel to round the edges of the pieces.


9) Glue the feeder tray and bottle neck holders to the back piece. I positioned the feeder tray so the bottom of the tray was at the start of the bottom half circle. The bottle neck holder position will vary depending on the bottle you want to use. You want this piece to hold the bottle up so that the opening is about 3/4" from the top of the feeder tray. This is far enough from the base so seed will flow out of the bottle, but no so far that it just pours out. I didn't have clamps that would reach that far so I improvised and used zip ties. They held the pieces together until the glue was completely set and worked great!


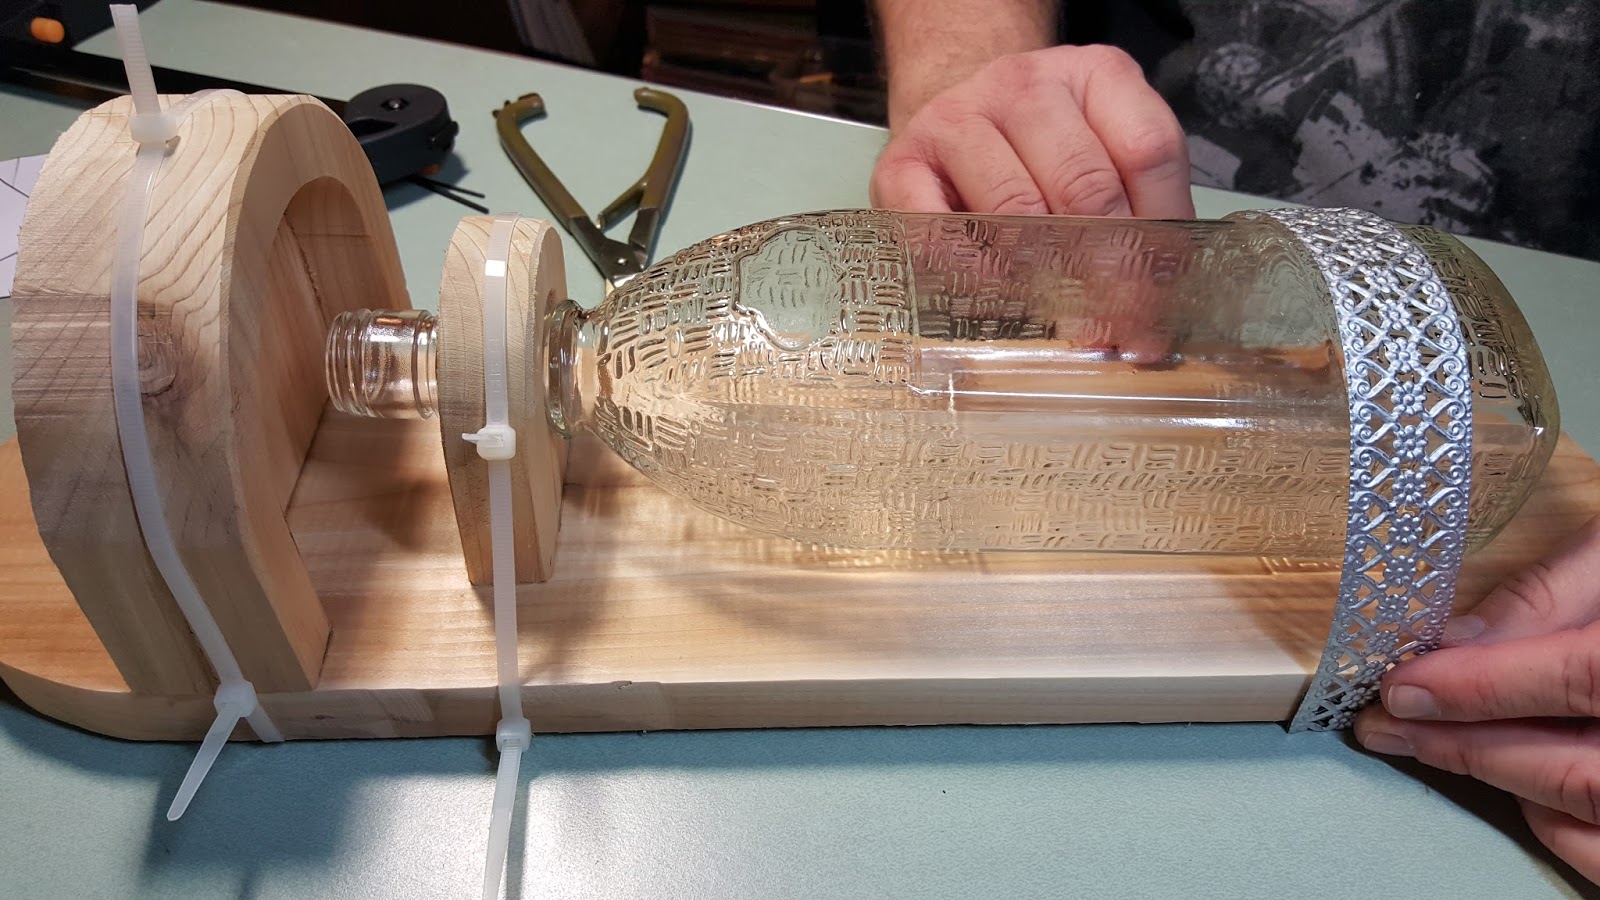
10) Seal and protect all parts of the feeder (except the inside of the seed tray) with linseed oil. Rub it in using a cotton cloth (rag). I didn't do the inside of the seed tray because I wasn't sure if the birds would like that oil against the seed they are eating. Let dry completely.


11) Attach a length of metal tape across the top of the bottle and on to the sides of the back piece using a staple gun. You want the metal tight enough to hold the bottle in place, but not so tight you can't slide the bottle out to refill it.


12) To hang the feeder, you can use screws to attach the back piece to a tree or fence, or attach a sawtooth picture hanger to the back.


13) Embellish! We changed the color of the metal tape with spray paint. We had a little owl necklace and thought that would look great hanging in front of the bottle. So it didn't look so "new," we distressed it some paint to make it look a bit older.


14) Use the funnel to fill the bottle with seed. Then slip the bottle back in to the feeder. If you hang the feeder using a sawtooth hanger, you can take it down, turn it upside down, slide it over the bottle and then flip it right-side-up to hang. If the feeder is attached with screws, just hold your fingers over the bottle opening or put a small piece of masking tape over the opening just until you flip it over and have it in place.


14) Use the funnel to fill the bottle with seed. Then slip the bottle back in to the feeder. If you hang the feeder using a sawtooth hanger, you can take it down, turn it upside down, slide it over the bottle and then flip it right-side-up to hang. If the feeder is attached with screws, just hold your fingers over the bottle opening or put a small piece of masking tape over the opening just until you flip it over and have it in place.

I think this will be a great addition to our backyard! I hope you'll try making one and let me know how it turns out.
Happy Crafting!
Joe
www.createNcraft.com
Happy Crafting!
Joe
www.createNcraft.com





