Hi everyone Steph Ackerman here today and I've used the Delta Sander and the Complete Model Building and Engraving Set from Proxxon Tools.
This plaque was perfect for a project I had in mind. So I began by lightly painting it. To age the plaque somewhat I used the Delta Sander to remove some of the paint.
Using the Model Building Set, I quickly and smoothly drilled two holes in the top of the plaque so I could add a metal hanger.
To add a rustic effect, I stamped a script background stamp with black ink.
Next, I placed an assortment of stamped images on the panel using foam adhesives to add dimension.
Thanks for stopping by today.
Steph
Friday, June 3, 2016
Journey Wall Hanging
Welcome to my blog. I've been married to Gary for 40 years. We have a 25 year old Criminal Justice college grad and an 18 month old puppy.
I've been creating in some form since I was a child. It started with crochet, sewing, macramé and beading. Turning down a scholarship to the Fashion Institute of Technology, I became a business major managing several major corporations during my career; however, I always kept my crafty endeavors.
I love to teach classes and can be found teaching in my craft room as well as my local stores.
Wednesday, June 1, 2016
DIY Personalized Graduation Gift Featuring The Proxxon Glass Engraving Set
I love to give personalized gifts whenever I can, so when I found this frame I thought it would be nice to add a engraved message on the glass to make it more personal. I chose to add "Congratulations" but you could also add a name or any saying you like.
Supplies:
Frame from Dollar Store
Print out with phrase you would like to trace
Directions:
Print or stamp your favorite phrase on a piece of paper. Remove the backing and any extra paper from the frame.
Place the phrase you would like to trace and tape it to the glass from the back showing through the front.
Trace the design with the Proxxon Glass Engraving Set until you have traced all of the letters and you are happy with how it looks on the glass.
Add your favorite photo and you are ready to give the frame to your favorite graduate! I love how easy the Proxxon Glass Engraving Set is to use. You can add names, dates, monograms etc. to any glass item in a matter of a few minutes! The possibilities are endless, and it is always nice to have the option to easily give a personalized gift without having to wait for a special order item.
Let's be friends!
Saturday, May 28, 2016
Playing with Alcohol Inks
Many people these days are painting with alcohol inks and playing with alcohol inks. I myself use them to normally color the gourds that I'm working with but recently I decided to just play with them on a gourd I was making.
Materials used in this project:
1 Med/Large Cannonball Gourd
A variety of alcohol inks that go together
Proxxon Jig Saw STS 12/E
Proxxon Micromot Rotary Tool 50/E
White Spray Paint
Kamar Varnish (if you use this the ink won't move again)
To begin with I marked a circle where I wanted to cut my hole. After a little trial and error I now know what size to make it. I then drilled a hole inside the hole with my Proxxon Micromot Rotary Tool 50/E to start my blade in. Next I cut the hole with my Proxxon Jig Saw STS 12/E
I sprayed the gourd with the white paint to give it a uniform surface to drop the ink on, plus gourds have a lot of yellow in their shell and some colors like blue do not keep their true colors.
Once the white paint was dry, I dropped several colors of the alcohol inks onto the gourd and once that was dry I sealed the colors with the Kamar Varnish. This is the final result:
Having the Proxxon Small Tools really helps me in so many ways when I'm working on a gourd. I have arthritis in my hands and their small, compactness makes them easier to handle. Check out these great tools at www.proxxon.com .
Barbara
Tuesday, May 24, 2016
~REVAMPING~ "Whats Old Becomes New Again" Proxxon DT Project by Sherri Welser
~REVAMPING~
"Whats Old Becomes New Again"
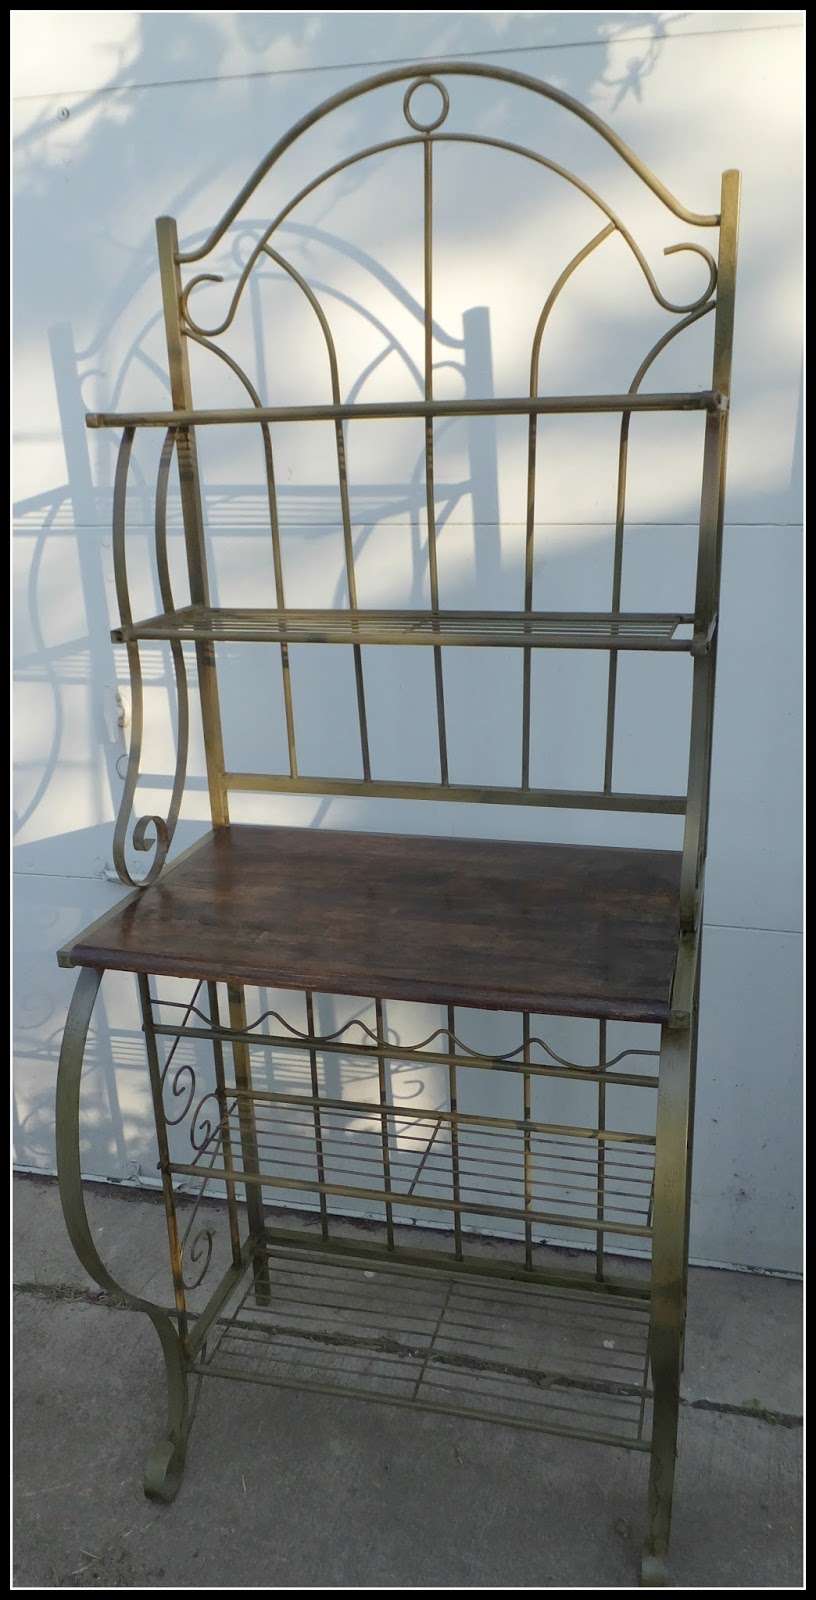
As many of you know who follow my projects, I LOVE to find old objects and make them "new" again. I was at my local ReStore and found this old Bakers Rack and thought it would make a great potting bench outside my new art studio! Before I started "ReVamping" it it was white, rusty and the wood block on top was stained and gross! Below you see it halfway through the process and then I take it to the finished project with a couple of supplies and a little TLC!
~Supplies~
Coarse Sanding Pad
Minwax Stain/Polyurethane
Gloves
Staining rag
Spray Paint (I used an Olive color)
Time To Have Some Fun!
I began the project by spray painting the top area
I then used the Proxxon Sander to sand off the wood base on the top.
Once it was all sanded down ( I didnt want to sand too much as it isnt a very thick piece of wood. I also didnt do a finer finish sanding as I wanted more of a rustic look to the overall piece.
I then finished spray painting the rest of the piece.
I applied stain using the rag to the wood top and also on the painted parts to give it "vintage" look and feel.
In the end as you can see it now has a rustic beautiful look about it! It didnt take up alot of time or materials but what a difference it made! I am so happy how this piece came out and now it will have another life as a potting bench! Using the Proxxon Delta Sander made it so quick and easy to get the top sanded to a wonderful finish!
I think we all should RePurpose & "ReVamp" and find ways to make whats old become new and vibrate again! Happy Creating and ReVamping!
Labels:
bakers rack,
potting bench,
Proxxon,
proxxon delta sander OZI/E,
repurpose,
sherri welser,
Vintage style
Friday, May 20, 2016
Baby Shoes Wreath
Hi everyone Steph Ackerman here today and I'm working with the Complete Model Building and Engraving Set from Proxxon Tools. This tool set includes a large selection of bits, grinding wheels and cutting discs and is the perfect set for working with small items.
If you've ever had small items that need tiny holes but find that drills are too strong and they split your work, that trying to punch a hole with a nail breaks your items, then this is the tool to use. I needed to create tiny holes in hard plastic baby shoes and I found the Complete Model Building and Engraving Set was perfect. I was able to control the speed of the tool and select different bits that would create the perfect tiny holes I needed.
Using the included bits, I first created a tiny hole, then moved to a larger bit to make the hole large enough to insert ribbon.
I was able to create perfect holes in all 6 shoes in a matter of minutes - no slipping, no cracking, no breaking. Then all I needed to do was add the ribbon.
I wrapped an assortment of ribbons around a Smoothfoam Ruled Wreath in keeping with the baby theme, then hung the shoes from the center. A coordinating bow was created to finish off the wreath.
Next time you need to work on a miniature scale, select the Complete Model Building and Engraving Set from Proxxon Tools.
Thanks for stopping by today.
Labels:
baby,
Model Building and Engraving Set,
PROXXON Tools,
ribbon crafts,
Smoothfoam,
Steph Ackerman
Welcome to my blog. I've been married to Gary for 40 years. We have a 25 year old Criminal Justice college grad and an 18 month old puppy.
I've been creating in some form since I was a child. It started with crochet, sewing, macramé and beading. Turning down a scholarship to the Fashion Institute of Technology, I became a business major managing several major corporations during my career; however, I always kept my crafty endeavors.
I love to teach classes and can be found teaching in my craft room as well as my local stores.
Wednesday, May 18, 2016
Father's Day Personalized Engraved Pilsner Glass Tutorial Featuring The Proxxon Glass Engraving Kit
Hi everyone and thanks for stopping by the Proxxon Tools blog today. Tammy here with a fun Father's Day project and review of the Proxxon Glass Engraving Tool.
When I received the glass engraving tool, it was packaged in a sturdy carrying case and had easy to follow directions. It also came with a practice glass to perfect my skills before making my Father's Day project.
The tool was so easy to use! I was able to create this cute bud vase on my very first attempt with the practice glass.
I like it so much, I keep it on my desk!
After I was comfortable using the tool, I had my daughter draw this note to her dad for Father's Day and I etched it onto a pilsner glass with the Glass Engraving Tool.
How I did it:
1. My daughter used a Sharpie marker to write a note on a piece of copy paper.
2. I placed the paper face side out on the inside of the glass and taped it to the glass.
3. I was able to easily trace the fine details of the drawing with the glass engraving tool, so it looks like she drew it on herself!
This would be a great gift for any dad that enjoys a cold beverage every once in a while, and you can easily trace any image with the tool so the possibilities are endless! I hope this gives you some ideas on how to use the Proxxon Glass Engraving Tool. It is becoming my new favorite tool for sure!
Supplies I used:
Pilsner glass from The Dollar Store
Paper
Sharpie marker
Tape
Let's be friends!
Sunday, May 15, 2016
Wind Chimes Repair
I love how handy my Proxxon Micromot power tools are. They make creating—and repairing—easy. This winter was hard on my wind chimes. In mid-February the wooden support for the chimes cracked, broke, and sent the chimes crashing down.
So, my son and I cut a new support. Well, truth be told, he did the work because he loves these tools as much as I do!! First, we measured the old piece and traced a circle the same size onto a piece of 1/2" wood. Then, he used the Proxxon scroll saw to cut out the circle.
Next, he routed the edges with the hand-held router.
Then, we used the Delta sander to smooth the edges.
The piece was sprayed with a sealant to protect it from the weather. When it was dry, the wind chimes were ready to be restrung.
I'm so glad that with the help of my Proxxon tools (and my son) I was able to repair these beautiful wind chimes rather than having them end up in the trash heap.
The wind was whipping around today, playing with the wind chimes. Listen to the beautiful music that they make.
![]() |
| Carole |
Labels:
Carole Lassak,
Delta sander,
Proxxon,
repairs,
router,
scroll saw
In addition to paper crafting Carole enjoys a variety of handcrafts and fiber arts, including needlepoint, crewel, knitting, crocheting, beadwork, and lacemaking. She regularly travels abroad to study the dying art of handmade bobbin lace. She incorporates mixed media techniques to create unique greeting cards and paper art pieces. She has served on several craft industry design teams including Sakura Hobby Crafts, Amazing Crafting Products, USArtQuest, and The Robin's Nest. Her favorite food is sushi, especially sea urchin.
Subscribe to:
Posts (Atom)