Friday, February 21, 2020

How to make a cute little plaque using the Proxxon rotary tool with the router base

Hi again, Carol here with a new project.

Today I want to show you how to make a cute little plaque using a couple of Proxxon's nifty tools that I haven't really used much before now.  Introducing Proxxon's professional rotary tool and it's accomplice, Proxxon's router base attachment. This project will show you just how easy these tools are to use and what you can do in just a couple hours.  This is definitely a beginners project.  I have never used the router base attachment on the rotary tool before this project so as a rank beginner I will show you how easy it is.   I think with just a little practice, you, and maybe even I, could make something awesome.


To get started let's collect our equipment and supplies:

1.  I used a piece solid  birch wood measuring 1/2" x 7" x 10"  just about the size of a piece of notebook paper.   I had it lying around as a cutoff from a previous project, but if you need to cut a piece to size the  Proxxon mini table saw would make short work of that.

2. Proxxon professional rotary tool equipped with Proxxon's router base attachment and a straight bit.  In the picture above you can see Proxxon has a nice assortment of bits that come as a set.

3. Plaid paints:   I used Bright magenta 20591E,  True Blue 101,  Yellow lemon 226, Concord grape 20595E, Orchid blush 4623, Nutmeg 944, Vivid orange 2904, Light flesh 229, Spring white 430, Bimini blue 2142E, and Shamrock 21479E.


5.  Sealer of your choice,  I used a 2 part resin..


This project actually started with a dream I had a long time ago.  I woke up one morning and was trying to remember what I had dreamt that night because I knew it had been so happy.  All I could remember was I had told someone that I was happy as a pig in peanut butter.   I loved that saying so much I wrote it down and have been saving it for a project.   Well now is the time   I chose the little pig you see in the picture because he does seem to be quite happy and pleased with himself.  🐷


In the next step I added my saying and then using transfer paper I transferred the picture onto my wood.


I adjusted the Proxxon rotary tool in the router base to cut at a depth of about 3/16" and simply followed the lines I had drawn on the wood.  Except when I got to the piggy's face I decreased my depth a little bit so that my lines would be much narrower.  Big fat lines would not work on his little face.  

That was easy and fun too.
Now we paint! Plaid paints are my choice!


I just painted my colors inside the grooves I made with the router.  If the paint gets outside the lines, no worries, the next step will clean it right up.

I used Proxxon's OZI/E delta sander to sand the whole thing.  Sanding removes any stray paint that has gotten onto the plaque.   Be sure to sand the edges and corners to round them over a little bit.


I used a two part resin to finish this but spray sealer would work just as well.  I'm practicing with resin for a future project so stay tuned.  So now the project is complete and ready for the kid's room.   I surely enjoyed making it.The piggy and the sentiment still make me smile.   Till next time, thanks SO much for visiting!.  Thank you Proxxon tools and thank you Plaid paints.   These two companies make me happy as a pig in peanut butter!   Carol 


Wednesday, February 19, 2020

How to Create Art

Hi everyone, Steph Ackerman here today using Proxxon tools to create Art.   Art has so many different meanings for everyone, so feel free to create what makes you happy.


Select a left over panel of wood that fits your stencil, then cut it with the Band Saw.


Use the Disc Sander to sand the panel.


Place a stencil on the panel and add color so the pattern is visible.  Use the Power Carver to carve  out the scroll pattern.  I've not used the Power Carve much so this was a learning process and I would rate this a beginner project.  With the variety of carving blades available, you can carve an assortment of details and with more practice, the possibilities are endless.


Now that the design has been carved into the panel, gesso the entire panel.


Once dry, reposition the stencil and repaint the panel with different colors.  Finish by spritzing a shimmery craft spray over the entire panel.


The final touch was adding brown ink around the panel as a contrast to the colors in the panel.


Thanks for stopping by.

Steph


Sunday, February 16, 2020

How to Make Salad Tossing Tongs

My son who is a chef says that one secret to a great green salad is gently tossing the greens so they are not bruised or crushed. These salad tossing tongs are perfect for that task.

Supplies and Equipment for Making Salad Tossing Tongs

 Instructions for Making Salad Tossing Tongs

  1. Cut two 6" x 3" x 1/8" blanks using the bandsaw.
  2. Tape the blanks together. Cutting both blanks at the same time helps to ensure that they are identical.
  3. Mist the back side of the salad tongs pattern, and mount on the taped blanks.
  4. Cut the verticals on the bandsaw.
  5. Use the scroll saw to cut the horizontals. (Note: Both Step and 5 can be done on the scroll saw.)
  6. Round the corners on the disc sander.
  7. Set the angle of the disc sander table to 45­­°.
  8. ­Bevel the edges of the tongs by sanding both sides at 45°.
  9. Finish detail sanding between the tongs and flat sides with the Delta sander using progressively finer grits of sandpaper.
  10. Treat with butcher block oil to bring out the grain.
  11. Eat salad—it's healthy!!
Carole

Monday, February 10, 2020

How To Build A Colonial Table Riser


    Hi everyone!  I'd like to show you how I made a simple table riser. It could have multiple purposes from purely decorative to lifting something hot off your table. I first made a round one to put under a lantern and later I made a rectangle one that I want to go down the center of my farm table. It's an easy project and can be modified to any size you need. Follow along with me and I'll show you how I made it using my Proxxon tools.

Supplies:
  •  1" x 12" pine boards (various lengths)
  • Proxxon Table Saw
  • Proxxon Micro Band Saw
  •  Proxxon Delta Sander
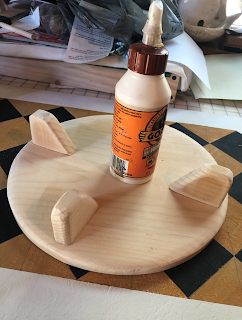
  • Wood Glue
  • Brad Nailer (optional)
  • Plaid Paint black
  • Plaid Waverly Inspirations Clear Wax
 Draw your pattern on the 12" pine board.

Cut the board off with the Proxxon Table saw leaving the section with the pattern.


Using the Proxxon Mini Band Saw, cut out the pattern.


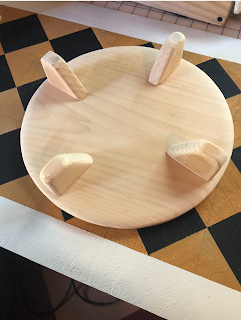
Draw the leg pattern on the corner scraps. You will need 4 of these.


Sand edges of all the pieces using the Proxxon Delta Sander. Glue legs to the circle using wood glue. 


Can also be secured with brads.(optional)


Paint with Plaid paint. I used black.


Finish with a coat of clear wax (Plaid Waverly Inspirations)
Thanks for following along with me. Colleen


Friday, February 7, 2020

How to make a Valentine's day door hanging

Hi everyon
e.   Well here it is again..., Valentine's day.   Let's get cracking and make a little door hanging for you and or your spouse to hang on the door just to let them know you love them.


Supplies and Equipment


First thing I did was to draw a heart. Then I added the "names" to each side.  Mine is generic, hence, "you and me", yours would be much nicer and more personal if you did you and your spouse's names  Remember that we are going to cut this in half like a puzzle so keep the names on their separate sides.


I transferred the pattern onto the wood and in the picture below I am cutting out my heart using the Proxxon mini scroll saw.  So easy, I just follow the line I drew.  


Note the puzzle like line going down the middle of the heart.  We are going to cut the heart right down the middle to make 2 puzzle pieces.  I want the 2 pieces to be separate but I also want  to be able to put them back together and have them stay there.  


Now I am going to sand the edges using the Proxxon disc sander.   Boy that makes short work of that.  When I finished with that I used Proxxon's OZI/E delta sander to smooth everything.


I next used Proxxon's Mini drill press to make holes where I can "sew" the 2 pieces of the puzzle together.  Mark your spots with the heart together so you know they will line up properly.


I painted the halves separately using Plaid paints.  The colors I chose were: cardinal red 414E,  white 2503E,  gold dorado 4033, sterling silver metallic, and black.  How you paint is entirely up to you.
When the paint was good and dry I sprayed it with Krylon crystal clear sealer which gave it a glossy shine and will protect it.


Now  I am going to use my long 1/4" piece of ribbon to tie the 2 halves together.  
To finish it up, I used the 1/2" ribbon to make and loop and tie a bow to the top for a hanger and we can call it all done!

Thanks so much for visiting.  I hope your Valentine's day is an especially good one.   See you next time.   
Thanks to Proxxon, (awesome tools), and Plaid, (awesome paint)!!
Carol