Showing posts with label St Patrick's Day. Show all posts

Thursday, March 4, 2021

St Patrick's day shelf sitter

 March...Time for St Patrick's day.   I love that nearly all months the have something to celebrate.  Today let's make a cute little shelf sitter to welcome in the festive time of leprechauns, shamrocks, rainbows, green beer, and friends.   This  blog is going to feature the Proxxon long neck angle grinder.  That is a powerhouse tool to be sure, and I had a good time working with it.   I think it is going to be a go-to tool in my workshop from now on.  Mine in the corded version but I hear they make a cordless rechargeable one now.  Wish list?      Christmas is coming ya know.     


I used a piece of 3/4" pine board for the majority of this project.

Tools and Supplies
3/4" pine board at least 4" wide
thin piece of wood for sign
wood glue
Plaid paints of your choosing
glitter spray or sealer 
small screws  (optional)  for reinforcing glued joints.

Let's start with a plan:

this is a full size plan if printed onto regular paper


I copied the plan onto my wood and cut it out all the pieces except the hands  using the Proxxon mini band saw.


Using the long neck angle grinder I made some texture in my little man.  This will stand out when we paint it.  

I left the hands on the longer piece of wood when I used the grinder on them.  the grinder is powerful and I didn't want it that close to my hands.  Where the fingers are I used to grinder to form a groove so that it will sit on his little sign and look like he is holding it.  After I was done with the groove I cut them out on the proxxon mini scroll saw.


I tapered his shoes with the long neck angle grinder so they looked pointy.    I shaped his pipe using the Proxxon OZI/E delta sander.   And I surfaced his little plaque with the angle grinder as well.


Time to put it all together

The body sits on top of the bottom  and is secured with glue and 2 screws.  The legs are attached to the front of his bottom piece and the shoes  are attached to the bottom of his legs.  The hands are glued to the top of the plaque, made to look like he is holding it up.   I drilled a small hole in the corner of his mouth and glued the pipe in.   


Now paint!   Plaid makes beautiful colors, and so many to choose from.   I suggest you paint before you place the plaque, just to make it easier.   Finish it off with some spray sealer or glitter, or..... whatever you like.     On your plaque write your favorite Irish saying.   I love this one.  

May the roof above you never fall in
and may your friends below it, never fall out. 

I'm going to set him above my front door.   


Thanks for visiting!!!   
Thanks Proxxon and Plaid!!    

Catch ya next time   Carol

Friday, February 24, 2017

How to make a cute St Patrick's Day Wooded Wreath

Hello friends. I am here today to show you how I created this cute little wooden St Patrick's Day wreath. This is a some what easy project if you have the right tools.

I started off cutting the wreath out of a thin piece of wood. I used the amazing Proxxon Scroll Saw DSH/E for this. I used a a green marker to draw the outline of the wreath on the wood first and then followed the outline to cut it out. Ok I will admit as I did not take pictures of this but this was my 2nd try. The first one was a little jagged and not what I wanted. That is the beauty of doing this kind of projects you can always do it over. :)
For the middle circle you can use a router to cut it out.  I didn't need to do this because the wood was smooth but if there are any rough edges make sure to sand them.


I grabbed a few different paints for this project. I didn't want a deep green so after digging through my stash I came up with a Milk Paint and Dye. I also used a Gel Medium to add a little more to the paint.  
Because this was a light colored paint I gave this little wreath three coats to cover it completely. 


After it was completely dry I added a few embellishments. These Shamrocks and Letters can be picked up and your local craft store. 
I placed the letters and shamrocks around the wreath. 


I am loving the way this little thing came out. It is perfect to use inside or out from year to year. 
What do you think?


Supplies Used:
Proxxon Scroll Saw DSH/E
Thin piece of ply wood
Embellishments (Letters and Shamrocks) 


Wednesday, February 17, 2016

How To Create A St. Patricks Day Wall Hanging With The Proxxon Delta Sander


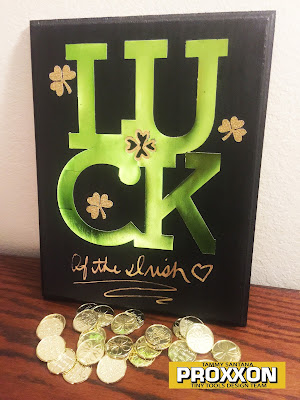
Hi everyone, Tammy here with an easy St. Patrick's Day decor tutorial! I love decorating for every holiday so when I saw this cute graphic in the Silhouette Design Store, I knew I had to use it for something. My husband is Irish so I think he will like this wall hanging :)

Supplies I used:
Wood plaque 10x14
Chalkboard paint
Toner sheet
Deco Foil
Parchment paper
Silhouette machine
Silhouette "Luck" graphic
Gold Shamrock stickers
Gold leafing paint pen
Xyron adhesive machine
How I made it:
First, I printed out a blank black toner sheet from my laser printer and cut out the "Luck" graphic I purchased from the Silhouette Design Store.
I placed the graphic inside parchment paper with Deco Foil on top of it
I ran it through my lamination machine
I removed the excess foil and ran the graphic through a Xyron adhesive machine to turn it into a large sticker.
Then, I sanded the wood plaque, with the Proxxon Delta Sander, until it was really smooth and ready for paint.
I painted the plaque with chalkboard paint and let dry completely
Then I put the "Luck" sticker in place and used a gold leafing paint pen and gold stickers for additional embellishments.

I love how this project turned out! I would love to see your projects, tag me on Instagram @TammySmithSantana
xoxo, Tammy