Friday, April 22, 2016

Live the Life You've Imagined

Hi everyone Steph Ackerman here today and I'm using the HotWire Cutter to create to create an embellishment for my canvas.


Supplies:
Proxxon Tools:  Hotwire Cutter
Smoothfoam
Ink
Paint
 

Using scraps of Smoothfoam, it's easy to create elements that add detail and dimension to your projects.  I drew an arrow on a scrap of Smoothfoam then used the HotWire Cutter to cut it. The HotWire Cutter makes it so quick and easy to cut any elements you need.


Next I created the background of my canvas using stencils, paints and spray inks.  I added some music paper, gessoing it in place and love that you can still see some of the music notes. 

 
Once the gesso dried, I added additional stenciling over the music paper with sprays and inks.  I also randomly stamped a script stamp around the canvas for some additional dimension and detailing, lighter in the center of the canvas and darker along the edges. Chipboard gears were added to the right side and my focal elements were added atop some torn and inked map paper.


I continued adding elements until I was happy with their placement.  The arrow was painted to coordinate with the colors in my canvas and placed in the corner to balance the canvas.


 Thanks for stopping by today.
 
 
Steph
 

Sunday, April 17, 2016

Travel Tic-Tac-Toe Game

My son and his family are planning a family vacation soon, and will be traveling with two little ones. I thought a surprise game might help keep them entertained on the long flight. So, I made this tic-tac-toe board using several of my Proxxon tools.

I started by measuring my board to 4" x 4". 

I used the Proxxon scroll saw to cut the board to size.

Next, I sanded the edges and corners with the Proxxon Delta sander.

Next came marking the grids to divide the board into nine squares for tic-tac-toe.

Using the penciled grid as a guide I put the Proxxon handheld router to work.

Last step was to add the playing discs. Now this game is ready for use.


Carole

Wednesday, April 13, 2016

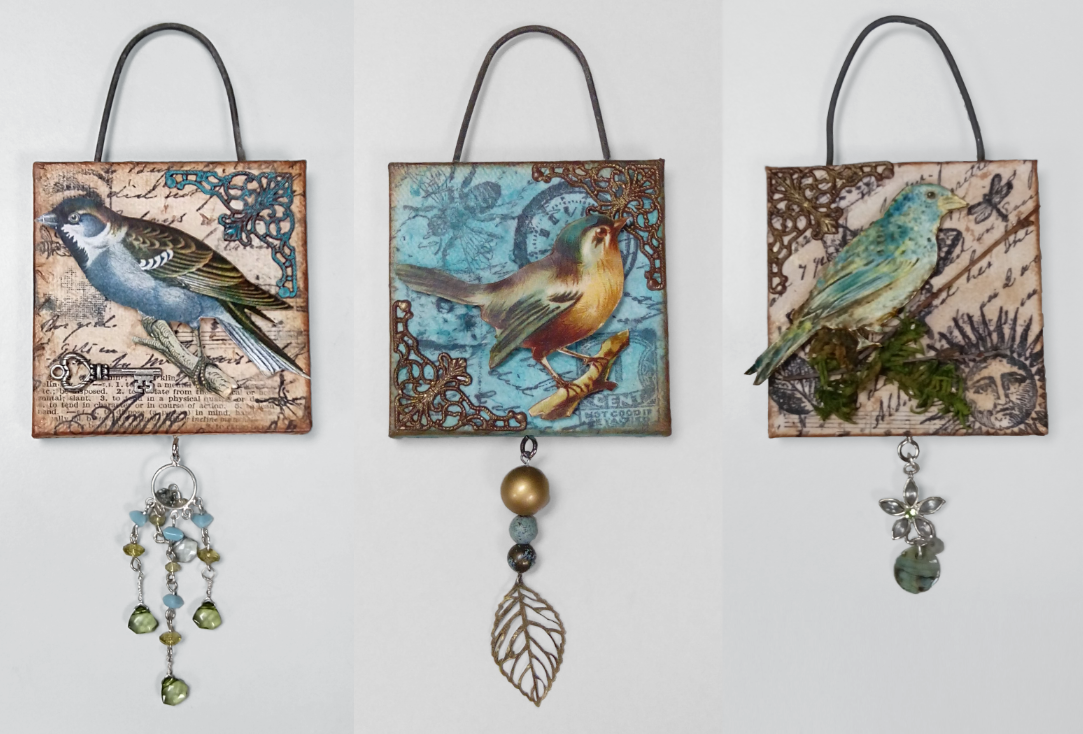
Tiny Birds on Tiny Canvases


These little canvases work great individually in a small space - like a cubicle or camper. Make a group of them, and a "flock" makes a great statement on any wall! I used birds, but you could easily use any images you like, for example butterflies, fish, sea horses, cats and dogs.

What You'll Need

Steps To Follow 

1) Carefully cut out (i.e., fussy cut) the bird you'll use on top of your canvas and set it aside.


2) Cut a length of wire about 6.5" long using the Proxxon Chop and Miter Saw KGS 80 fitted with the Cut-Off Wheel. The cut-off wheel is perfect for cutting non-ferrous metals, like aluminum, copper and brass. A non-ferrous metal does not contain iron, is not magnetic and is resistant to corrosion.


3) Measure the diameter of the wire. I used a metal drill bit gauge. It's one of my favorite tools!


4) Select the appropriate drill bit based on your measurement and make two holes in the top of the canvas. This is where the wire will go to make a hanger for your finished piece. I drilled the two holes while the canvas was still wrapped in plastic to protect the canvas from any tool marks (like from the vise).


5) Stamp images on the white tissue using the archival ink. Be sure you put something under the tissue while you stamp, just in case the ink goes through the thin tissue. You don't want to stain your work surface! Let these dry completely.

6) Collage the stamped tissue on to the canvas using the acrylic medium. Be sure you're collaging so the holes are on the top of your piece! Check out this YouTube video to see how you collage tissue thin materials (like napkins or tissue paper) using Perfect Paper Adhesive (PPA) from USArtQuest. The process is the same for this canvas as it is for the wood frame used in the video. Allow the collage to dry well. You can speed up the process with a heat gun.


7) Glaze the collage using the acrylic glaze. Let it dry completely. You can speed up the process with a heat gun. My favorite is the 360 watt gun made by Milwaukee.


8) Use a thumb-tack to pierce the canvas at the bottom of the frame. Insert the screw eye. You might need to use the pliers to twist it in, but you shouldn't need to drill a pilot hole. Attach charms, trinkets, beads, etc. to the screw eye.


9) Bend the wire in half around a cylinder (like the barrel of a flashlight) to get a smooth curve. Then insert the wire in to the two holes at the top of the canvas. Use the pliers to bend over a small bit of the wire in the back so the wire can't pull out of the top.

10) Attach the bird to the canvas with a pop-dot so it's raised above the canvas


Proxxon bench tools make it easy to create several of these at once so you can have a flock of birds on your wall!

Happy Crafting!
Joe

Proxxon Scroll Saw Tutorial: Fiesta Menu Board


I am so excited to start a #FiestaFriday blog series on www.TammySantana.com every Friday starting this week! It will have recipes and craft ideas with fiesta flair. I wanted to create a cute menu board to highlight the recipes that I will be featuring but I couldn't find one of those wood cutouts that said "Fiesta". I decided to get out my Proxxon Scroll Saw and cut my own. I can't believe how easy it was to cut out this Fiesta wood piece from 1/4" plywood. Now I can create my own custom cutouts any time I want for any project!


Supplies:
Silhouette Design Store Fiesta Design
Sabor Papel Ole' Cardstock 
Black Paint
1/4" Plywood 
Xyron machine
Adtech Hot glue gun
Foam tape
Blackboard

How I made it:

I Purchased a Fiesta design from the Silhouette Design Store that had the word that I could cut out of cardstock and also a larger outline that I could use for the wood piece. 


I cut the larger cardstock piece out of adhesive cardstock and the smaller piece out of the Ole' Cardstock.


I Placed the adhesive cardstock on the plywood 


I traced around the image and cut it out with the scroll saw


I created a hole with a drill to start the saw for the inside cut.


After the piece is cut, there will be some rough edges.


I used the Delta Sander to smooth out the edges


I painted the piece with black paint


I ran the Ole cardstock piece through a Xyron machine and attached it to the top of the wood piece after the paint was completely dry.


I attached the plywood piece with a hot glue gun and the pinata embellishment with foam tape to a blackboard that I recycled from another project.

I love how this project turned out and I can't wait to use it on Friday! Stay tuned for more projects with my Proxxon Scroll Saw!

Let's be friends!


Tuesday, April 12, 2016

"Not Just Another Letter" ~New DT Project For Proxxon Tools~

"Not Just Another Letter"

It is so much fun to work with and create unique textures and to also offer something of visual interest when working on  a very ordinary object! Letters are Hot right now and I wanted to come up with some ideas to create interesting visual excitement to these seemingly plain and ordinary wooden letters that I cut out using a template and my Proxxon Scroll Saw DHS/E. To sand the edges a bit I used the  Delta Sander OZI/E . Below you will find a supply list and further instructions for creating 2 unique finishes for your wooden letters.

~Supply List~
3/4 " plywood  & whatever size you want to make your letter 
( Mine are about 8"tall x 5" wide)
Acrylic Paints ( orange,blue, turquoise, copper)
Mod Podge ( matte finish)
 1 sheet of Tissue paper
Doodle Pens
Markers
Gel Pens
Brushes


  I created a template  using  a brown paper bag and several wooden letters I had around, this way I will be able to create more letters by just tracing the template on the plywood. Using my Proxxon Scroll saw I cut out the letter O  ( to create the  inside of the O you need to drill a hole in the center of the wood and then remove the scroll saw blade.Place the wood on the saw table and insert the saw blade  back on  but through the drilled hole .Work from that inside area sawing the center  out to create the inside part of the O.  I then cut the V and sanded them  a bit with the  Delta Sander for a smoother finish.


  Paint the letter O with the orange acrylic paint and let dry.
Using your brush and Mod Podge create a fine layer for the tissue paper to adhere to.


 Using the tissue paper gently push down into the mod podge and  you want to have some crinkling in it to create a unique textured appearance.

 After its dried apply the turquoise and copper paint, randomly. We want to look of " Verdigris Patina" metal.


After drying the texture is beautiful and looks so much like textured verdigris metal!


 For the V wooden letter I wanted some color and fun doodling to make that visual impact so after painting it the blue color and letting it dry I then got out my pens and markers!

 This is where you can really be creative just drawing lines, circles,flower petals, triangles,dots etc!


 After the outlining  my designs with the black pen I just used the markers to color in the lines and shapes but left a fair amount of the blue showing on the letter to create a "rest space" for the eyes. Using paint dots is another way to create interest in your doodling projects!

I hope you have enjoyed this fun and unique way to create something interesting from something very ordinary!

Friday, April 8, 2016

A Great Way of Displaying Your Business Cards in a Gourd

If you read this within the first couple of days of my posting this, then I will be at the Missouri Gourd Festival in Springfield, MO. While getting ready for this wonderful festival, I thought it might be fun to make a special piece to put my business cards in, as I have a booth and sell some supplies.

Items needed for this project: 

An Apple Gourd
A simple card holder
Glue
Apple Red Paint
Jacaranda Pod
Spray Sealer

I started out this project by first drawing a line around the card holder onto the top of the gourd and then cutting out the shape, using the Proxxon Jig Saw STS 12/E.
Here's what the gourd looked like after the gourd was opened. See all the gourd pulp inside?
The card holder sitting beside the gourd is the one that was used. Then I took the Proxxon Belt Sander BS/E and sanded all of the edges smooth. I was also trying out the fit if you will of the card holder as I worked. The hole looked so smooth and really fit the card holder well.


Once all was sanded smooth and the card holder fit, I painted the gourd, glued on the jacaranda pod, sealed the gourd with a good sealer and inserted the holder and glued it in. This is the final result.

This really is a nice piece and looks just like a big 'ole apple holding some business cards!! I know I'm going to get a lot of comments on this one from the people going through my booth. What do you think? Do you have any questions about the tools that I've been using? Just ask and if I don't know I'm sure Proxxon Will!

Barbara