Wednesday, January 13, 2016

Mid Century Modern Bird House (Part 1 - The Floor/Walls)


Mid century modern architecture featured simplicity and an integration with nature. Flat planes, including a flat roof, were key elements in this style of architecture. With World War II came experimental technologies and materials like steel and plywood, which were leveraged for building after the war. We can incorporate these design elements to create a mid century modern birdhouse that's updated with what we know about our feathered friends.

Design Improvements

This project was inspired by the Modern Birdhouse created by Chris Gardner back in April 2011 for CURBLY. I started with his design and then added a little "bird know-how" to make sure it was appropriate for today's flying home hunters. I think these four changes make the house even more functional while keeping it's beautiful design.
  1. The original design uses smooth cedar. To make it easier for the young to leave the house when they are ready to fledge, I used cedar that's smooth (finished) on one side and rough (unfinished) on the other. Place the rough side of the wood to the inside of the house.
  2. The original design uses 1/8" Luan plywood for the floor (base). To make the base more substantial, so it's more stable on a mounting bracket, I used the same cedar as the sides.
  3. The original design has as solid base. To ensure there is proper drainage to keep the nest and its contents dry, I added 1/4" drain holes in each corner of the floor.
  4. In the original design, the roof is not permanently attached. You lift off the roof to gain access inside the house to clean it. I was concerned the roof could be lifted off by some of our high-wind rain storms or be pried off by a predator's little paws, so this design attaches the roof permanently and provides a hinged side that can be lifted up to clean the inside of the house.
Proxxon tools make it easy to work on a small project like this. The scale of the tools is perfect for a project this size.


In this post we'll build the floor and walls. In the follow-up post, we'll create the roof, assemble it and finish the house with linseed oil and paint.

What You'll Need


Steps To Follow 

  1. Use the Proxxon Table Saw FET to cut the rough cedar to the specified sizes.
  2. Create a 1-3/8" hole in the front of the house. 
    1. Mark the center of the hole with the pencil. The center is about 1-13/16" from the top, and 2-3/4" from each side.
    2. Use the compass and pencil to draw a 1-3/8" circle around the center mark.
    3. Drill a pilot hole using the 1/4" bit and Proxxon Bench Drill Press TBM 115 on the center mark.
    4. Use the Proxxon Scroll Saw DSH/E to cut out the circle. Fit the blade through the pilot hole and then cut around the pencil mark. Sand the finished hole.
  3. Drill 1/4" drainage holes in each corner of the floor (base), about 1" from each edge. 
  4. Glue 4 of the five pieces together (front, back, 1 side, floor). The easiest way to do this is to apply glue to all the edges that touch except for any edge that touches one side. Then put all the pieces together and hold them in place with the clamps until the glue is set. You should be able to completely remove the side after the glue has set. You're only putting the side in place to help hold it all together while the glue sets on all the other pieces. Be sure the rough sides face inside the house.


  5. Drill a 1/4" hole from the front in to the side that hasn't been glued, about 1/2" down from the top. Go through the front and about 1/2" in to the side. Do this on each side of the side. Each of these two holes will be fitted with a dowel that will make a hinge, letting you lift the side up to clean the house.
  6. Take the side out and use the Proxxon Disc Sander TG 125/E to remove a bit of the width. You want the side to be able to lift up and down easily. Just sand a bit, try it, and repeat until you feel it opens and closes easily.
  7. Put the side in place and insert the dowel in to one side. Mark the desired length and cut it with the  Proxxon Chop and Miter Saw KGS 80 about 1/16" of an inch shorter than your mark. Repeat the process on the other side.


  8. Insert the dowels in to the holes and side and push them in until they are flush with the walls. The side should easily swing opened and closed.
You should have a solid box now, that makes the sides and floor of our mid century modern birdhouse. In my next post, Mid Century Modern Bird House (Part 2 - The Roof and Finishing Touches), we'll create the roof, assemble it and finish the house with linseed oil and paint.

Saturday, January 9, 2016

Starting the Valentine Decorations

Hello everyone! Today's project is a Valentine garland that I made out of masonite board. I made it after the plain little Valentine candies that have the little sayings on them.


Items needed for this project:

1. Proxxon Jigsaw STS  12/E ( found here: Proxxon tools )
1 Proxxon Delta Sander OZI/E (which is also found here: Proxxon tools )
1 Proxxon Micromot AC Adapter NG 2/S or NG 5/E ( I have both sizes which I use and that can also be found at: Proxxon tools )
1 Proxxon Foot Pedal
 Paint and Paint Pens
Brush
Drill and bit
Cord
Paper twine or ribbon

I started out by tracing the pattern that I made of a heart onto some masonite board. I then used my Proxxon Jigsaw to cut out six hearts.
Once the hearts were cut out, I then sanded the edges with my Delta Sander.
These tools are so easy to use and they're not intimidating. I love using the foot pedal with the Jigsaw. Proxxon has a LOT of tiny tools and if you need tools for smaller projects then you definitely need to check them out at: Proxxon Tools . 

After I finished sanding the hearts, I painted them in different colors. I used chalk paint because I had some but you could use acrylics just as easy. 

Once the paint was dry I used my paint pens to print the sayings on the hearts and drilled a hole in the top of each one.

I then printed the sayings on the hearts with the paint pens and tied them to some red parachute cord I had with red twisted paper. I like the way it turned out don't you? Simple to make and can be used year after year. Check out Proxxon Tools and these amazing tools that they have.

Barbara
 

Wednesday, January 6, 2016

Cute Valentine Themed Crate


Hi everyone and Happy New Year! Tammy here with a cute idea for a Valentines holder for your child's desk at school. My daughter asked me to make something for her to collect Valentines at the class party in, and this is what I came up with.

Supplies used:
Proxxon Hot Wire Cutter
Proxxon Delta Sander
Mini crate
Black chalkboard paint
Hot pink paint
Red glitter paint
Adhesive
Ribbon
Chalk marker
"Love" wood piece

How I made it:
Sand the wood crate with the Proxxon Delta Sander
Sand the "Love" wood piece with the Proxxon Delta Sander
I used chalkboard paint to paint the crate
I used hot pink paint to paint the "Love" wood piece
I added some red glitter paint on top of the hot pink paint
I cut and heat sealed some Valentine's ribbon with my Proxxon Hot Wire Cutter
I added the ribbon to the top of the crate and glued the "Love" wood piece to the front
I added my daughter's name to the side with the chalk marker
I also added her name to the front with the chalk marker
I really love how this project turned out! It was so easy to decorate with the help from my Proxxon Delta Sander and Proxxon Hot Wire Cutter!

I love to see your projects! Tag me on Instagram @TammySmithSantana

xoxo Tammy


Tuesday, January 5, 2016

New Design Team Project for Proxxon ~ StoryTelling Sticks~


" StoryTelling Sticks" Aka "The Talking  Stick"

I am fascinated by Native American culture and ways, so I decided it would be a wonderful project to create these StoryTelling Sticks or as the Native Americans say " Talking Sticks". There is a rich history in the use of these Talking Sticks" at community gatherings. The person who would be speaking would be given the "Talking Stick"  to speak his "truth" and not to be interrupted by others. Only the person holding the Talking Stick would be allowed to speak. There is much meaning behind the creation of the Talking Stick as well. Everything used to created the stick has meaning from the wood used, to the bead colors, paint colors, fur, gemstones etc. And although a Talking Stick can be used to speak one's voice, it can also be used by a Storyteller and to document the stories told . Charms  with ribbons and  a connection to the story being told can be attached to the end of the stick with ribbon, this way each story is documented. More information can be found by doing a search on the internet and I also have gathered some information below for you on Talking Stick Circles.

*Talking Stick Circle Guidelines (David Boje & Joe Gladstone, 2008) 
1. We sit in circles, not pyramids.
2. The person with the Talking Stick is the designated story-talker.
3. Pass the Talking Stick clockwise. Start with the person sitting in the East-most position, then go to the right. In Talking Stick going clockwise is an earth-process. Otherwise the magic is undone.
4. Persons without the Talking Stick, please listen, write notes, and notice the story. Focus your listener attention on the storyteller with the Talking Stick. Let your mind recall stories as the teller tells stories.
5. Try to limit interruptions. A person with the Talking Stick can pass it to someone for a clarification, question, or amplification on a point, then call the stick back to finish their story.
6. There will be multiple rounds of Talking Stick Story Circles. Each time there is a question. At the end of a round of story-sharing, story-noticing (story-listening), a spokes-person repeats the main themes, issues, resolutions, and proposals that came up. So be sure to take notes.
7. The output of Talking Stick Circle is ideas, proposals, and stories of a vitalized community. Designate people to listen, to observe, and to provide a report out of the collective story that is emerging in the Circle.
8. The point is to create a collective story, one that is faithful to everyone's living stories, to unify in community.

This was such a wonderful project using  art,intention, purpose and meaning.I hope you enjoy creating them as much as I did!

~Supplies~

Wood pieces about 3 x 11
Drill for holes
Acrylic Paint
Distress Stain ( I used Tim Holtz)
Tribal stamps ( I made mine)
Stamp pad
Glue Gun
Ready made suede tassels ( or you can make one)
Gemstones
Carved  gemstone feathers or other shapes
Iron metal focal
 Jewelry Wire for stringing the beads
Assorted  6mm beads,feathers,leather,leather string, hemp string,Sari Silk Ribbon

For this project I really used a lot of things I had around my art studio. So investigate your stash and see what you might have lying around that would be a perfect compliment to creating your own "StoryTelling Stick".

1) Sand the rough edges on your pieces of wood to create that vintage/worn look. Drill a small hole about 1" for the bottom from the front to back.

2) Paint your sticks, I used a turquoise and a deep orange for the main color.

3) Distress you sticks with  the Distress Stain in a mahogany color for that distressed/vintage look

4) Glue on a leather piece that is random in shape to go several times around the stick in the middle. ( I had some spare pieces that were embossed from another project that I used)


5) Using your tribal stamps  and ink pad ,start stamping where you  have open space on your sticks. Mine shapes represent the mountains and the forest ( pine trees)
6) Wrap the sticks with more ribbon,hemp or leather strings and tying around the  middle of the stick.


7)Start embellishing with the beads, gemstones and  feathers as I have above.

8) Add the tassels at the bottom of the sticks where you have drilled a small hole.


And there you have a wonderful creative StoryTelling Stick!

~Happy Creating~
Sherri


Sunday, January 3, 2016

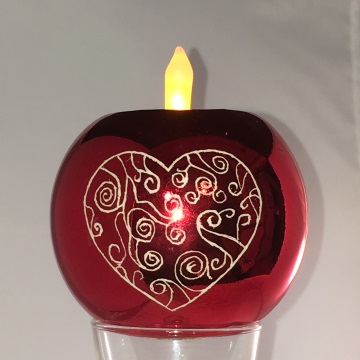
Engraved Valentine Tea Light

With Christmas and New Year's behind us, and all those decorations stored away for another year, the house seems so barren. So, I'm going to bring some of that same decorative festivity to Valentine's Day. I'm starting with this engraved tea light.

I found the plain candle holder at the thrift shop, loved the color, and guessed that the red coloring was just a coating. I guess right!! When I got home, I tested a small spot on the base of the holder, and sure enough—under the shiny, red coating was a white interior. Perfect for engraving!!

First, I created and sized the heart shape in Make-the-Cut. I used my Zing electronic cutter to cut it out of vinyl. (Of course, you could draw the heart freehand and cut with scissors or a craft knife.) I adhered the heart to the candle holder. I wasn't worried about the wrinkles—I just needed a rough outline. 

I etched the outline of the heart using the Proxxon Engraver GG 12 and 1 mm diamond grinding bit. Next, with the same grinding bit, I just doodled with the engraver to add the interior swirls and curls.


Last step was to cover the base with a piece of handmade paper where I'd done the scratch test.


Now I'm all ready for a romantic Valentine's dinner. 
Carole

Friday, January 1, 2016

2016 Journal

Happy New Year everyone, Steph Ackerman here today as a member of the Proxxon Tiny Tool Design Team. 

Do you believe 2016 is now here?  Time is just flying by so why not create a journal to document all that happens in 2016? 


Supplies:

Proxxon Detail Sander
Book
Clearsnap Ink
Clearsnap Art Screens for Ann Butler
Clearsnap Stamps
Indigoblu Stamps
Art Anthology Paint
Gesso

This book was a little too cutesy for my taste, so I decided to alter it.  But first I had to remove all the dimensional elements and glitter that was affixed to the book.

 
Using the Detail Sander, I was able to remove the elements and create a smooth surface to work on in no time at all.  The sander is perfect to use on projects both big and small.  It's light weight, easy to hold and the shape of the sander gets into small spaces.


Once the elements were removed, it was time to create the book I really wanted.  I  painted it with pinks and purples, then proceeded to decorate it with stencils and stamps.  I lightly stamped a village stamp along the bottom edge with black ink.
 
 
 Using molding paste with a star stencil, I partially covered the front cover.  Then I added wood letters, using the Detail Sander to smooth them before inking them.
 
 
 Once the molding paste dried, I adhered the letters to the right side.  I wanted a fun phrase for the front cover, so I stamped this Indigoblu stamp with brown ink.  I distressed the edges and inked it before adhering it to the book.   And I love the final result!!


Thanks for stopping by today.
 
Steph


Friday, December 25, 2015

A Special Project for our Family in Japan

A lot of people know that my husband and I recently made a trip to Tokyo, Japan to visit for a couple of weeks with our oldest son and his family that is with him. After returning we made a special gourd piece which is going in the mail to them as one of their Christmas gifts this week. Here's a little bit on it and the wonderful Proxxon Tiny Tools that we used to create it.

Supplies Used in this project:

1 Med/Large Gourd
Proxxon Delta Sander OZI/E
Proxxon Super JigSaw STS 12/E
Heat adjusting Wood Burner
Dremel or similar tool with burrs
Paints (Acrylics)
Sealer (I use Kamar Varnish)

When starting out, after cleaning the outside of the gourd, I used my Proxxon Super Jig Saw to cut around the gourd to open it up and create a bowl.

Once this was done, I cleaned out the inside and sanded the inside and the top using my Proxxon Delta Sander. 

Sorry but I forgot to get the picture before the inside and top of the gourd was painted. You can tell from the picture though just how smooth I was able to get the interior.

I then wood burned the designs on the gourd and carved and sanded (with my Proxxon Delta Sander) Mt. Fuji and carved out around the cherry blossoms and Shrine. When I completed my part I turned the gourd over to my husband who painted the designs and I finished it off with the background and sealer. This is what the piece looked like when finished from several sides:

Oh yes, we added some 10 cent yen pieces to further decorate the gourd. Hopefully this will be a family heirloom and remind them of Japan when they are no longer there and also to remind them of our visit. What do you think of the project? Has anyone used any of the Proxxon Tiny Tools, such as the Jigsaw or Sander? Comments are certainly welcome and appreciated.

Barbara