Sunday, April 2, 2017

How to Make Small, Useful, Easy-to-Take-With-You Phone Stands

Seems like everyone is always on the go, and using their smartphones at the same time. You'll love these small, easy-to-take-with-you phone stands when you're on the go. One folds to pack in the tiniest of spaces. The other is there for you everyday as a key chain fob.

Supplies and Tools for the Folding Acrylic Stand

Supplies and Tools for the Key Chain Fob Stand

Instructions for the Folding Acrylic Stand

Begin by covering one side of the acrylic with  painter's tape. Cut the acrylic in half to make two 3½" x 3" pieces.

On the painter's tape on one of the pieces spray repositionable adhesive. Put the two pieces of acrylic together forming a sandwich with the painter's tape in the center.

Cover one of the exposed sides of this sandwich with painter's tape. Spray the reverse side of the pattern with spray adhesive, and adhere to the painter's tape. Because you're cutting both sides at the same time, you'll end up with the right and left pieces for the stand—each an identical mirror image of the other.
3"H x 2 3/8"W

Following the pattern, cut the pieces on the scroll saw. If necessary, lightly sand any rough edges.

Position the hinges to be sure they are aligned. I taped mine to a teflon mat on top of my grid work surface. Use a dab of E6000 to glue the hinges in place, taking care not to get adhesive in the hinges. Carefully line up the second wing of the stand making sure the bottoms are level. Let the glue dry for 24 hours.

Instructions for the Key Chain Fob Stand

Adjust the blade height on the table saw and cut a 3" x 1" piece of hard wood. The blade should extend slightly above the height of the wood.
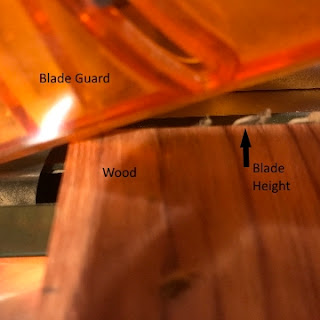
Set the longitudinal stop on the table saw so the blade cuts the leftmost side of the notch on the pattern below. Set the blade  height only to the top of the 5/8" high notch.

Make the first cut.  Using the scale on the longitudinal stop, move the stop 1/8" to the left. Make the second cut. Continue alternately moving the stop and making a cut until the notch is ½" wide. (If you have a case on your device you may need to increase the width of this notch.)
Setting the longitudinal stop
 If necessary, sand any rough edges. On the end of the stand, mark the center for the eye screw.

Select a drill bit the same size as the eye screw, and use the professional rotary tool and drill stand to drill a pilot hole.

Add the screw eye and swivel (or split ring) to complete the stand.

Now, you're ready to be on the go with your smart devices.

Carole

Friday, March 24, 2017

A Ship, A Ship, Made with the help of my Proxxon Tools!

If you read my last post you would know that I am using my Proxxon Tools to create a ship on a gourd. I got about halfway finished in the last post and have been working diligently on the rest of the steps to completion.

Items used in this project are:
Proxxon Jigsaw
Proxxon Delta Sander
Proxxon Rotary Tool
Alcohol Inks
Colored Pencils
Hemp
Glue
Stick and Burn (for wood burning)
Wood burner
Acrylic Paint & Brushes

As you may remember from the last post, I had finished the wood burning and had cleaned the gourd up in preparation to finishing it. Well the next step in the process was to use my Proxxon Rotary Tool and stipple around the ship. I used a ball burr and it took a very long time with rests occasionally to complete this step.
It's basically just making dots in a random order on the gourd to create a different effect on the surface of the gourd.

Once the stippling was finished, it was time to paint the picture, so to speak. I used acrylic paints and alcohol inks to color the gourd. The background is done in alcohol inks.

I then cut a gourd, cleaned it out completely and covered it with hemp rope to use for the base,


I think it set off the ship, don't you?

I'm really impressed myself with the wonderful job that my Proxxon Tools did with this project. I'm also happy with the way this project turned out all together. Why don't you take a look over at the Proxxon Tool Company and see if you don't want to order one of these amazing tools for yourself.

Barbara

Tuesday, March 21, 2017

Inspirational Necklace "When Doors Open" By Sherri Welser and Proxxon Tools!


Inspirational Necklace "When Doors Open"

Create this beautiful inspirational necklace by using Proxxon Tools!

Wearing inspirational pieces always helps to reinforce that feeling of joy and hope. In this necklace I used a metal embosser ( Vintaj  Big Kick) to get the lovely texture on the  copper metal pieces and the  Proxxon Bench Drill Press TBM 115  . I have had these 2  metal door pieces for awhile and was waiting for the right project to use them. Below please find the supply list and instructions!

~Supply List~
Proxxon Bench Drill Press TMB 115
Vintaj Big Kick
Rose patterned embossing folder
2 copper metal "door" pieces
Verdigris paint
Brass or copper wire ( 24 gauge) about 6 " long
Seed beads 8/0 or 15/0
WeldBond adhesive
Type setting  paper word phrases or letters 
jump ring~ 6mm
Copper or brass chain ~Approx 24" long
Lobster claw closure ( copper)\
Small copper piece for "window
Small metal clip

I began with the copper metal doors and even though there were holes, they wernt big enough for attaching the wire and still being able to open the doors freely. 
1) Paint the verdigris paint on the front of the door and the small square metal piece~ let dry
2) Set up the Big Kick and place your metal door and window pieces in between the folder and pass through the Big kick to create the  embossed pattern.


3) Re-drill the holes a bit larger with the Proxxon Bench Press in both doors

4) Cut to size the words for the inside of the door

  5) Glue in place with the WeldBond


6) Next glue the small "window" piece to the front of the door and secure tightly to dry with a clip


7) To connect the front to the back doors take your 24 gauge wire and put it through the first hole from back to front 


8) Add several seed beads and twist the wires together.

9) Weave through the bottom wire , adding beads and twisting for a fun effect. Making sure you can still open and close the doors.


10) Attach the chain by adding the jump ring to the door and then putting the chain through the jump ring.


The door may tend to open so if you want add a tiny piece of velcro or something similar to keep the door closed until you want it to open.
Have fun Creating!

Sunday, March 19, 2017

How to Make Adorable Easter Bunnies with Proxxon Tools

I think Easter bunnies are just the cutest things every!! I love to decoration with them. You'll have fun creating these adorable Easter bunnies made with Proxxon tools.

Supplies that you'll need:

Proxxon tools used:

Instructions:

I began by laying out the patterns for the bunnies on a large sheet of MDF.

Then, I used the table saw to cut the large sheet into four smaller, more manageable sizes.

I adhered a pattern to each of the four squares. Cover the surface of the MDF with painter's tape, then spray the back of the pattern with spray adhesive, and put that on top of the painter's tape. The spray adhesive holds the pattern in place, and the painter's tape makes for easy removal.

Next, to the scroll saw to cut out each bunny.

The scroll saw cut so smoothly that there was no need for sanding, so I moved right on to painting each bunny using FolkArt Milk Paints by Plaid Enterprises.

While the paints were drying I made a bow for each bunny. I cut the ribbons with the Thermocut. The hot wire cuts the ribbon and at the same time seals the cut ends to eliminate fraying. You can see the wire glowing red hot.

I used a variety of ribbon scraps and the Mini Bowdabra to make these bows. Now I'm ready to decorate for Easter!!

Carole

Friday, March 17, 2017

Butterflies and Flowers Wall Hanging

Hi everyone Steph Ackerman here and I'm hoping and wishing for Sping.  With the new snowfall we recently got and with more on the way, I wanted to create a wall hanging that would have me thinking of Spring all the time.


I used the Delta Sander to sand a wood plaque I had in my stash.


Next, I added color to the plaque using Plaid Folk Art Ultra Dyes in Emerald City and Turquoise, blending the colors with a baby wipe.  I love how the dyes allowed the wood grain to remain visible after painting with Plaid Folk Art Ultra Dyes.  Originally I placed painters tape around the edges so the colors didn't run over the edges, but I decided to add the same colors around the edges after all.


Using Joy Clair stamps, I stamped a flock of butterflies on the left side of the plaque in black ink.  Then I used molding paste through several different stencils about the plaque.


Once the molding paste dried, I added some large flowers to the corner.  Then I added some butterflies created with Makin's Clay.


Finally I spritzed some Tattered Angels Glimmer Mist for some splotches of color.


The words are also stenciled on the plaque with molding paste.


Have I gotten you in the Spring mood yet? 

Thanks for stopping by.